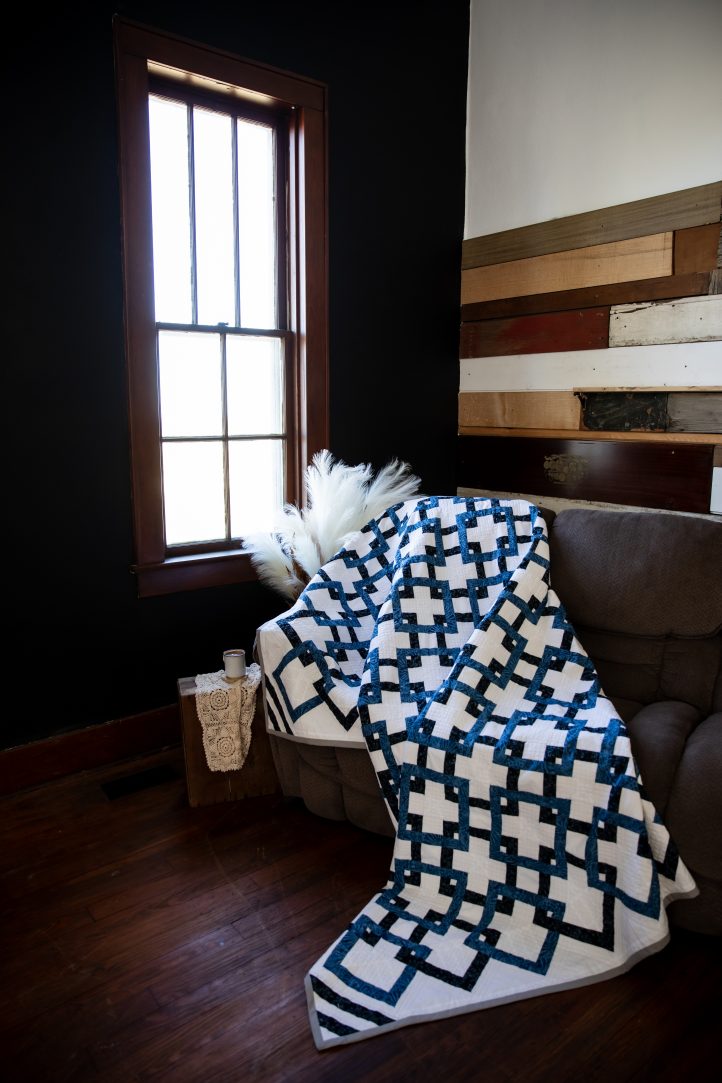
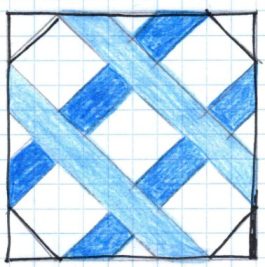
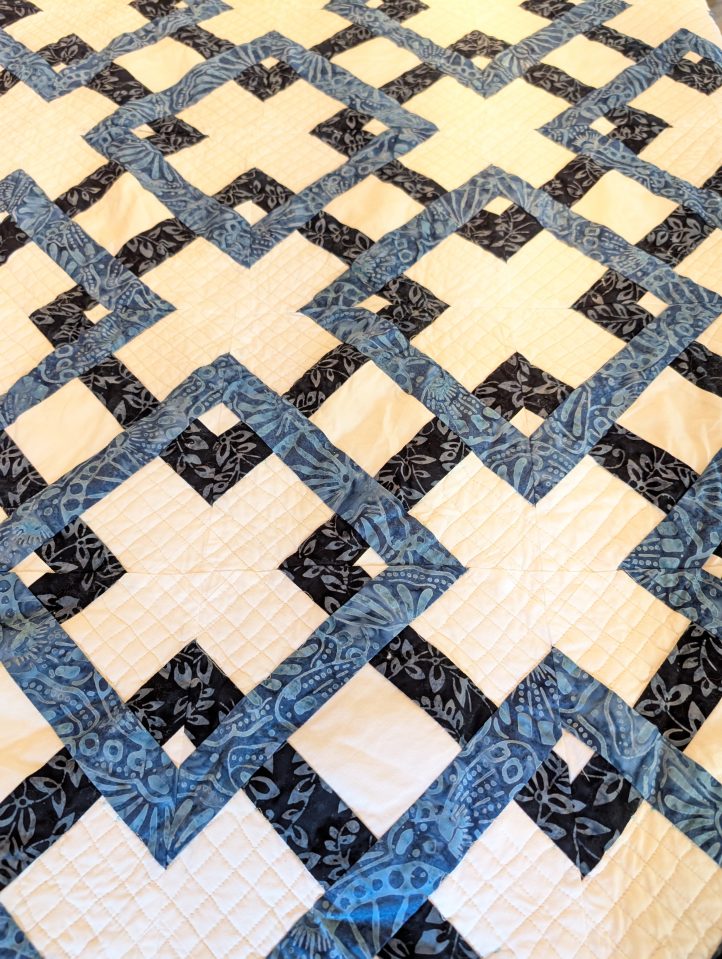
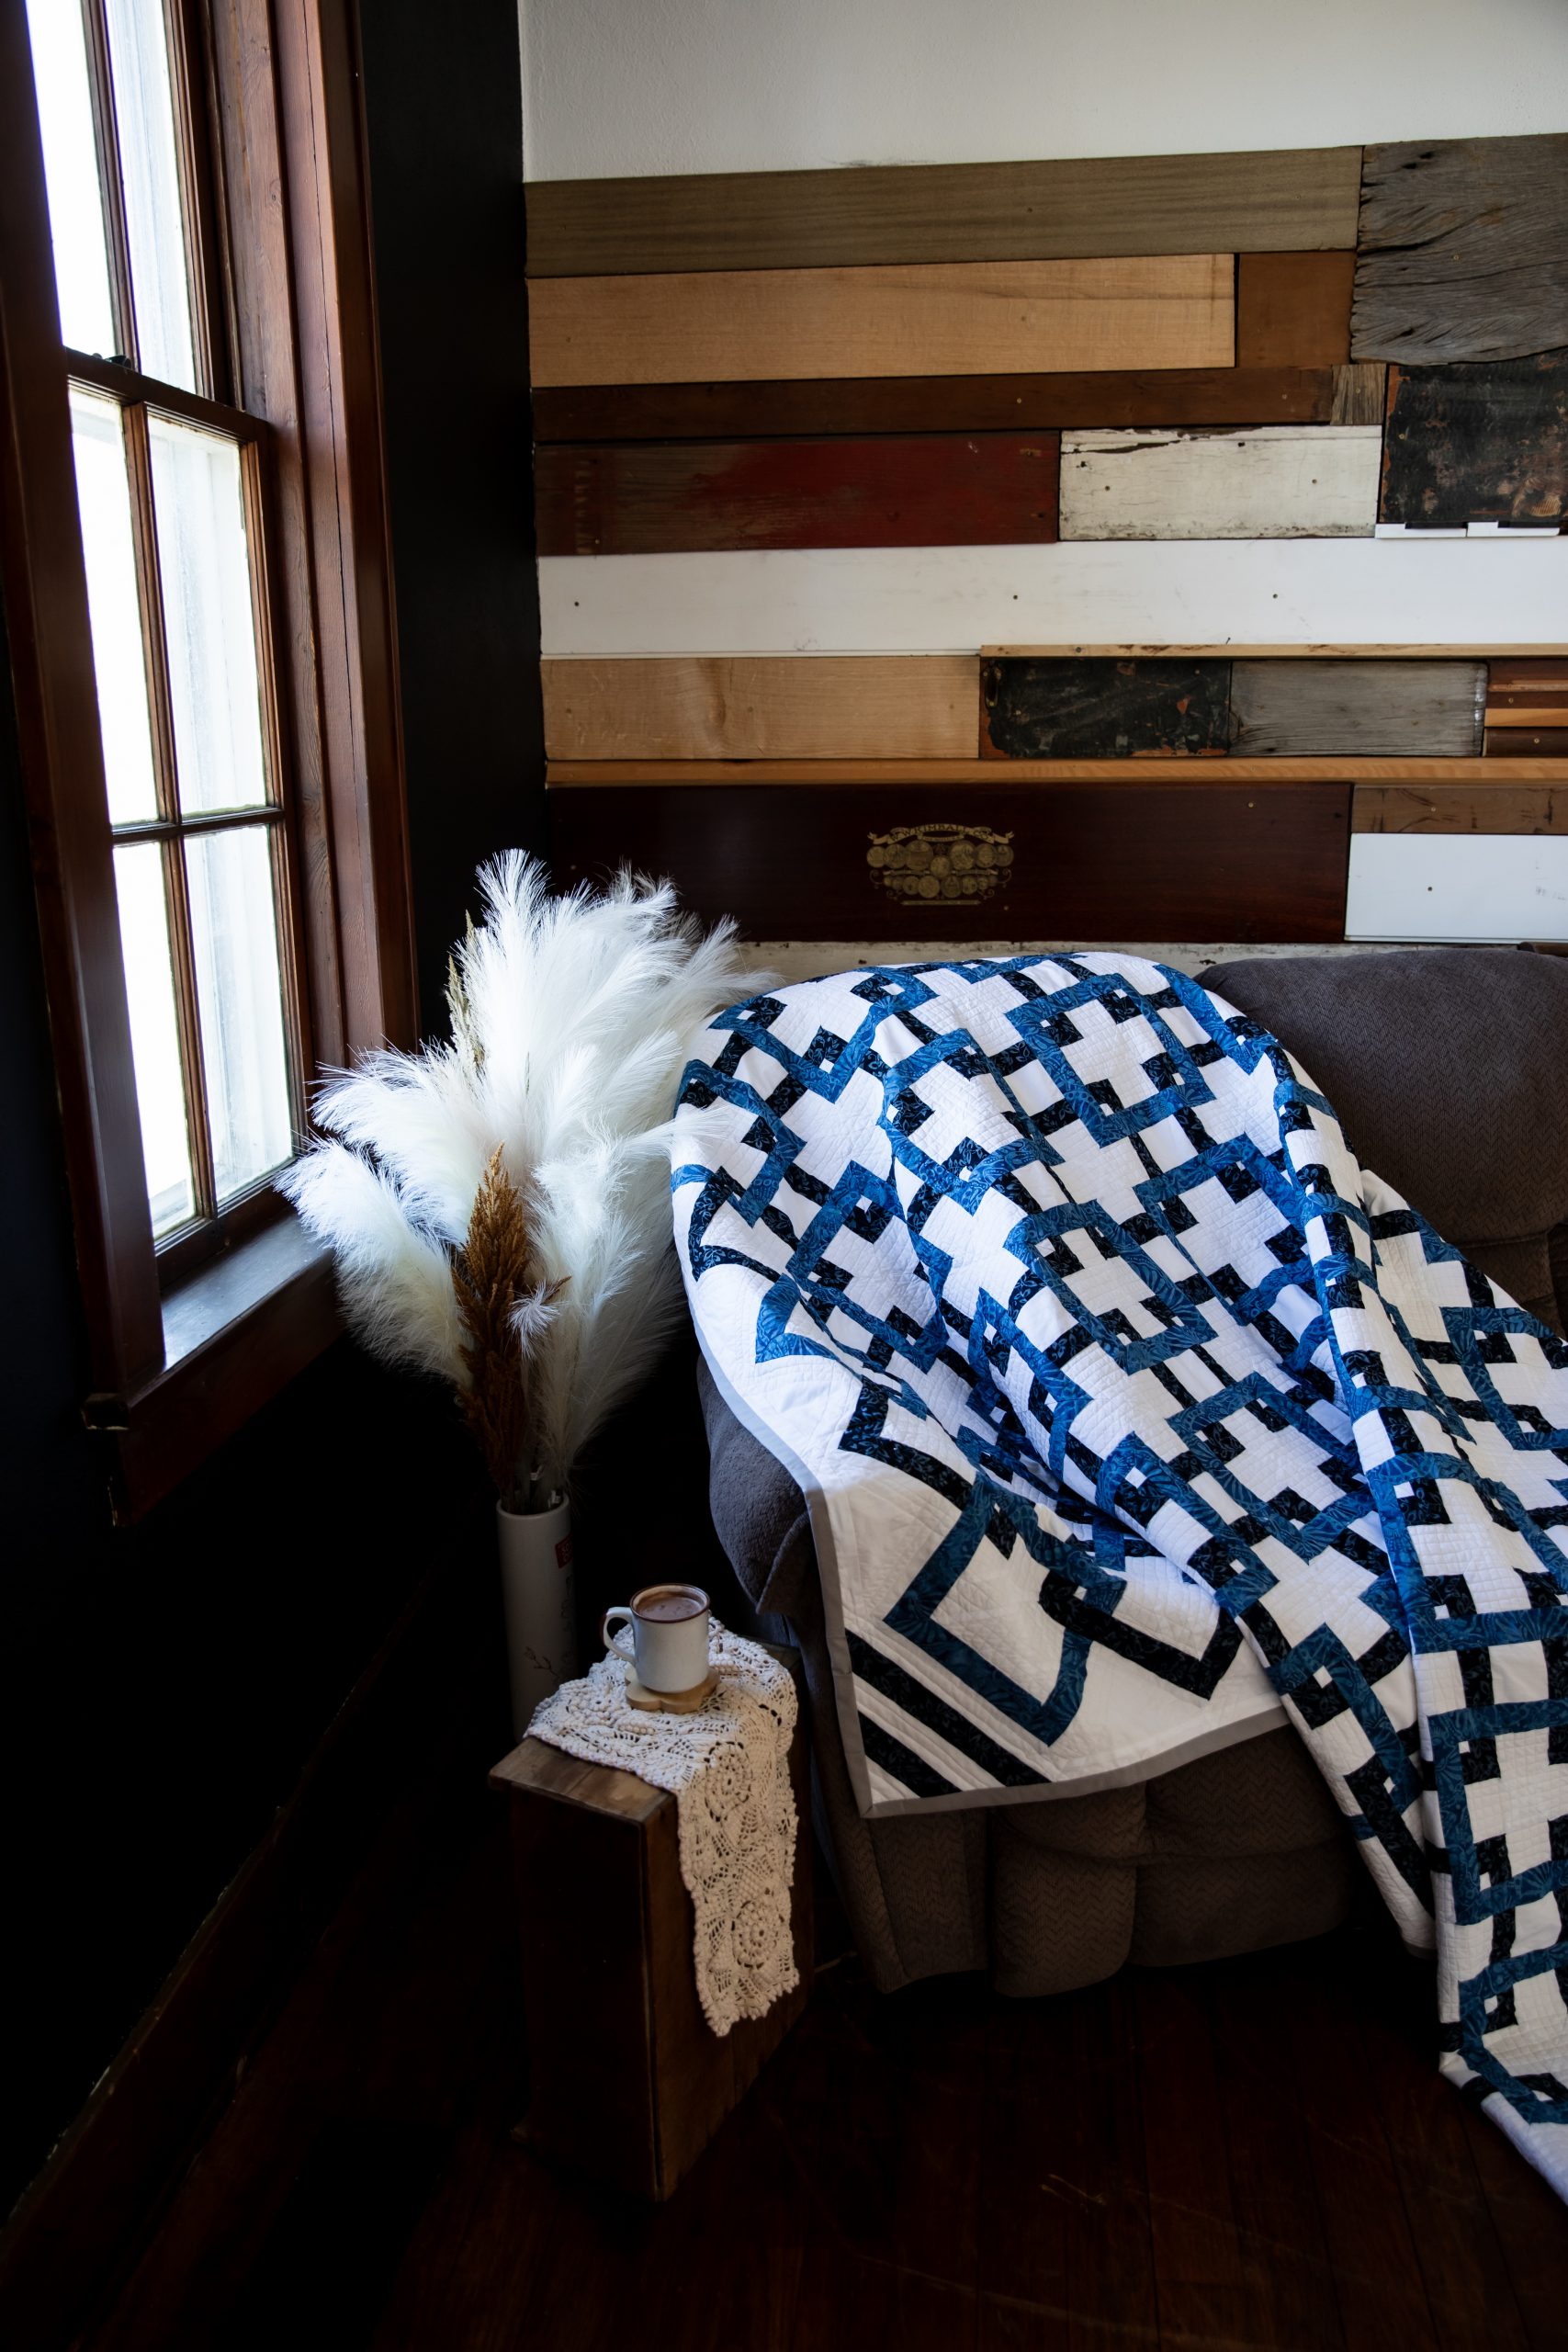
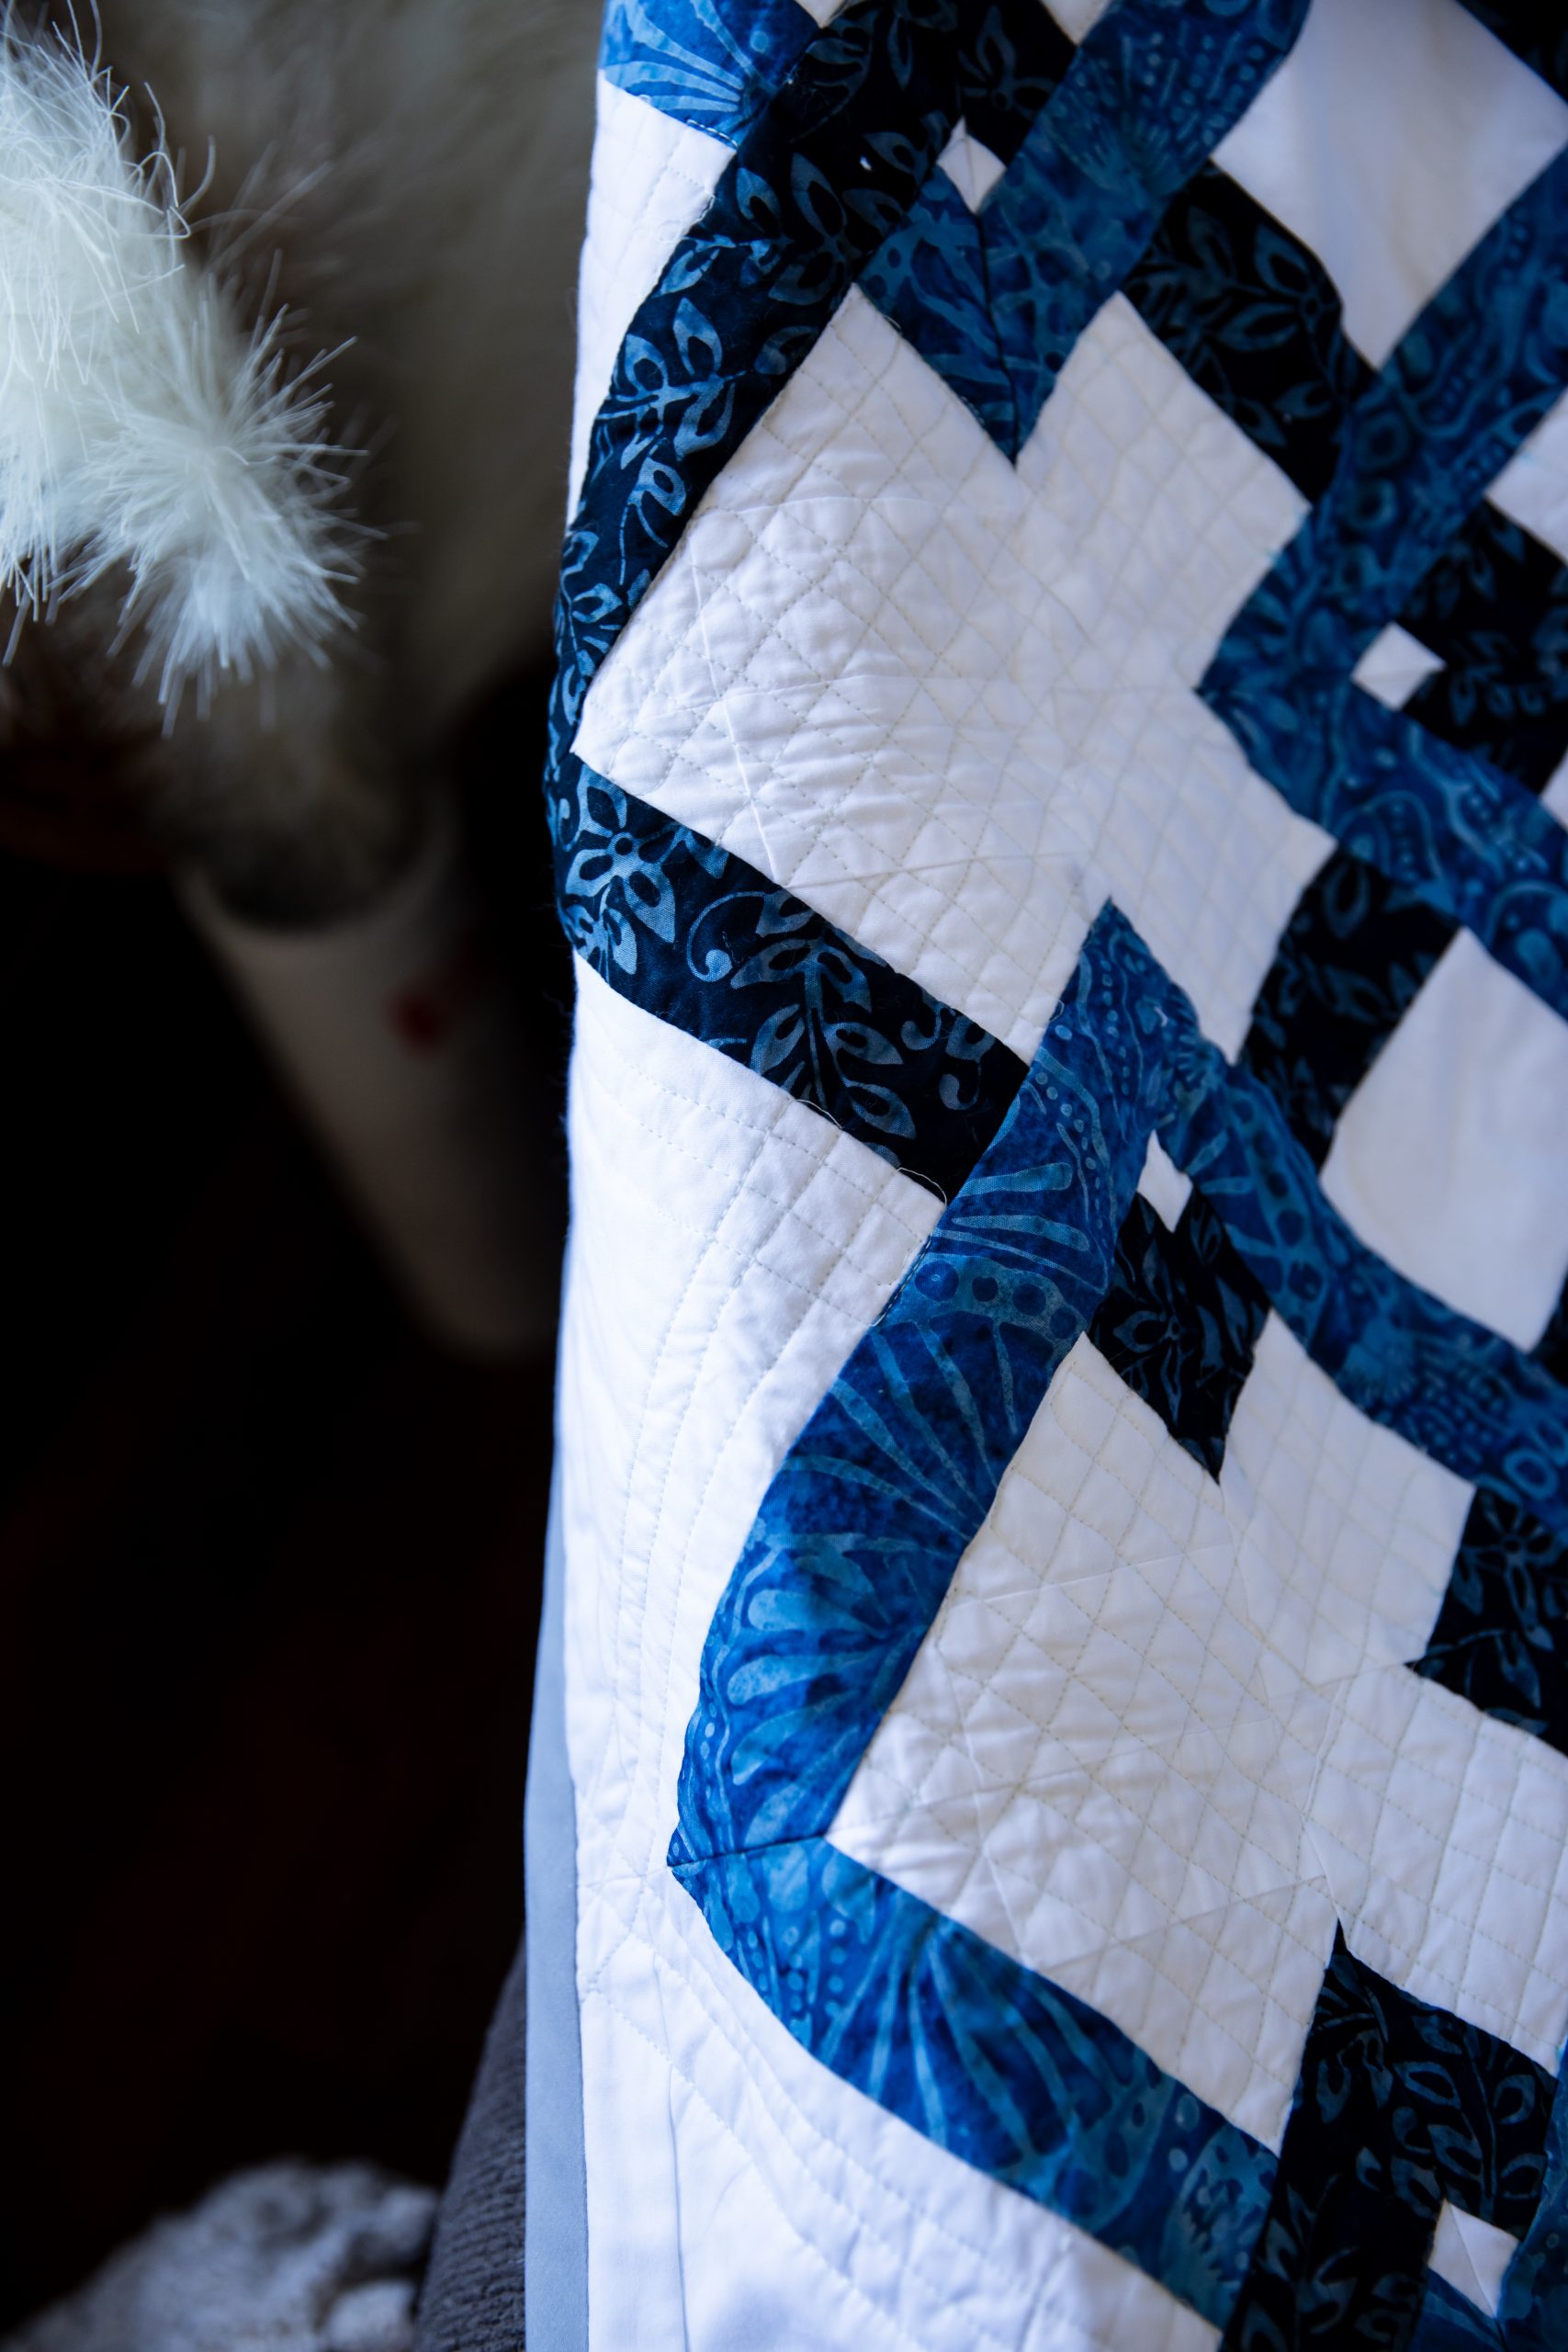
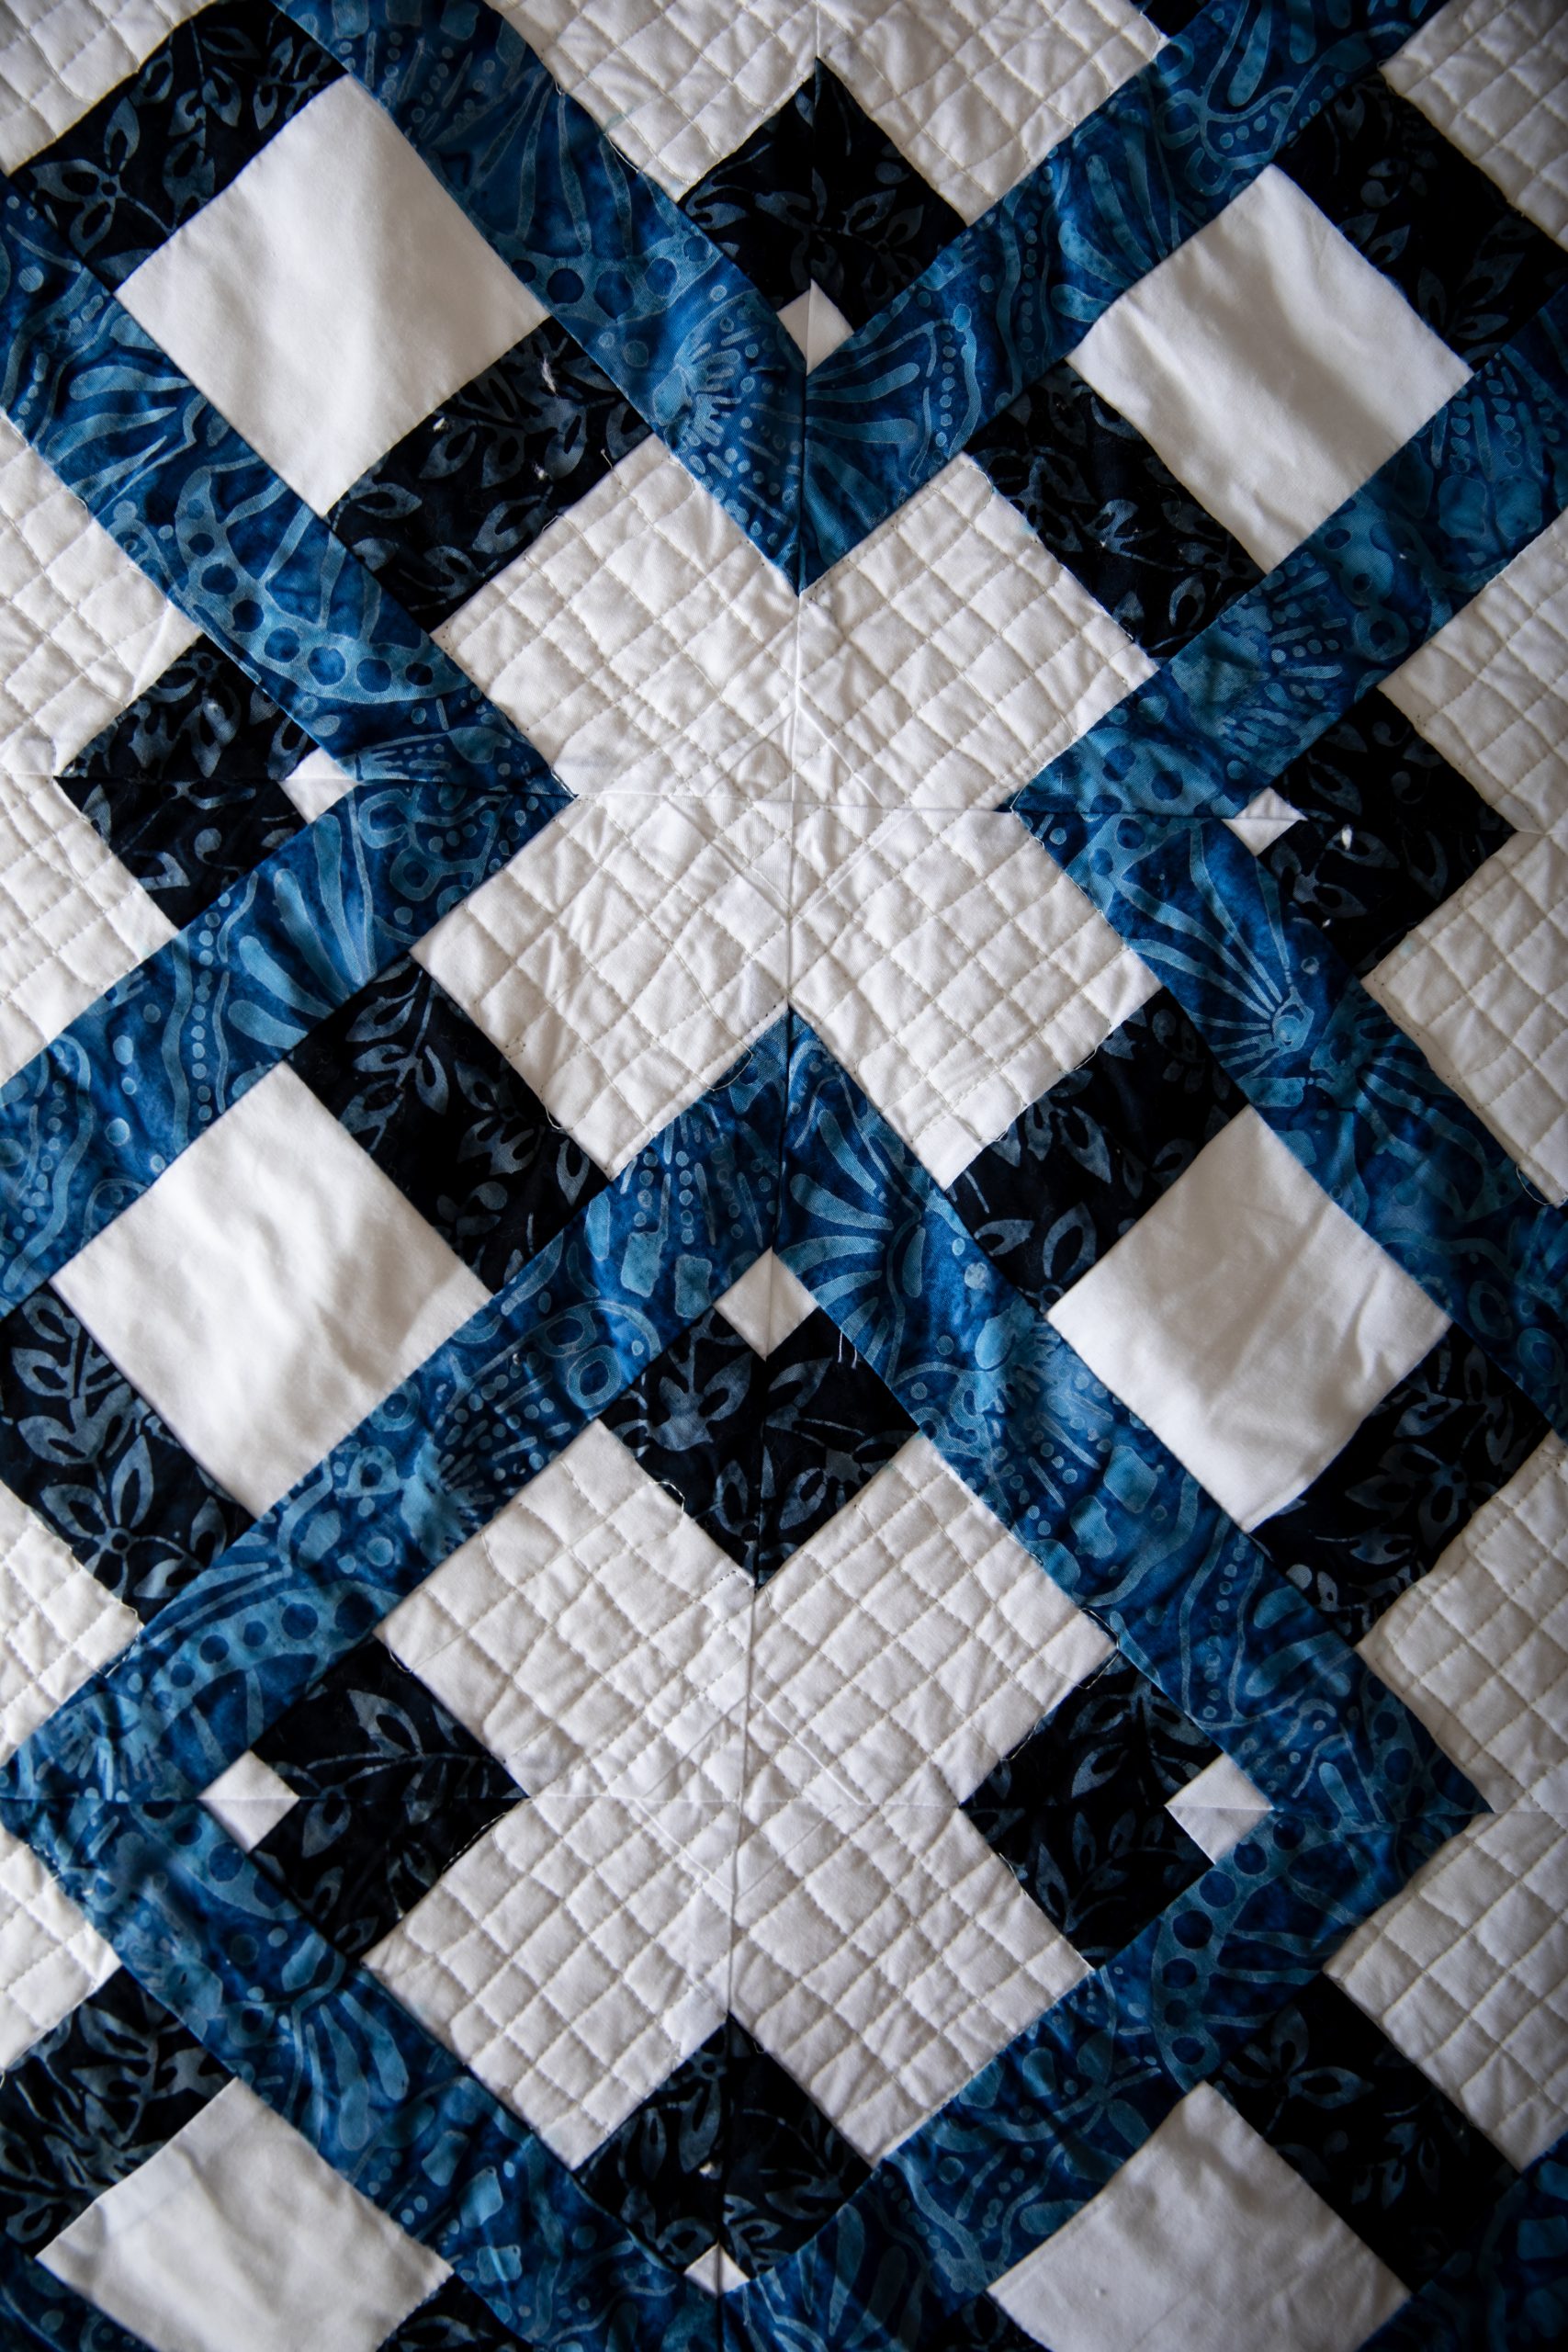
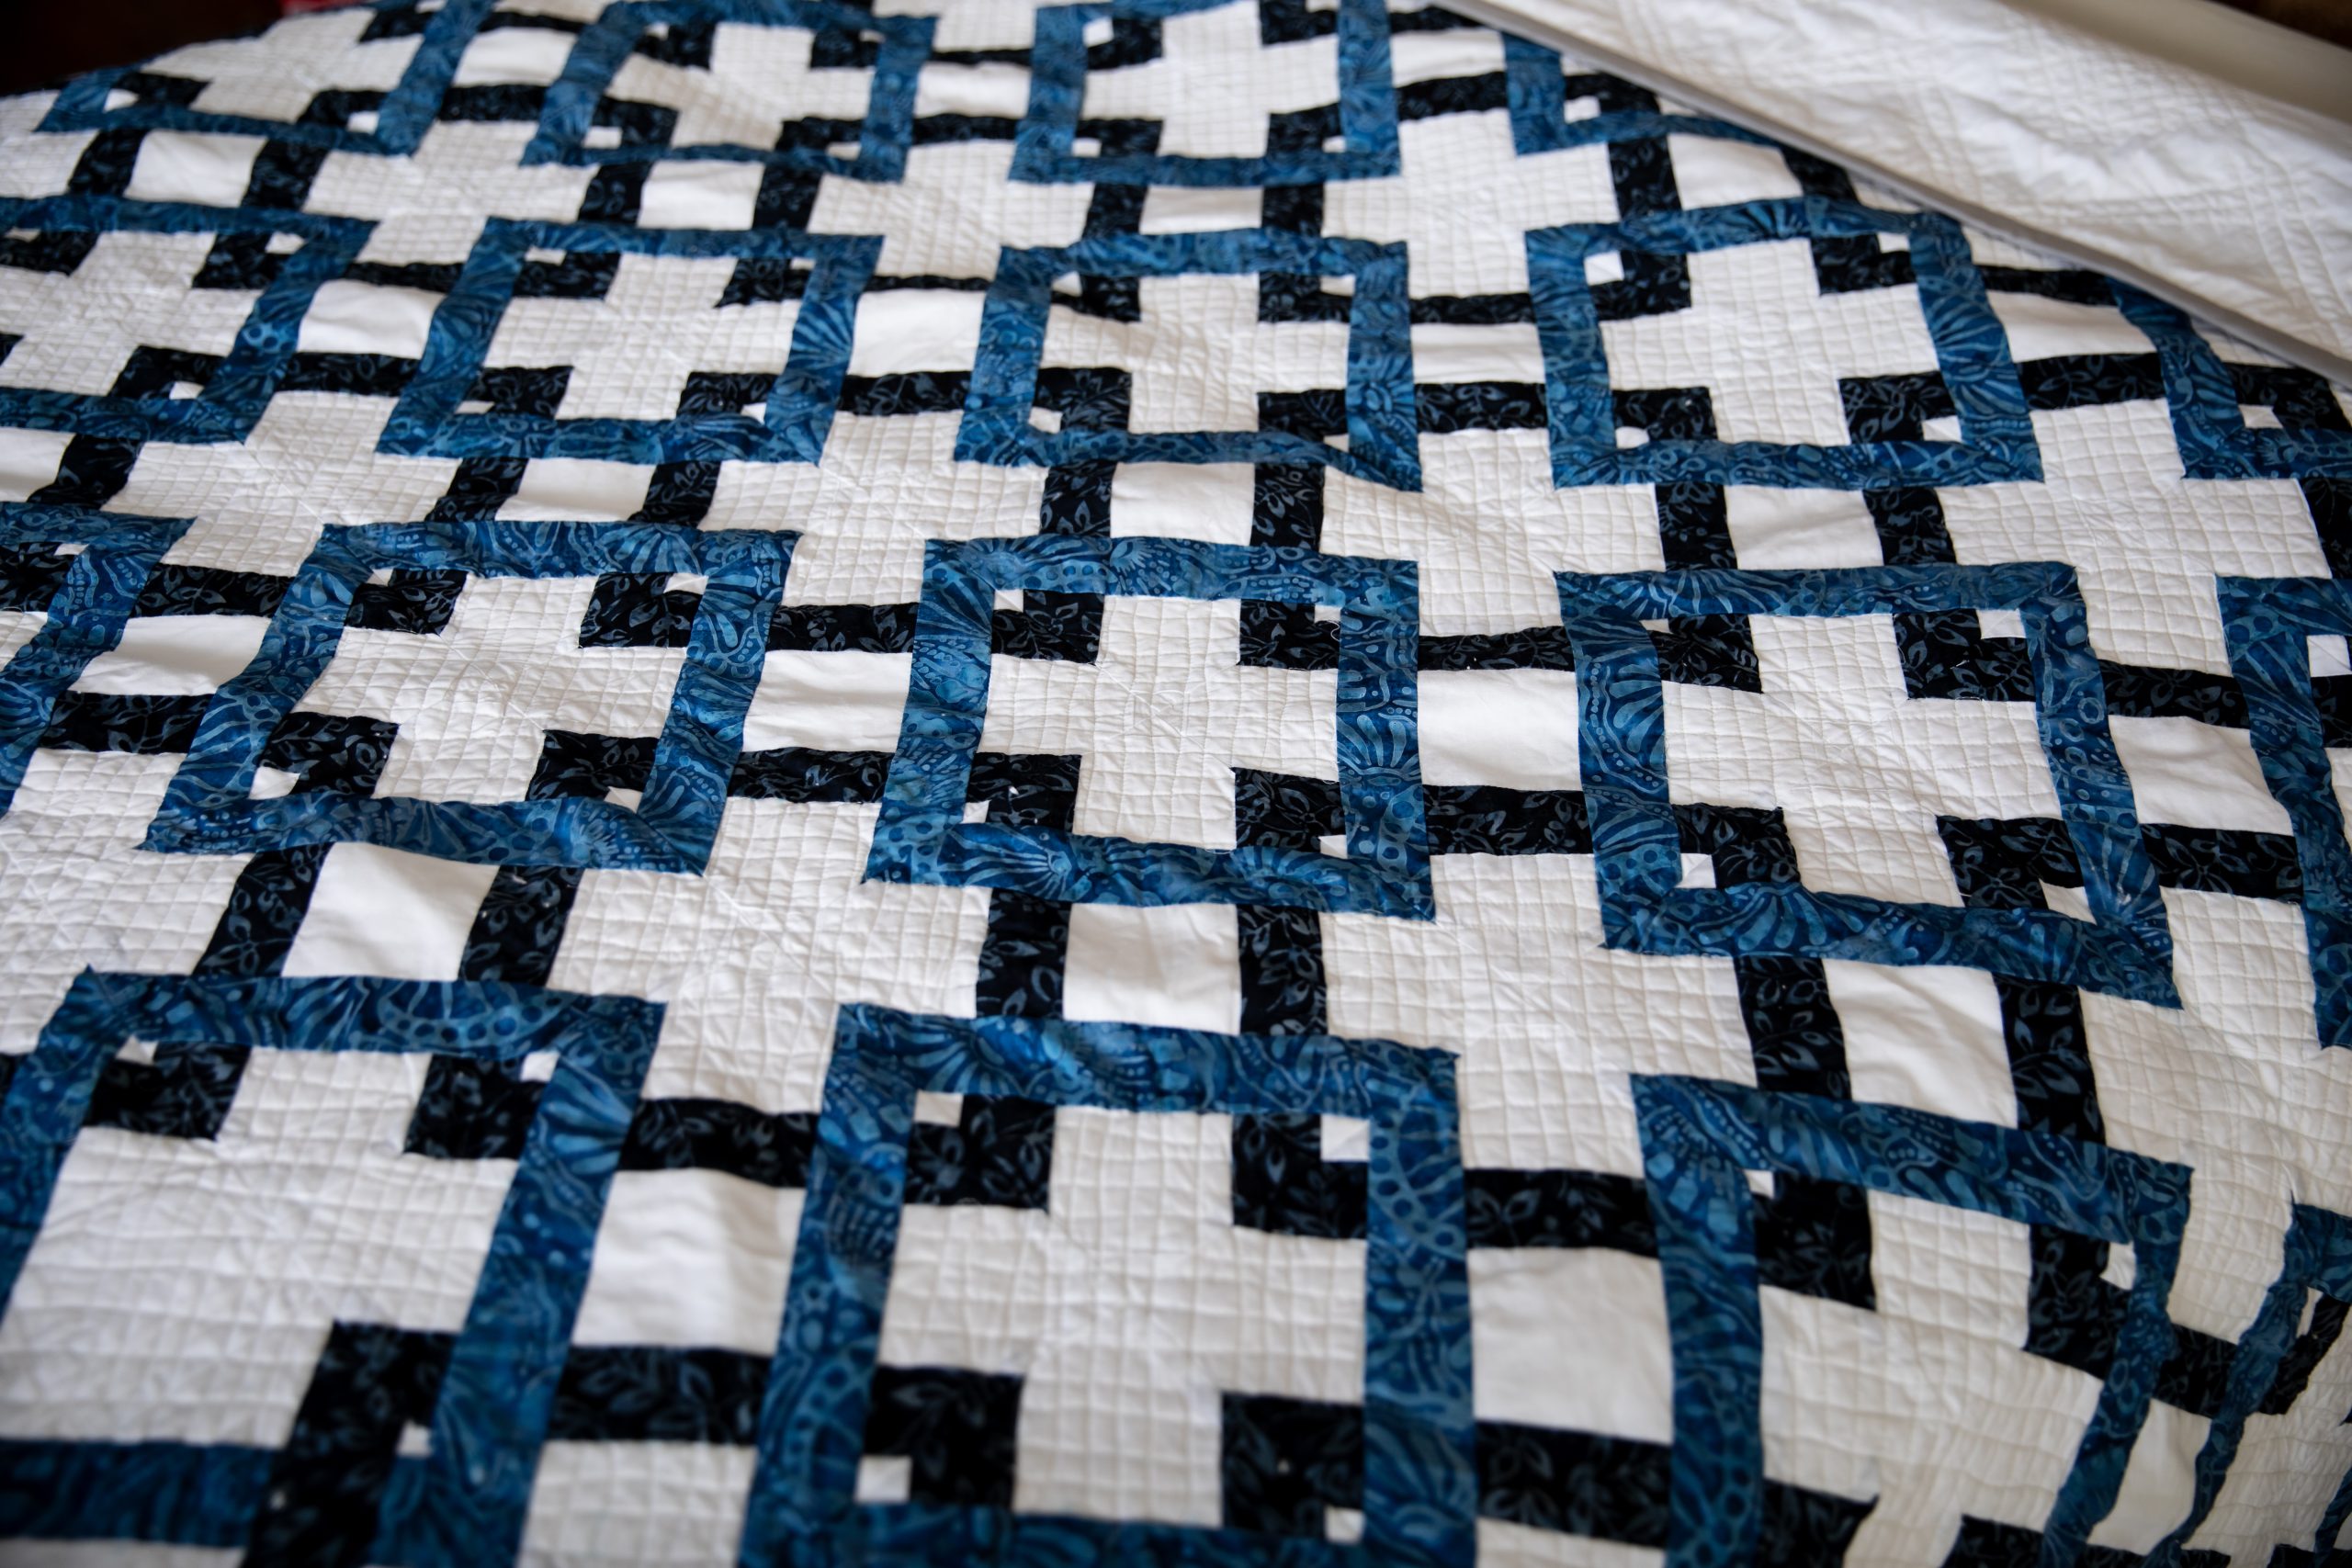
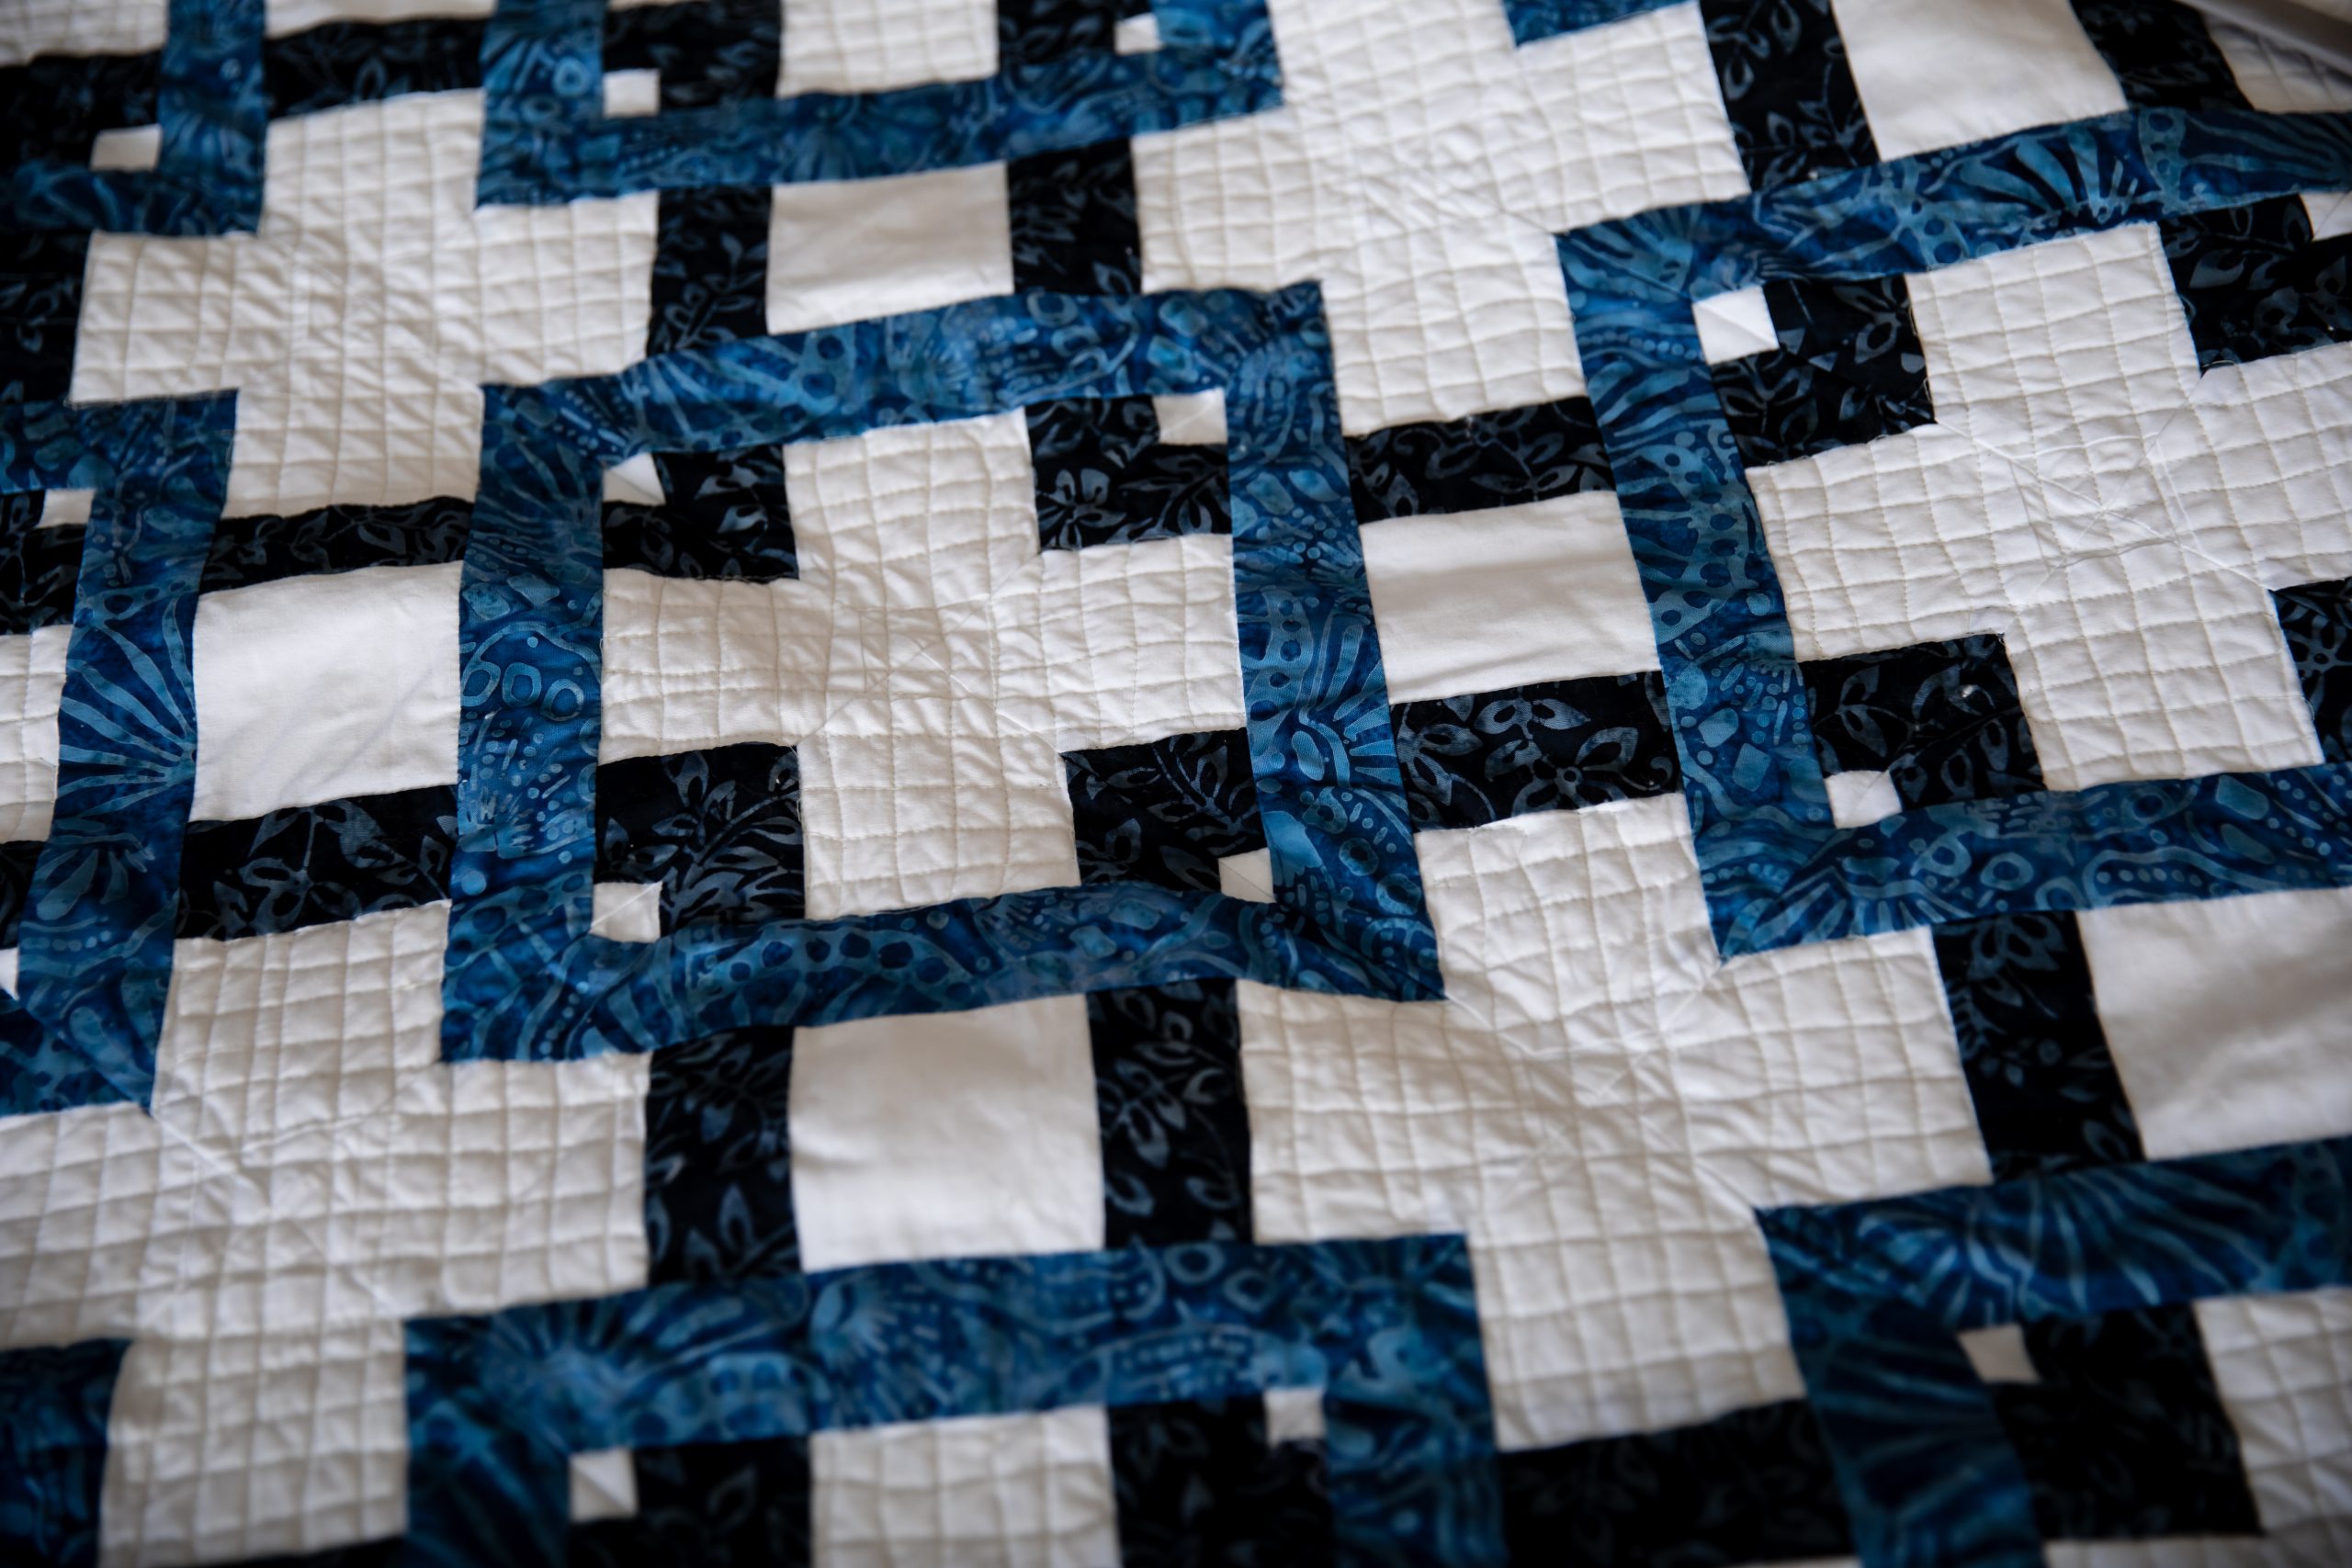
Is there anything cozier than settling down in your quilt studio on a snowy afternoon? If you’ve been searching for the perfect quilt to work on this month, don’t miss this stunning winter quilt pattern from Debi Schmitz. Made in rich blue batiks against a stark white background, this lattice quilt pattern measures at 72 inches by 108 inches and features a lovely design of interlocked blocks. Give your living space a snug, warm feeling by adding this beautiful lattice quilt to your winter décor.
Finished Size: 72 inches x 108 inches
Designer Notes:
- Because Debi used batiks and white cotton fabric, there is no right or wrong side visible. If you use a fabric with a dominant side, be mindful of the fabric side when sewing.
- The designer recommends making one of each block to make sure everything lines up correctly or make adjustments as needed.
- Always measure twice and cut once. Also, keep your pieces pressed between steps.
- Press seams toward the darkest fabric. If white on white, press the seams toward the square or rectangle if possible.
Abbreviations:
- HST = Half Square Triangles
Materials:
- (9) yards white cotton fabric – 44 inch wide
- (3) yards white 108 inch wide fabric (quilt backing)
- (3 1/2) yards dark blue batik
- (3 1/2) yards light blue batik
- (1) Full-size needled cotton batting – 90 inches x 108 inches
- White thread – 3-5 regular spools
- (12) yards gray 7/8 inch quilt binding (If you want to use fabric to match the quilt, you will need to add 1 1/4 yards to the fabric needed.)
- PDF Templates – These are located at the bottom of this page. See printing instructions below.
Tools:
- Sewing machine
- Scissors
- Rotary cutter
- Acrylic ruler
- Cutting mat
- Iron
- Best Press
- Pins
- Seam ripper
- Water-soluble sewing marker
- Hand sewing needles
- Lint roller
PRINTING INSTRUCTIONS:
To download the PDF templates, click on the download button at the bottom of the page. We recommend opening your download using Adobe Acrobat.
Cutting Instructions:
BLOCK ONE – MAKE 4:
White:
- 1A: (2) 5” squares cut in half diagonally for (4) HST
- 1C: (4)
- 1D: (4)
- 1E: (2) 7” squares cut in half diagonally for (4) HST
Light Blue:
- 1C: (4)
Dark Blue:
- 1B: (4)
- 1D: (4)
BLOCK TWO – MAKE 32:
White:
- 2A: (32) 2 1/2 inch x 10 1/2 inch rectangles
- 2B: (16) Pattern B
- 2F: (64) 2 1/2 inch x 4 1/2 inch rectangles
- 2G: (32) Pattern G
- 2H: (32) Pattern H
- 2I: (16) Pattern I
Light Blue:
- 2E: (32) Pattern E
Dark Blue:
- 2C: (32) Pattern C
- 2D: (32) Pattern D
BLOCK THREE – MAKE 60:
White:
- 3A: (120) Pattern A
- 3B: (120) Pattern B
- 3C: (300) 3 1/4 inch squares
Light Blue:
- 3E: (120) Pattern E
Dark Blue:
- 3D: (120) 2 inch x 3 1/4 inch rectangles
- 3F: (240) Pattern F
Piecing Instructions:
DIRECTIONS FOR BLOCK 1 – (FOUR CORNER BLOCKS OF QUILT):
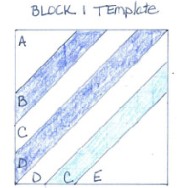
- Stitch (1) white 1A HST long edge to the short edge of (1) dark blue 1B.
- Stitch the long edge of 1B to the short edge of (1) white 1C.
- Stitch the long edge of 1C to the short edge of (1) dark blue 1D.
- Stitch the long edge of 1D to the long edge of (1) white 1D.
- Stitch the short edge of 1D to the long edge of (1) light blue 1C.
- Stitch the short edge of 1C to the long edge of (1) white 1E.
- Trim to 9”, making sure to center the block and cut from both sides equally. The designer used the grid on her cutting mat to be sure to get the block centered.
- Repeat 1-7, (3) more times to complete the 4 corner blocks.
DIRECTIONS FOR BLOCK 2 – (32 EDGE BLOCKS OF QUILT):
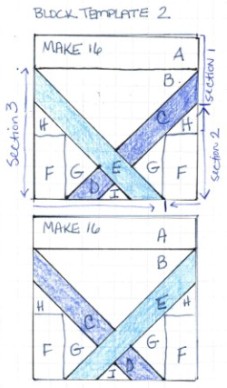
- Stitch the long edge of (1) white 2A to the long edge of (1) white 2B, centered.
- Stitch the upper side of 2B to the long edge of (1) dark blue 2C. Set aside. Section 1.
- Stitch the long edge of (1) white 2F to the long edge of (1) white 2G.
- Stitch one short side of (1) 2H to the right side of 2F used in the step above. Set aside, Section 2.
- Repeat Steps 3 and 4 in this section for Section 3, but attach the 2H to the left side of 2F.

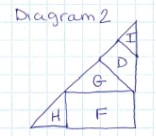
- With Section 3 facing, and 2H on the left of the 2F, stitch the long edge of (1) dark blue 2D to one short edge of 2G as shown in Diagram 2 below.
- Stitch (1) white 2I to the short side of 2D. Diagram 2.
- With RST, stitch Section 1 to Section 2, lining up the diagonal as shown.
- With RST, stitch the long edge of (1) 2E to the top portion of the block.
- Stitch Section 3 to the short edge of 2E to complete the bottom of the block. Diagram 4.
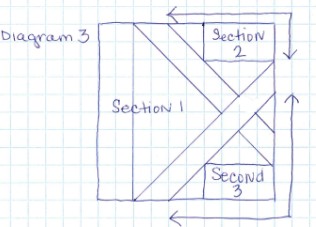
- Trim block two to 9 inches evenly, using the cutting mat gridwork as shown. Diagram 5.
- Repeat Steps 1 through 11 in this section for 15 more edge blocks.
- Repeat Steps 1 through 11, but reverse the sides on which the light blue and dark blue strips are sewn. See Block 2 Template. Make 16 blocks like this.
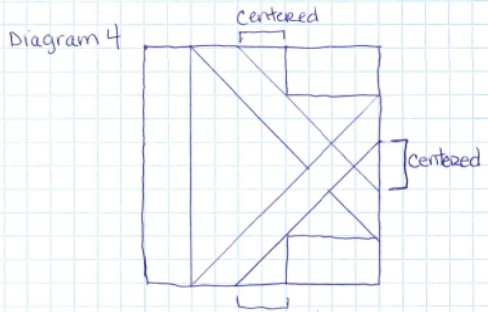
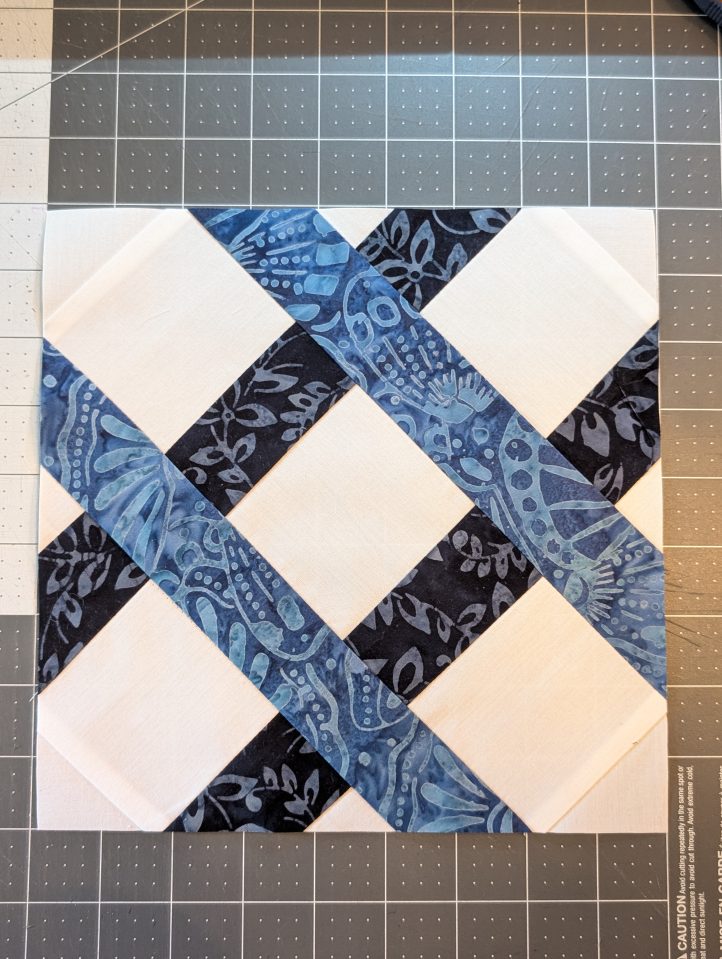
DIRECTIONS FOR BLOCK 3 – (60 BODY BLOCKS OF QUILT):
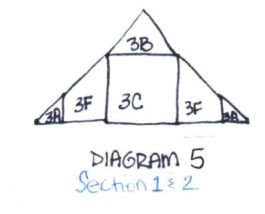
- Stitch the long edge of (1) white 3B to (1) 3 1/4 inch square, 3C.
- Stitch the long edge of (1) dark blue 3E to the left of the block and (1) dark blue 3E to the right of the block.
- Stitch the short edge of 3E to the short side of (1) white 3A on one side and then (1) white 3A on the other side of the 3E. This completes Section 1. See Diagram 5.
- Repeat Steps 1 through 3 from this section for Section 2.
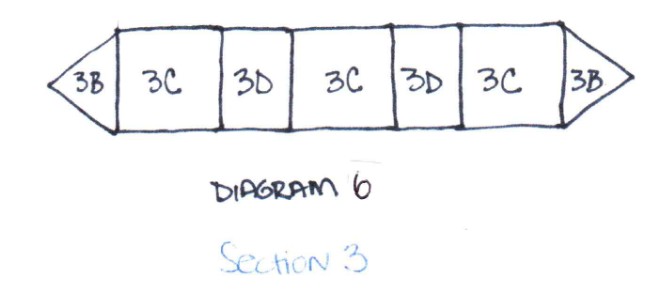
- Stitch the long edge of (1) white 3B to one edge of (1) white 3C.
- Stitch the opposite edge of 3C to the long edge of (1) dark blue 3D.
- Stitch the opposite edge of 3D to another 3C.
- Stitch the opposite edge of 3C to the long edge of (1) dark blue 3D.
- Stitch the opposite edge of 3D to another 3C.
- Stitch the opposite edge of 3C to the long edge of (1) 3B, completing Section 3 as shown in Diagram 6.
- Stitch Section 1 to the short edge of (1) light blue 3F.
- Stitch the long edge of another 3F to the opposite edge of Section 3.
- Stitch Section 2 to the short edge of 3F.
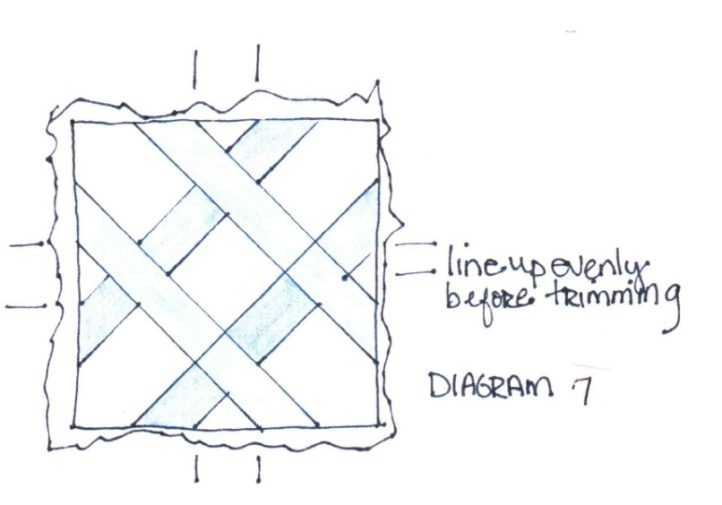
- Trim block three to 9” evenly, using the cutting mat gridwork.
- Repeat Steps 1 through 15 in this section for 59 more body blocks.
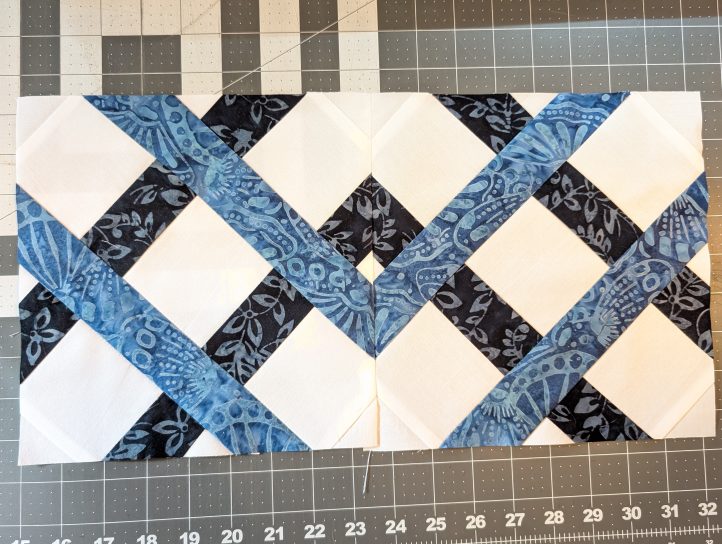
ASSEMBLING THE QUILT:
Note: All block 2 pieces will be lined up with the 2A edge along the outside of the quilt.
Row 1- (1) Block 1, (6) Block 2- every other one reversed, (1) Block 1
Row 2 through 11- (1) Block 2, (6) Block 3, (1) Block 2
Row 12- (1) Block 1, (6) Block 2- every other one reversed, (1) Block 1
- Pin all seams before sewing.
- Press the entire quilt top one last time.
- Make a quilt sandwich with the white fabric on the table first- 90 inches x 108 inches, batting- 90 inches x 108 inches, and the quilt on top.
- Secure the three layers of fabric with safety pins every 4-6 inches. Make sure the length lines up since the quilt measures 108 inches long. Make sure fabrics are pressed flat.
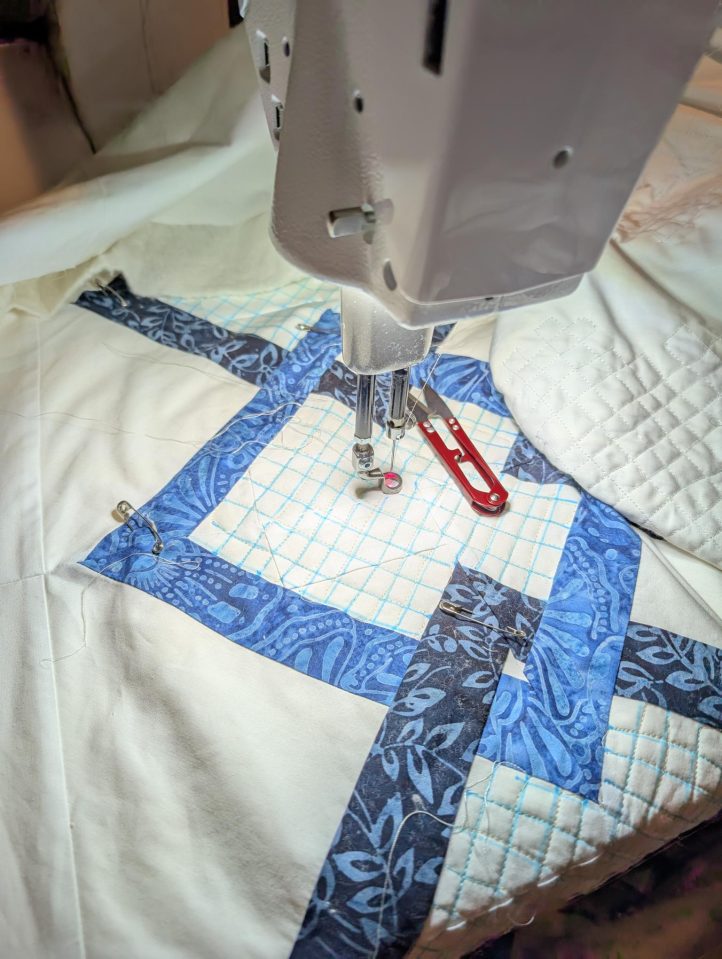
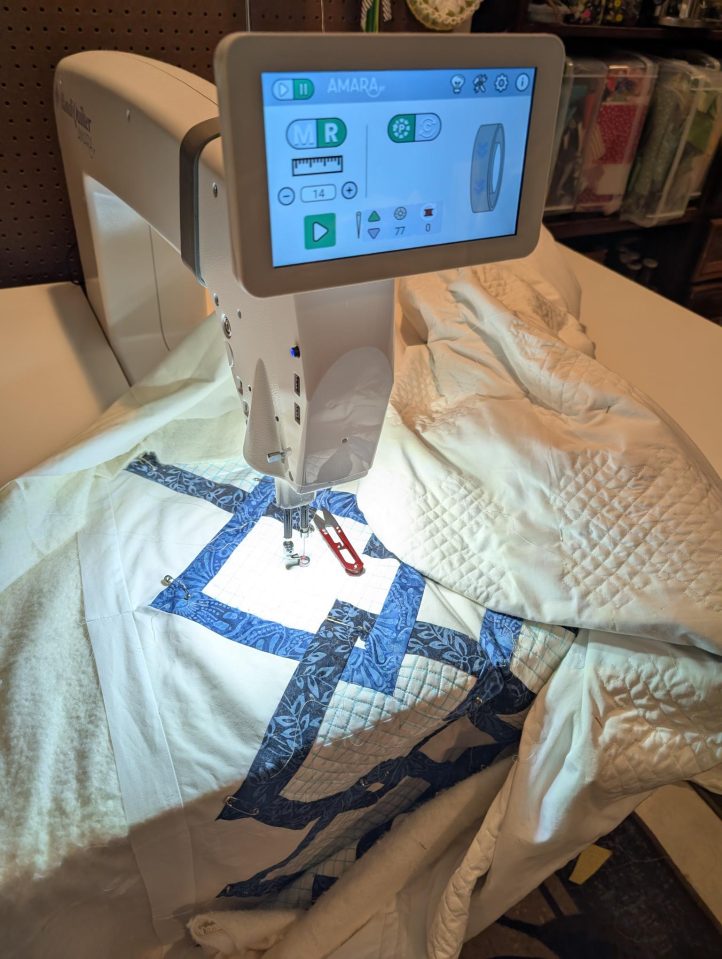
- Quilt as desired. Debi quilted a checker pattern in every large white opening. She then marked all her lines with an acrylic ruler and a water-soluble sewing marker. The lines were 1/2 inch apart. Debi quilted with a Handiquilter Amara ST for ease with such a large quilt.
- Trim the edges straight and attach the quilt binding around the perimeter to your preference. The designer sewed the bias to the front by machine and then finished the back by hand.
What a beautiful quilt! I love the intricate interwoven design and your clear, precise directions to make it!
Thanks so much for your kind comment, Sujata! Have a great day 🙂 – Ashley, We Like Quilting