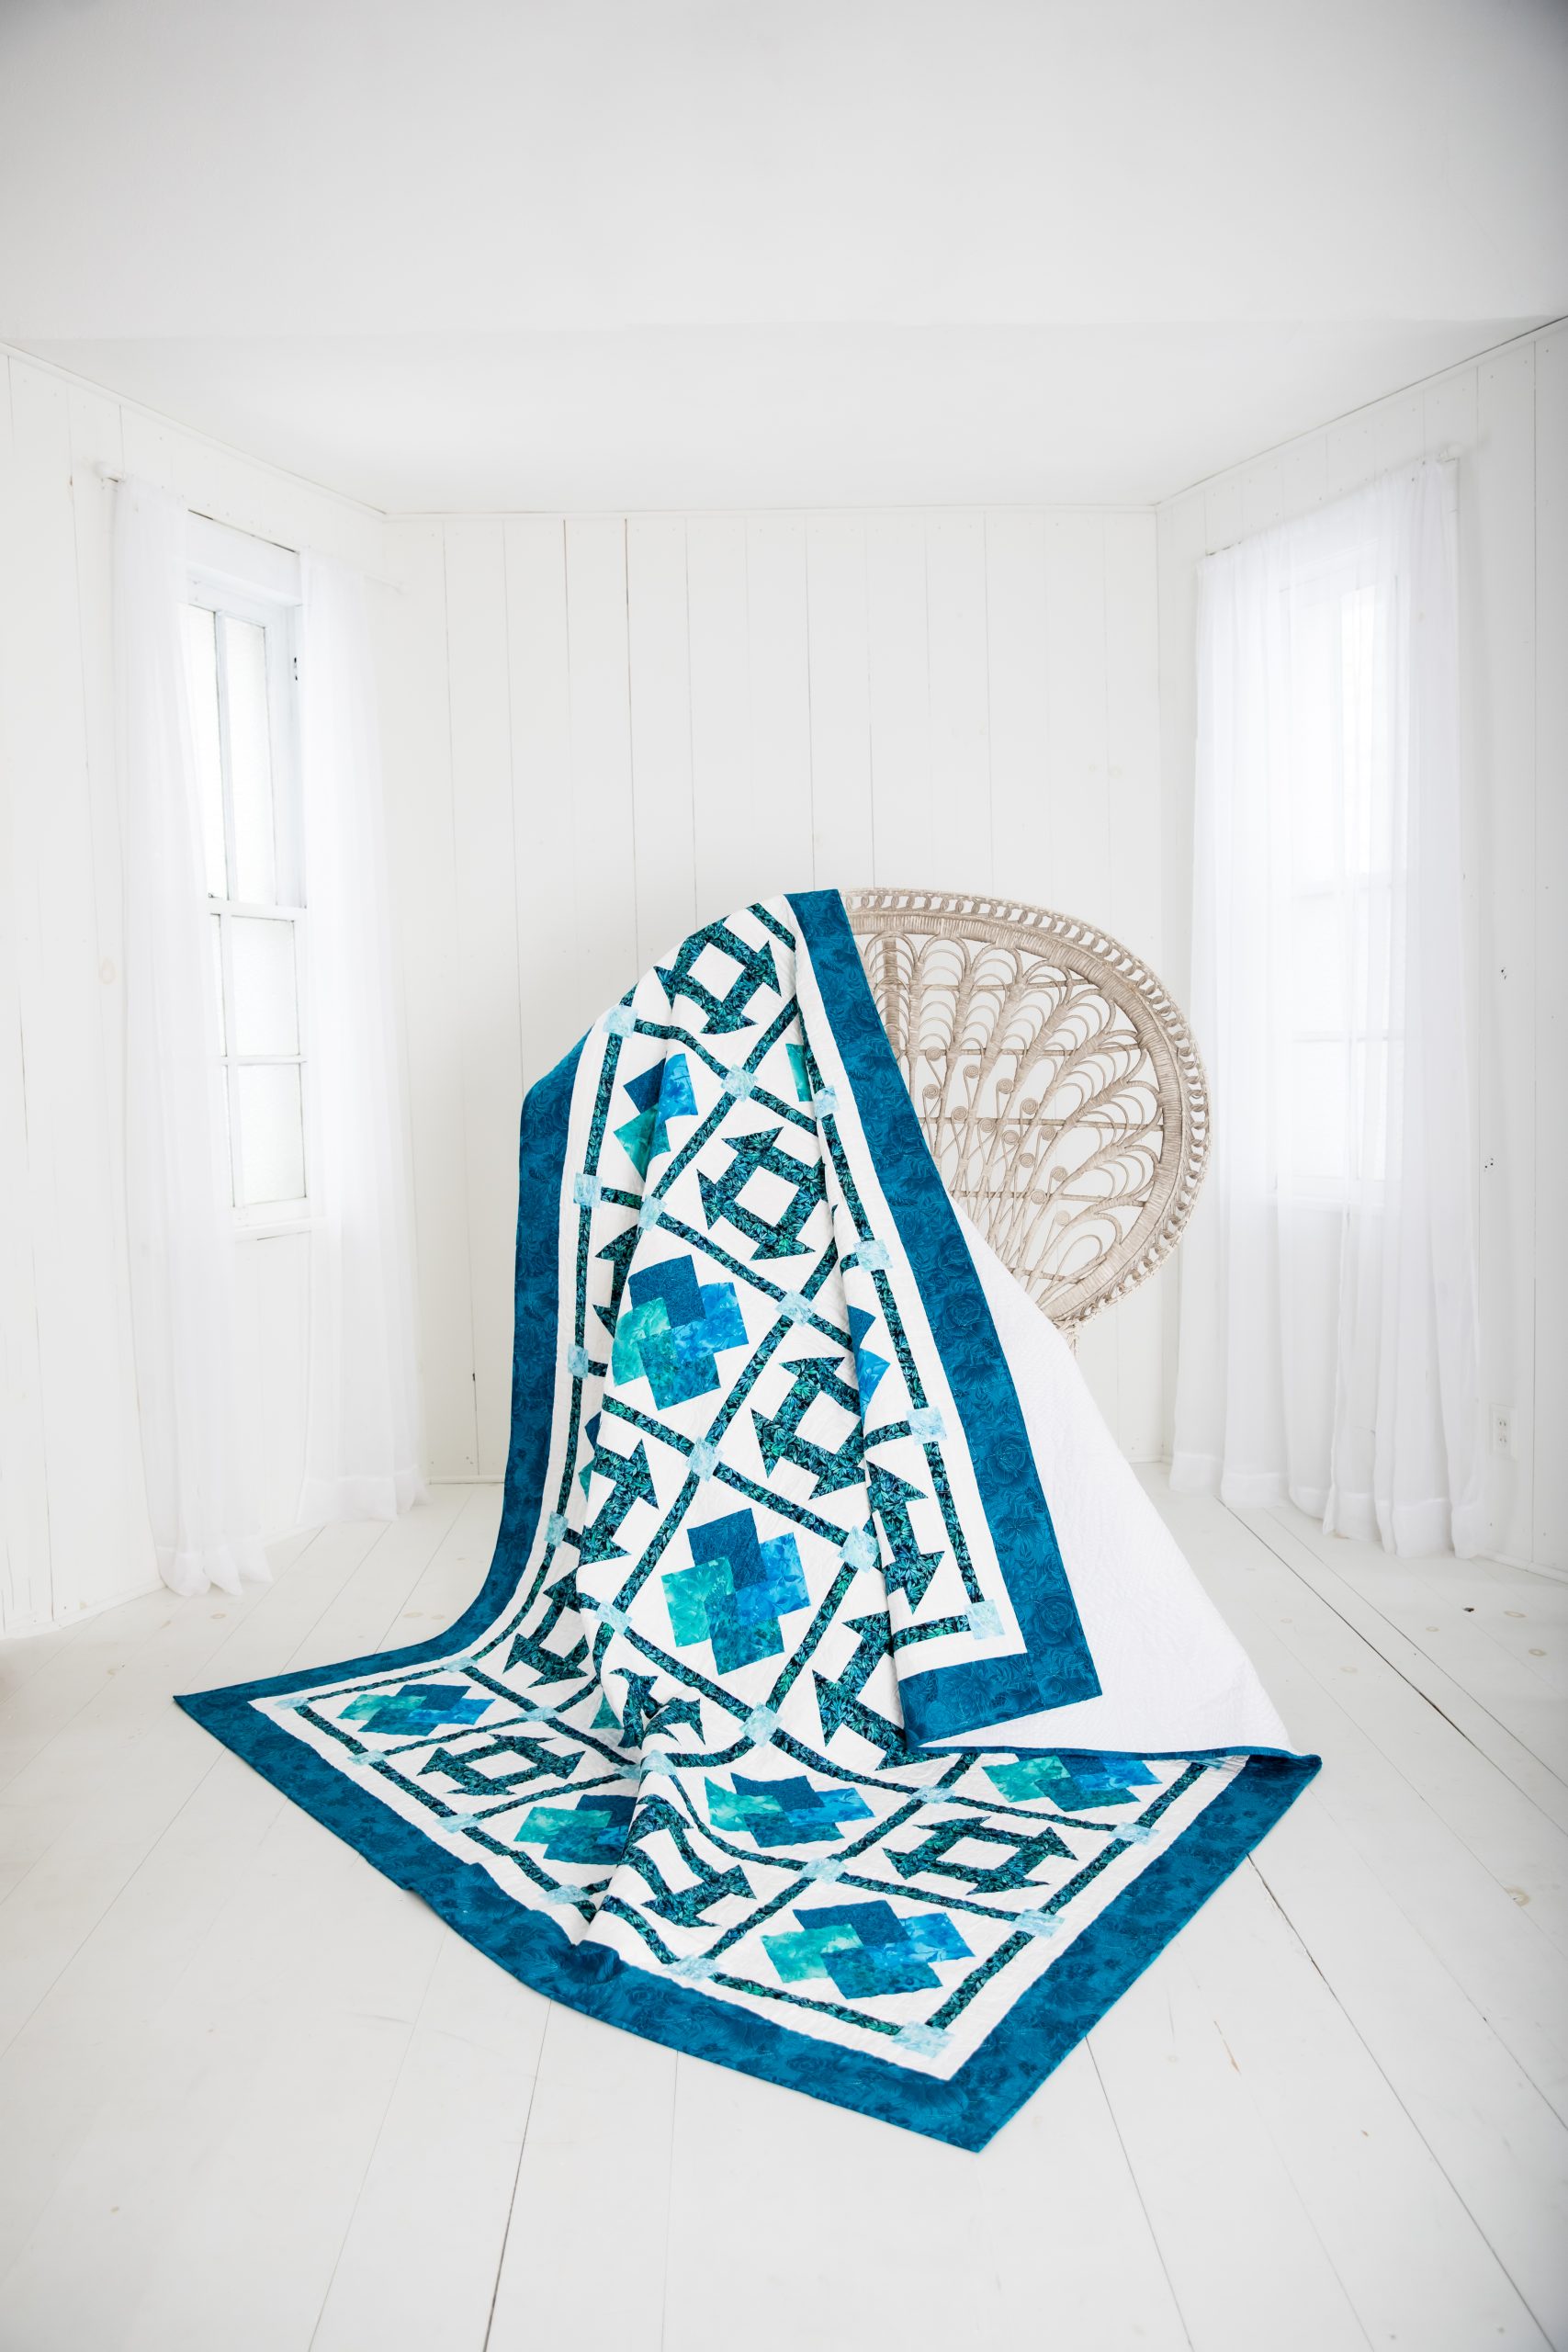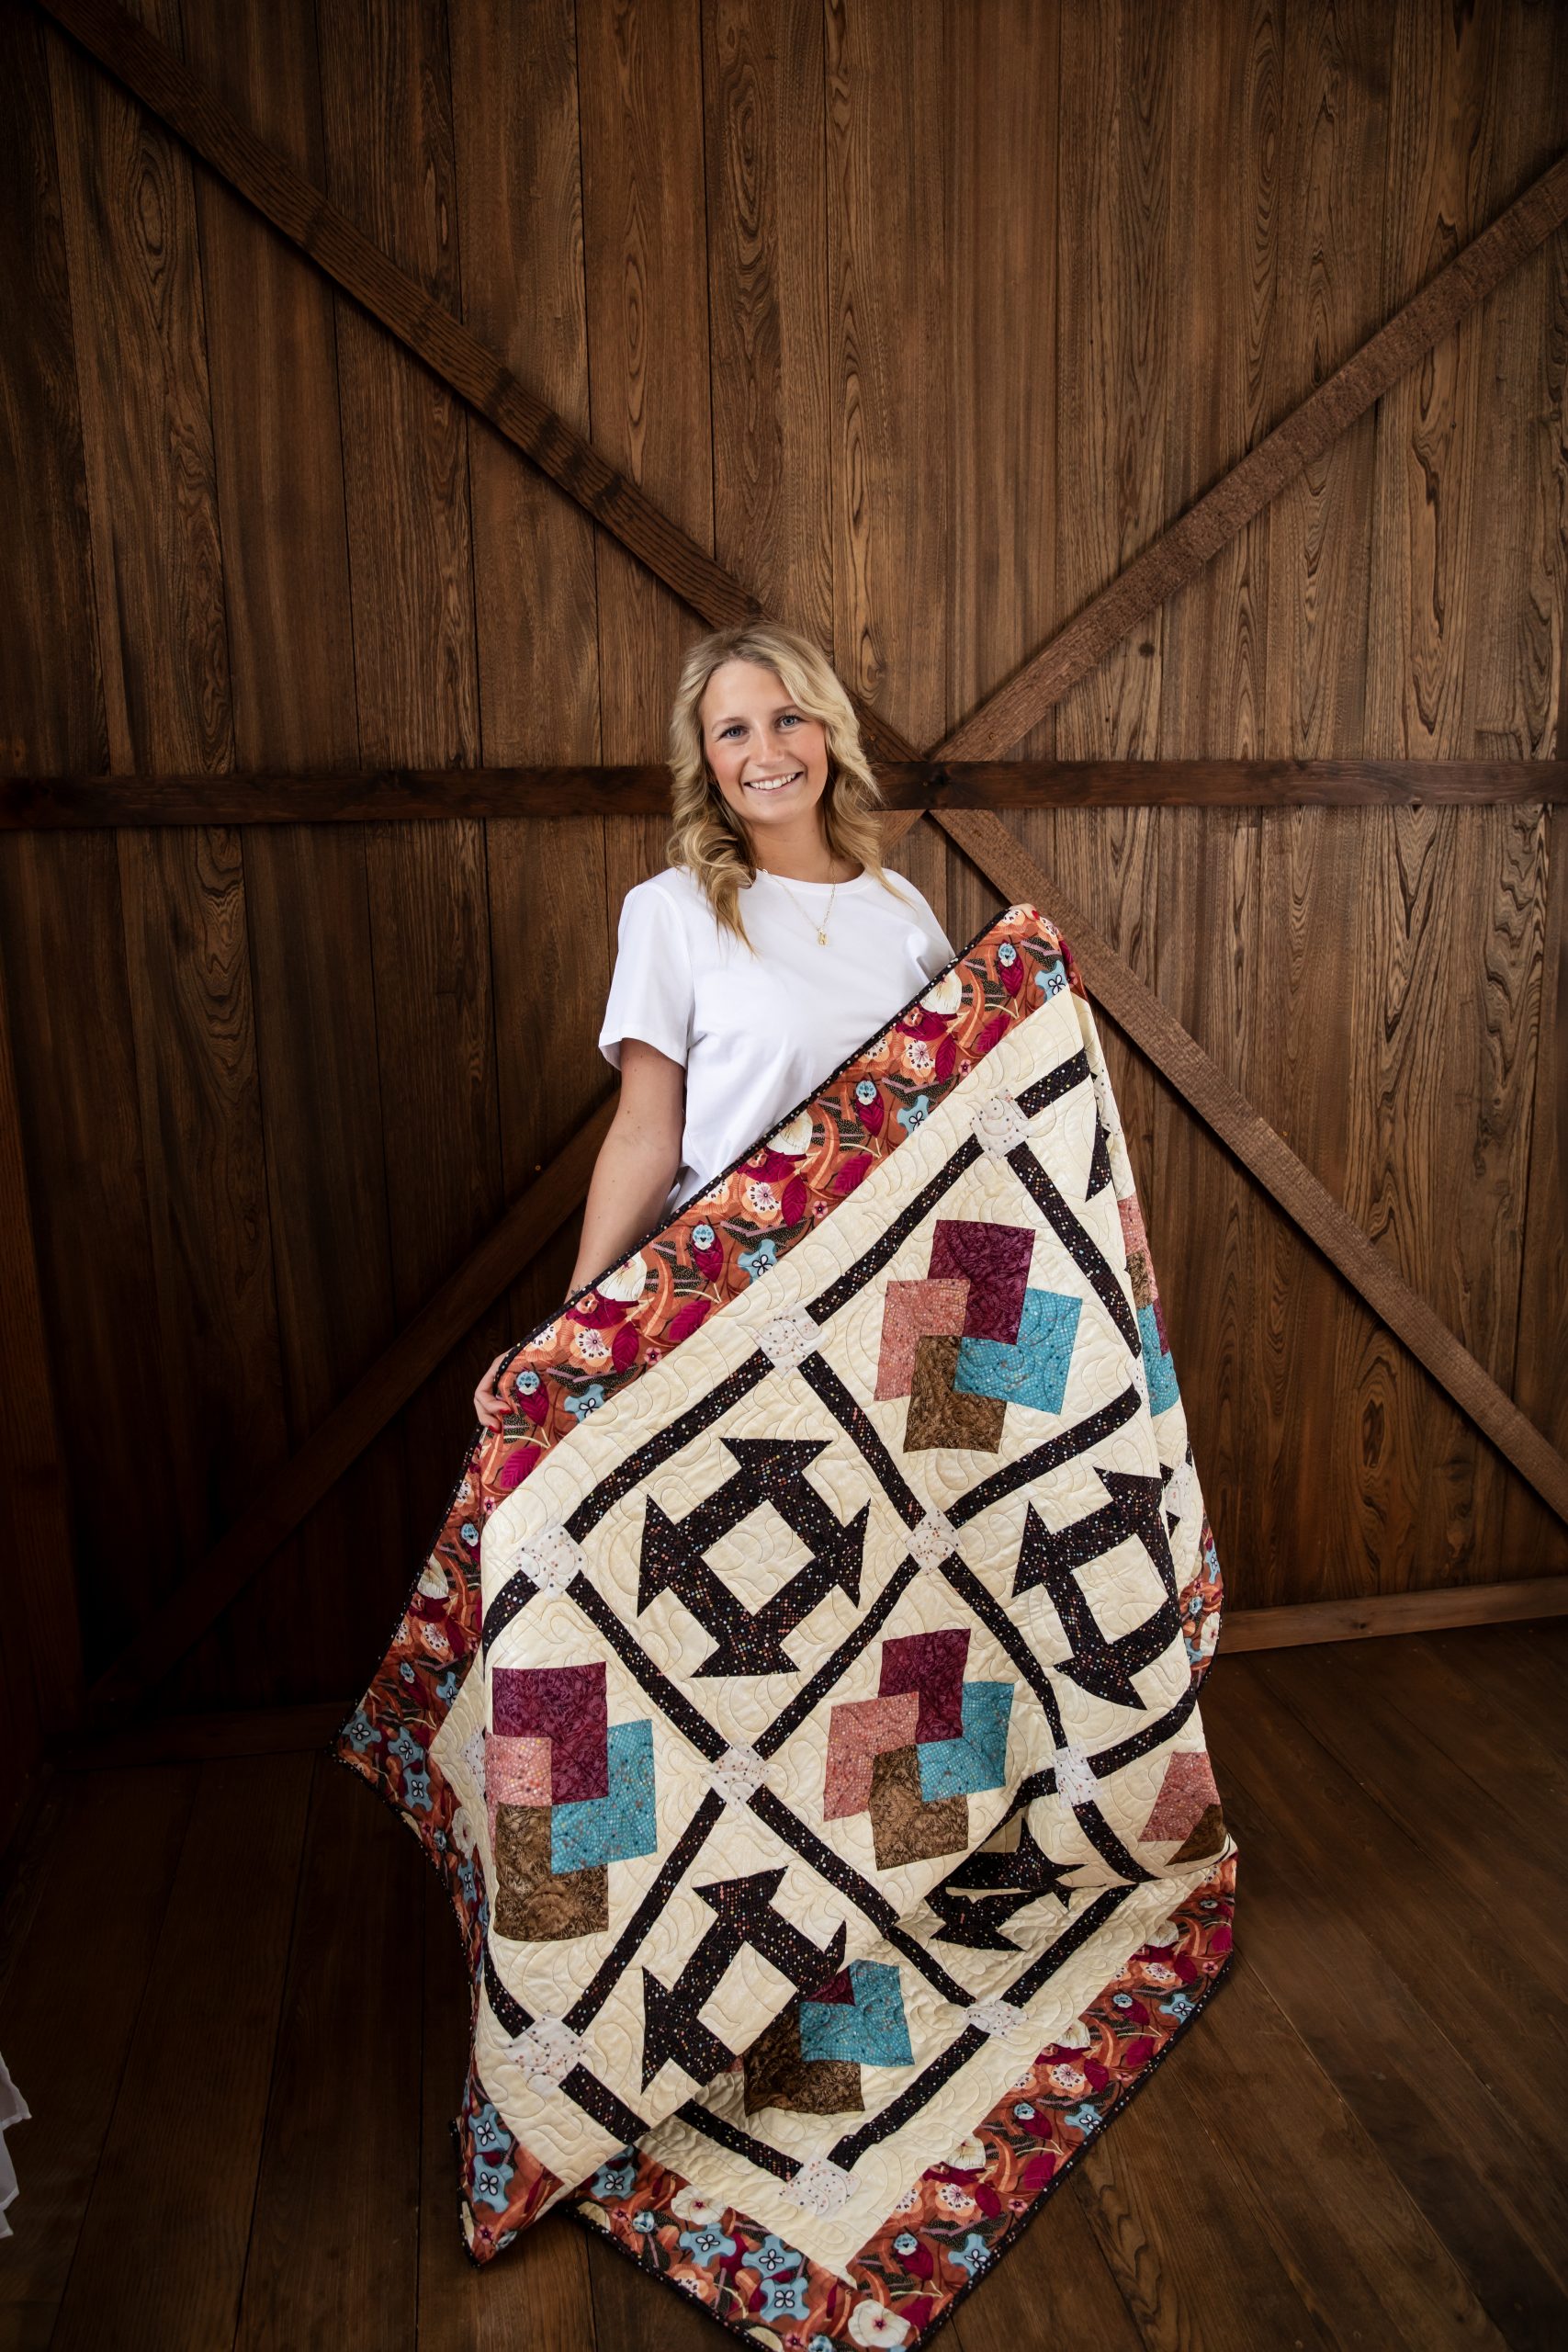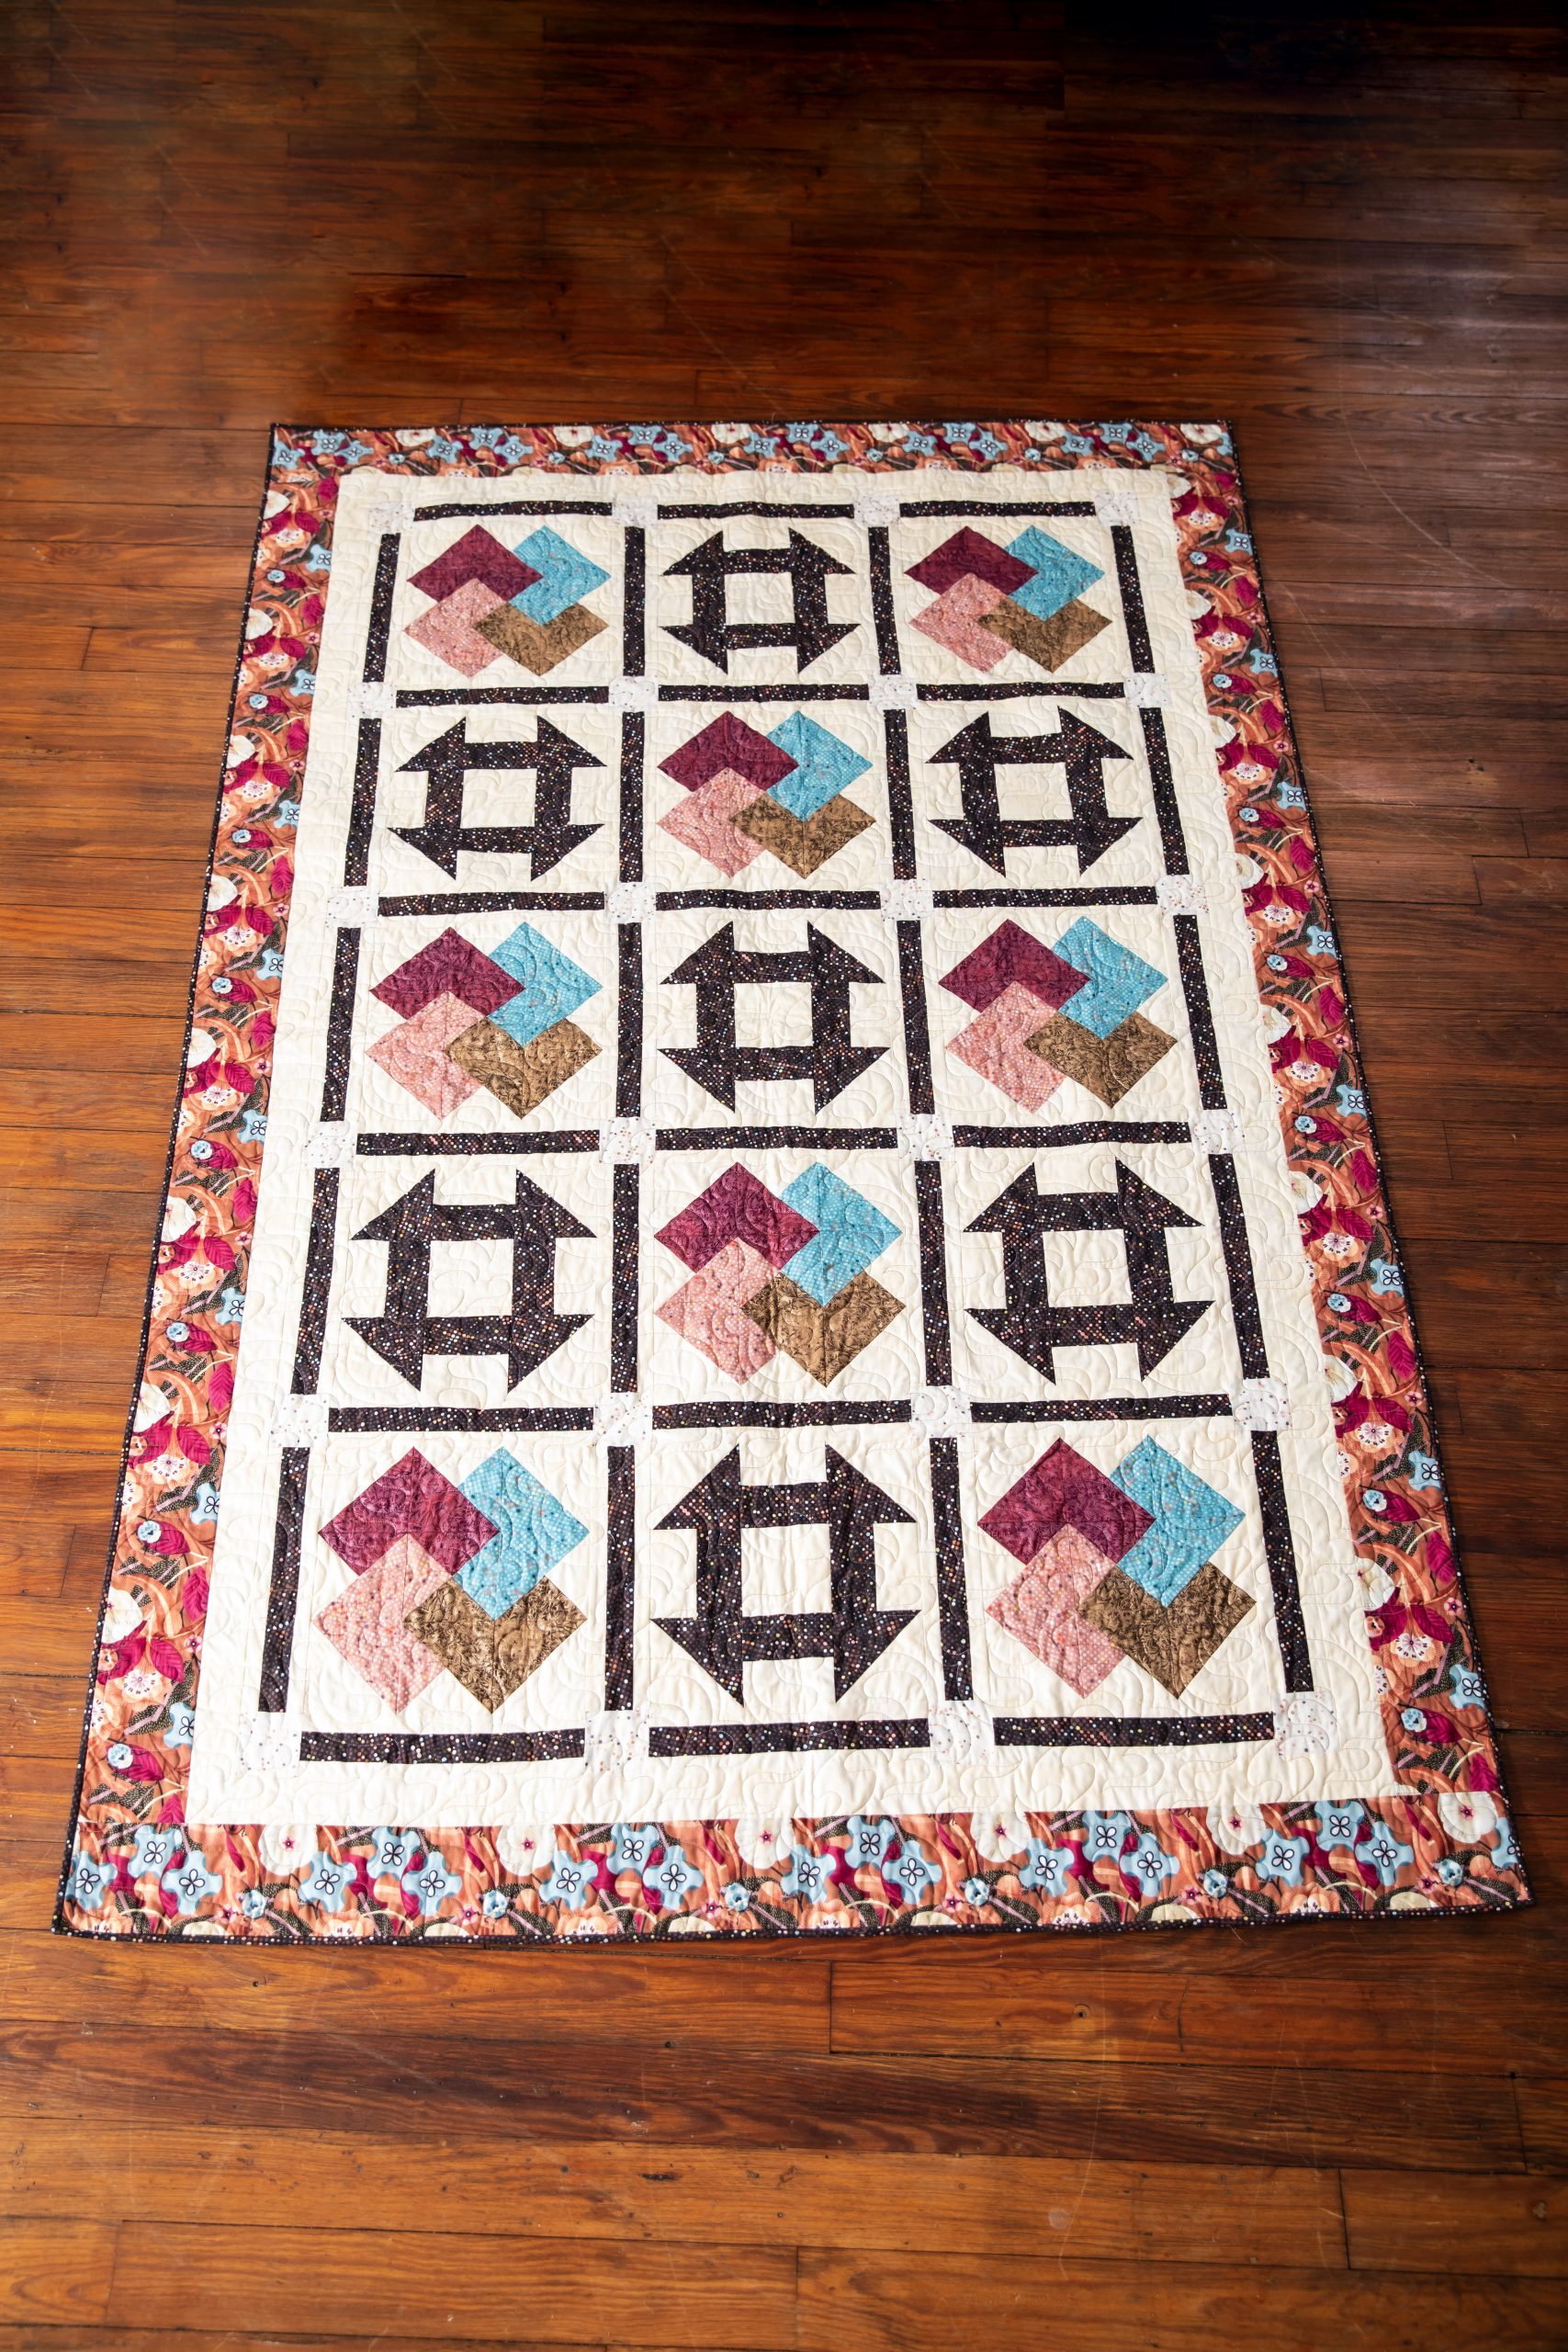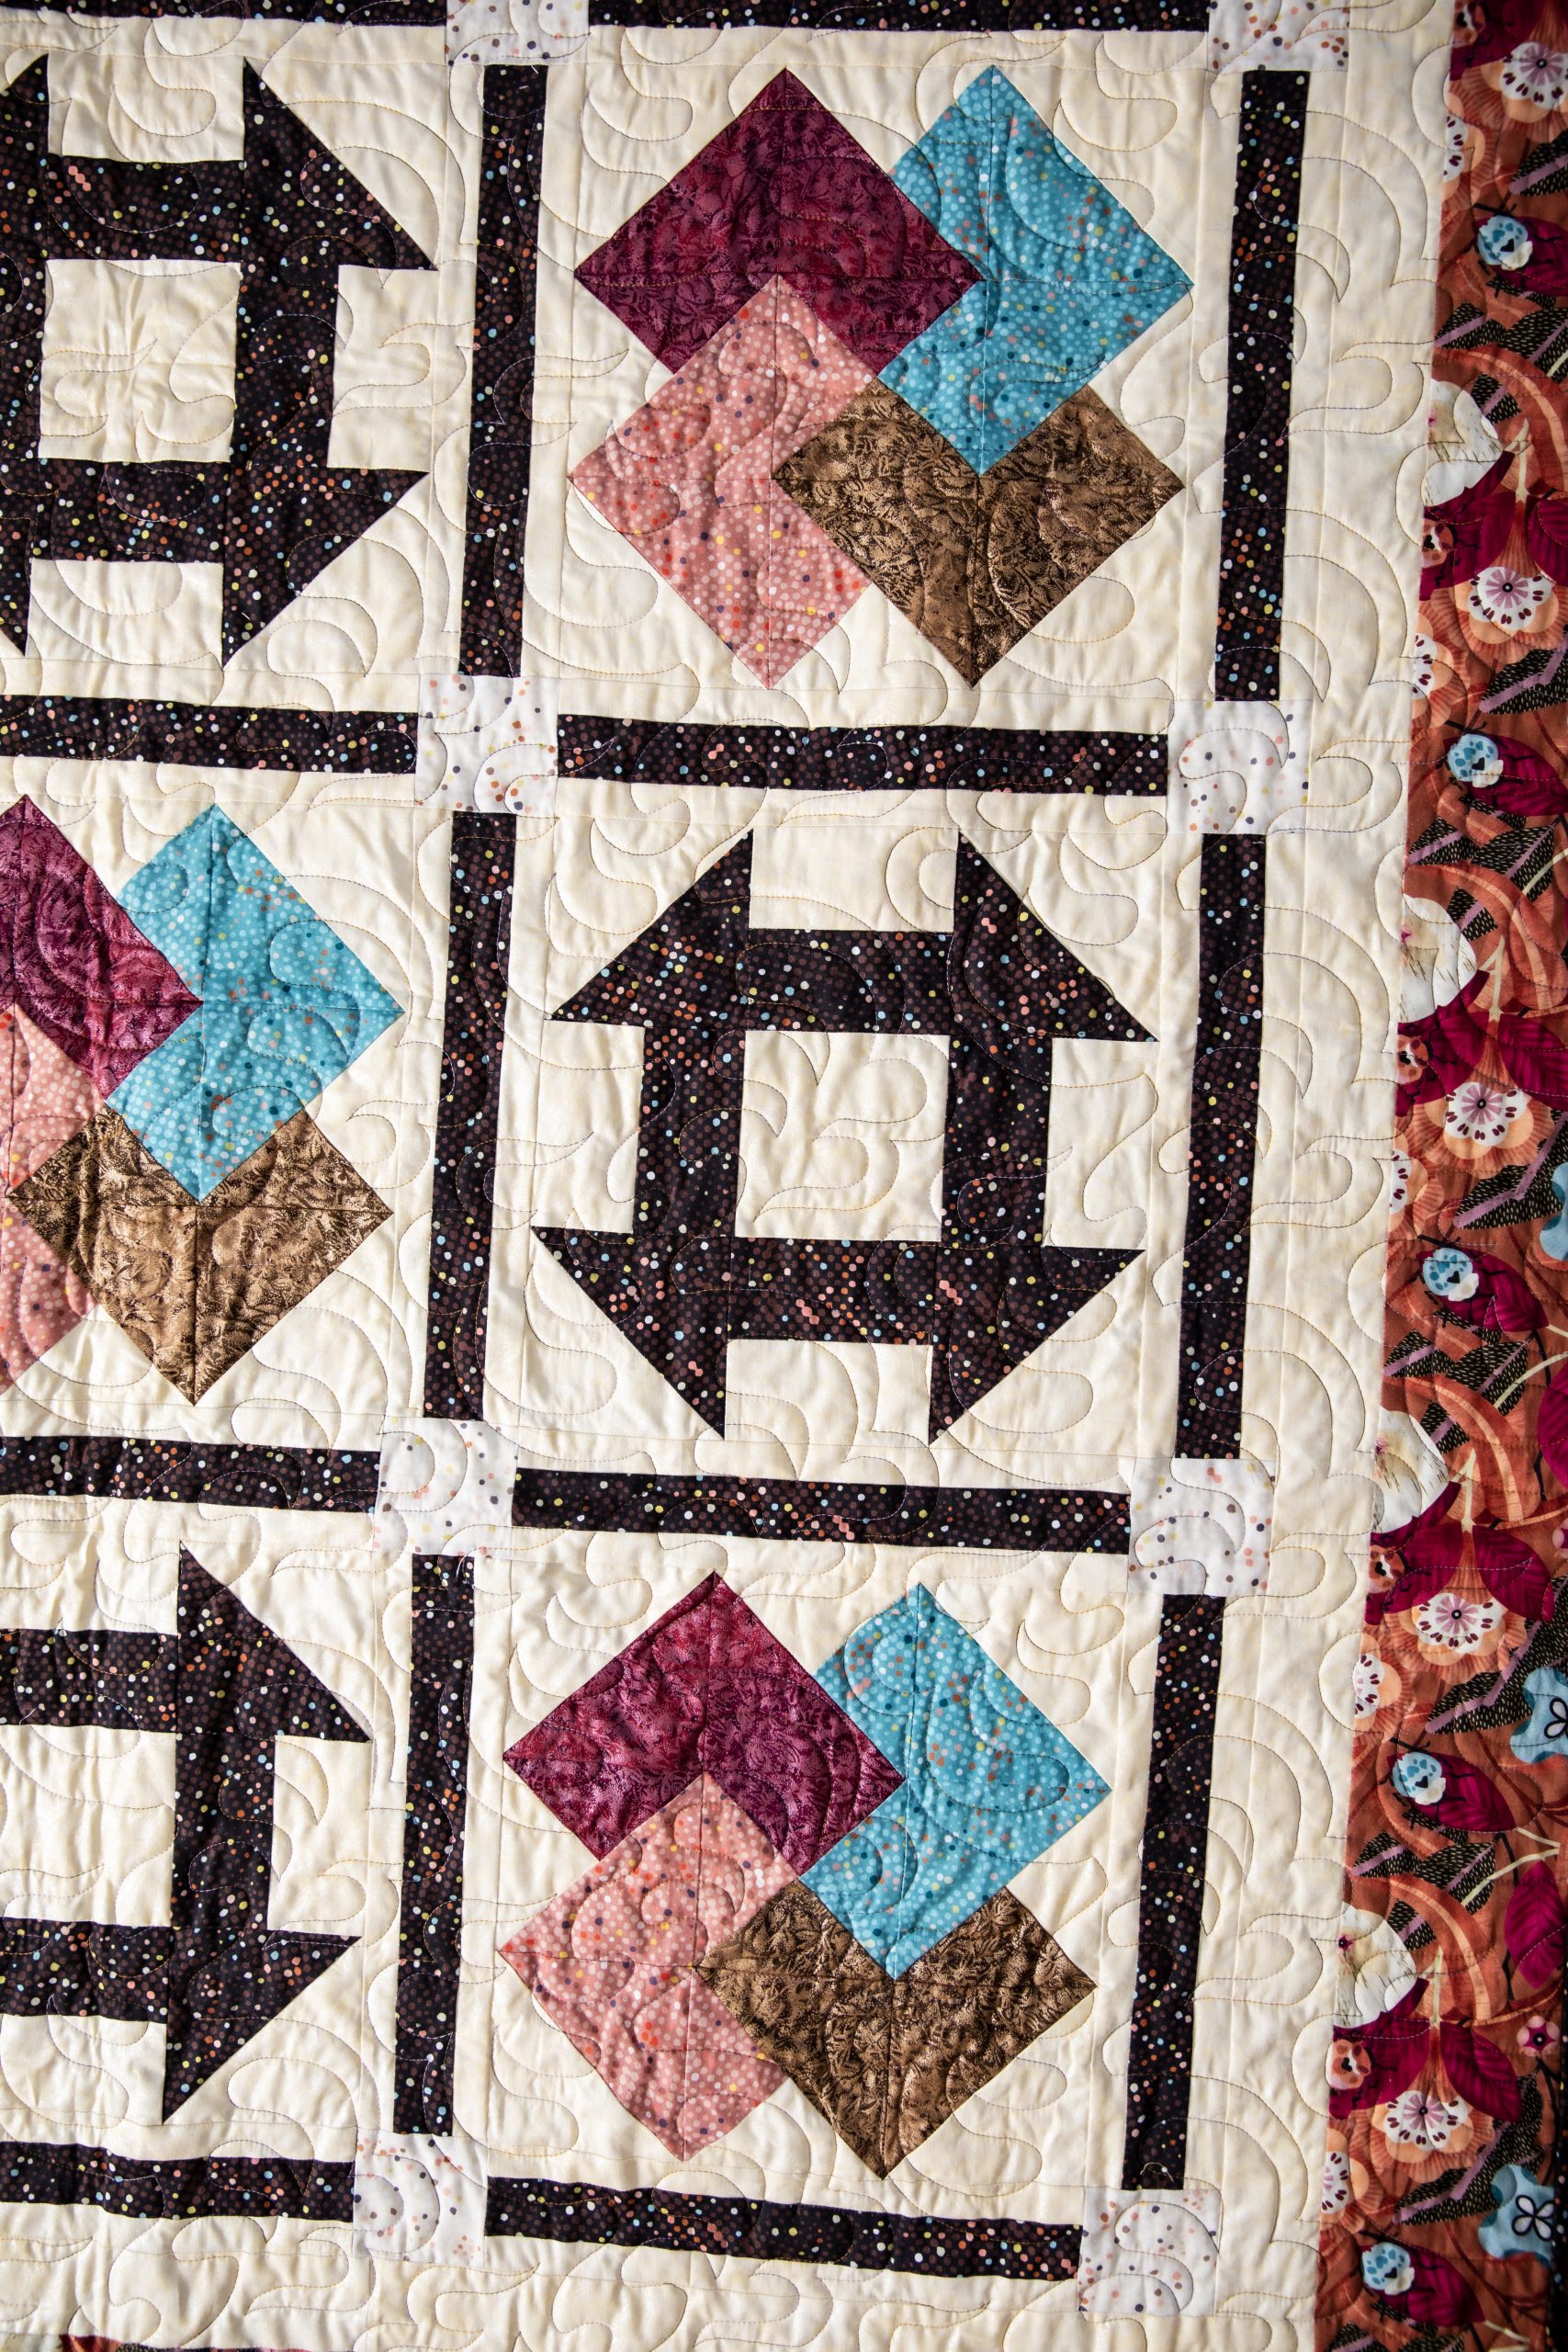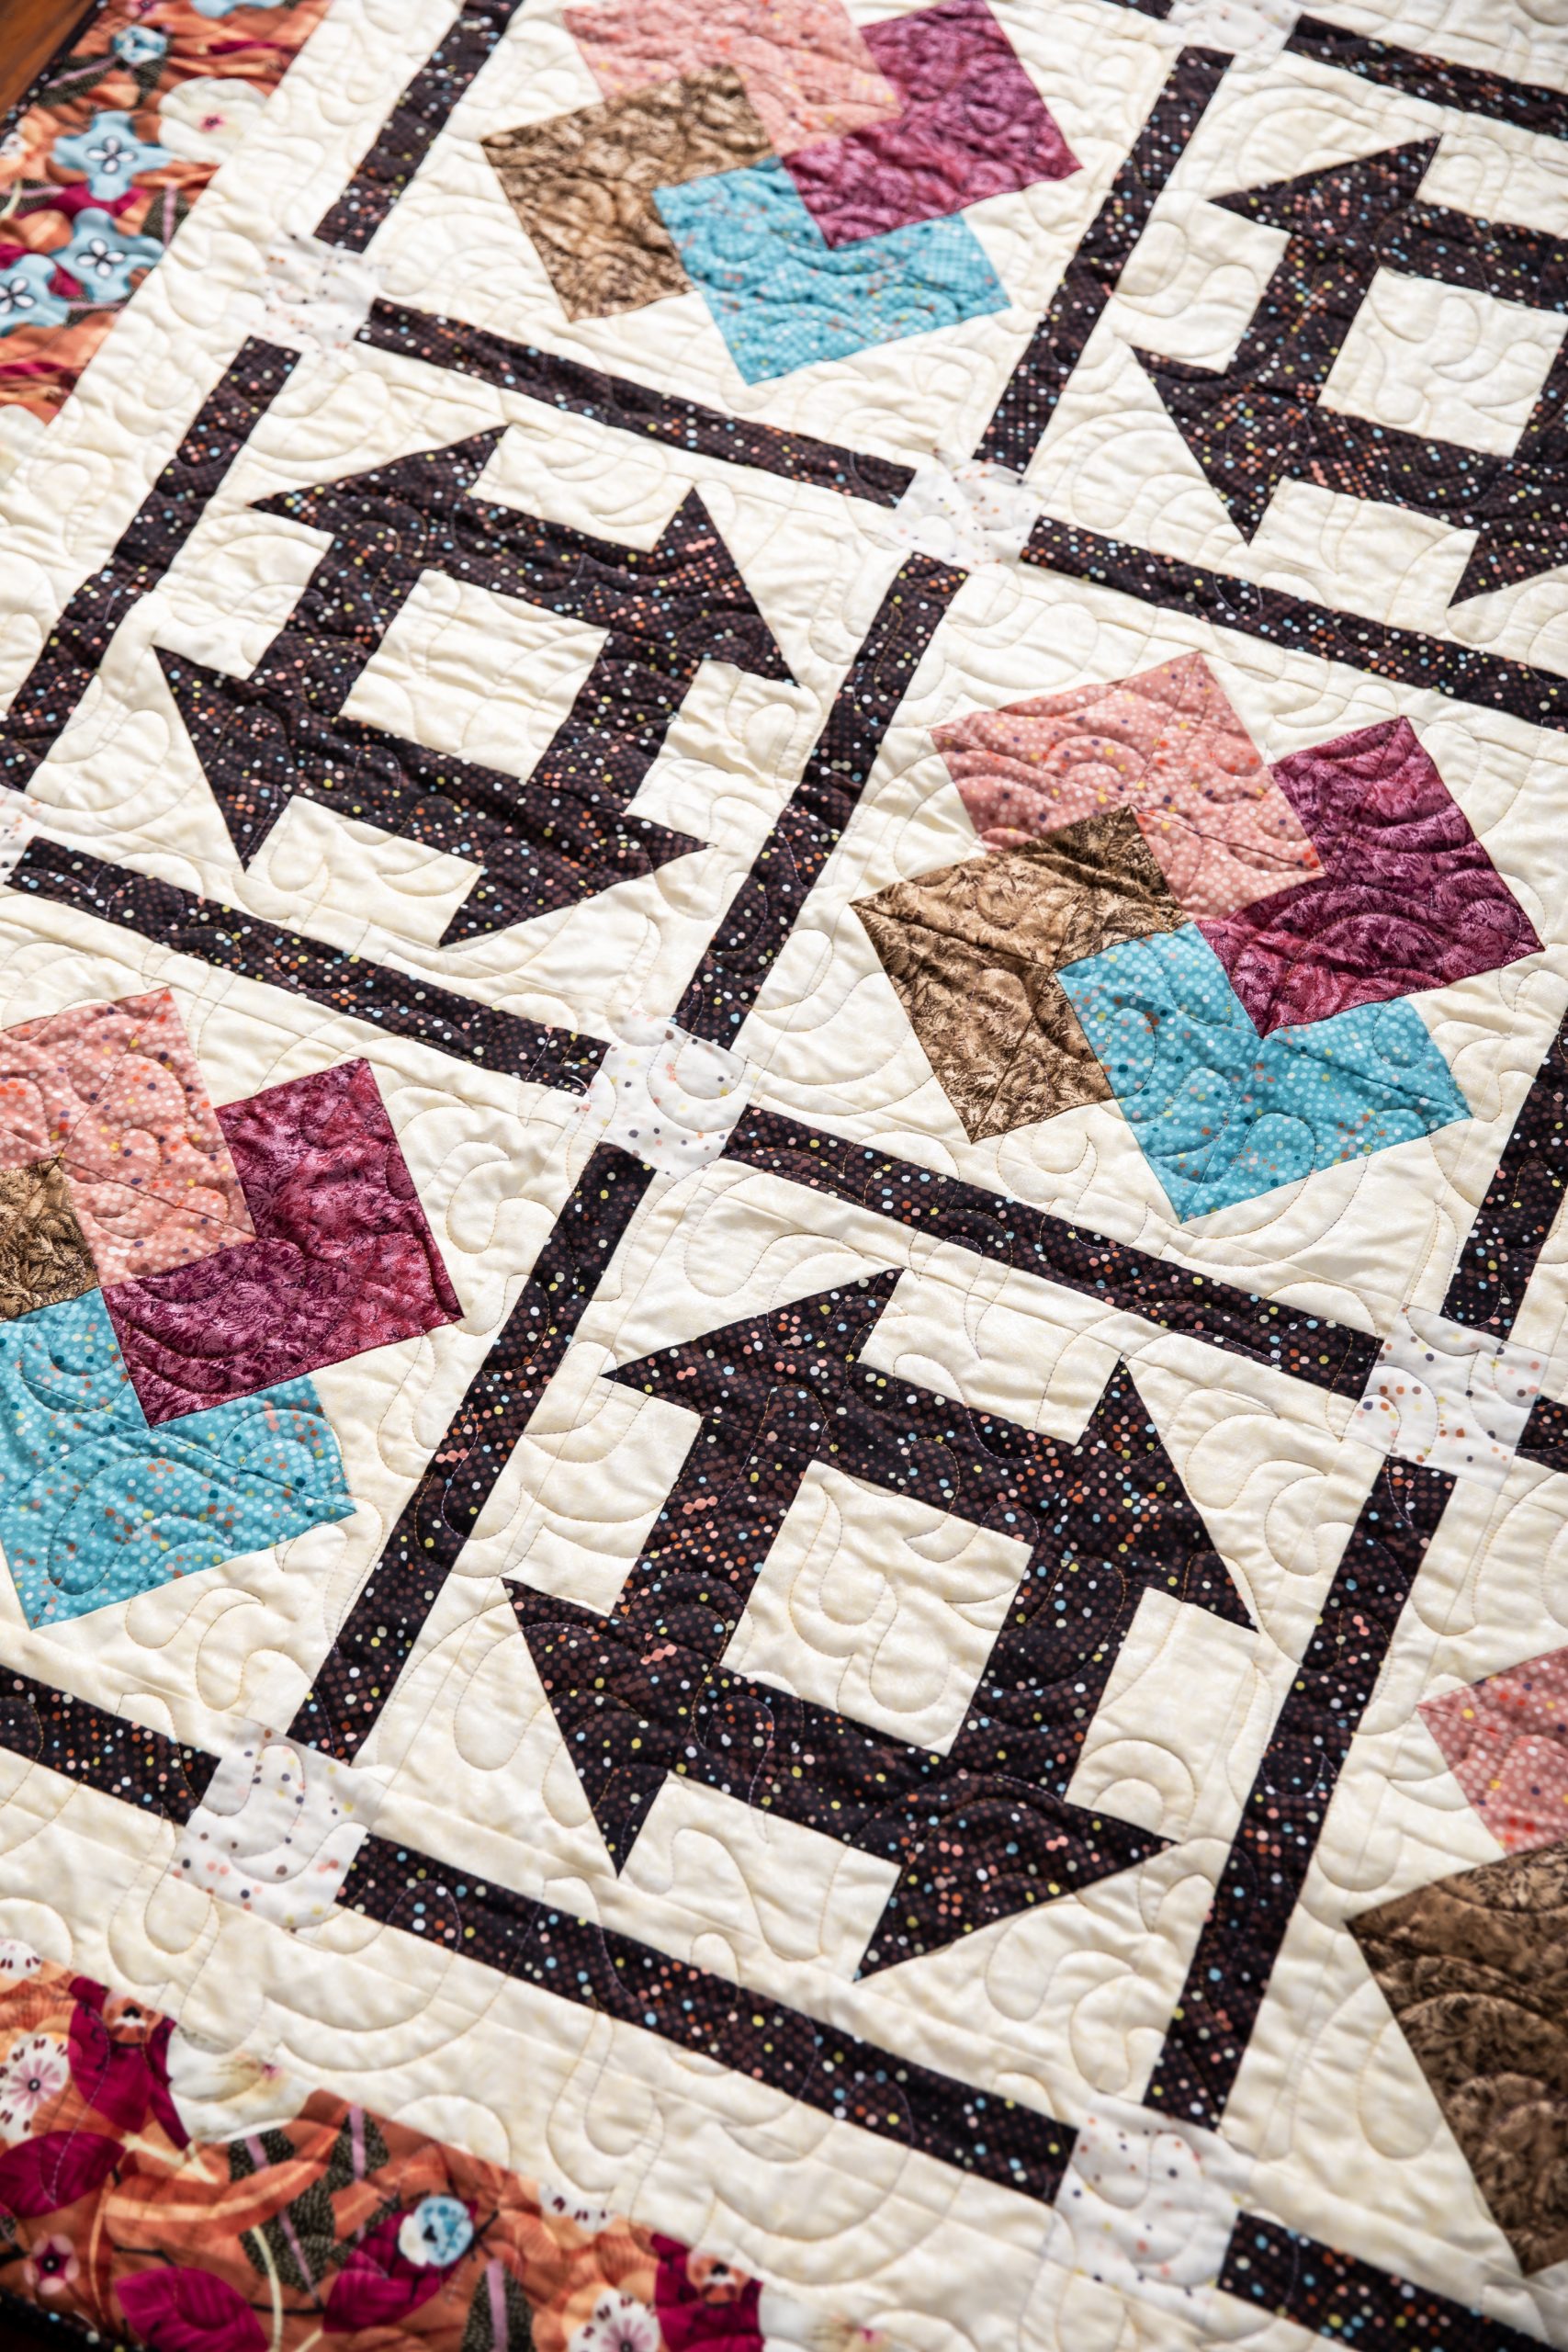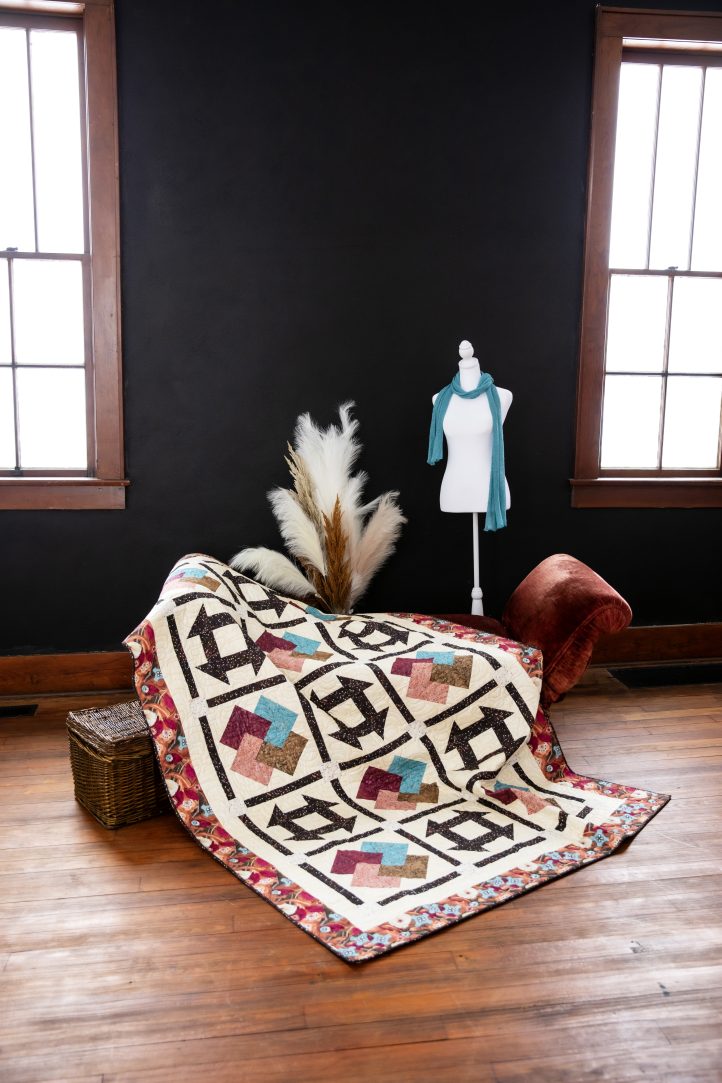
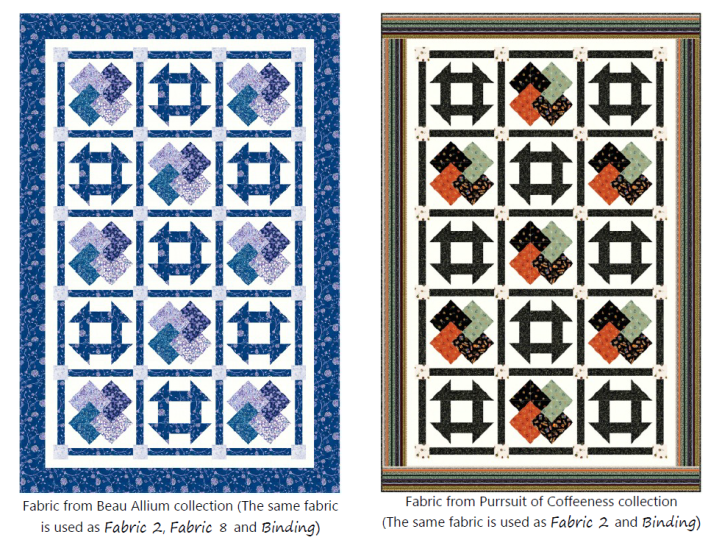
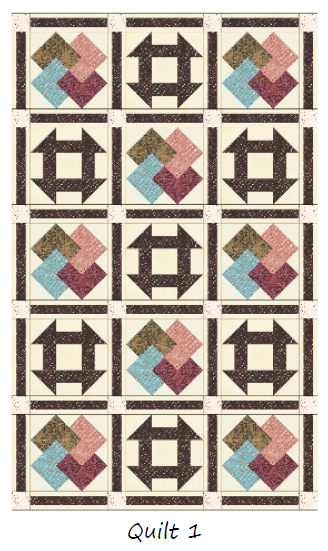
The classic card trick and churn dash blocks combine into one gorgeous spring quilt pattern. Designed by Brenda Plaster, this large quilt pattern is a delightful scrap quilting project and can be made in two sizes: 59 1/2 inches by 89 inches or 89 inches by 103 3/4 inches. Our designer has created two versions for readers to see the versatility of this quilt design and show how easily different color palettes can transform the mood of a quilt.
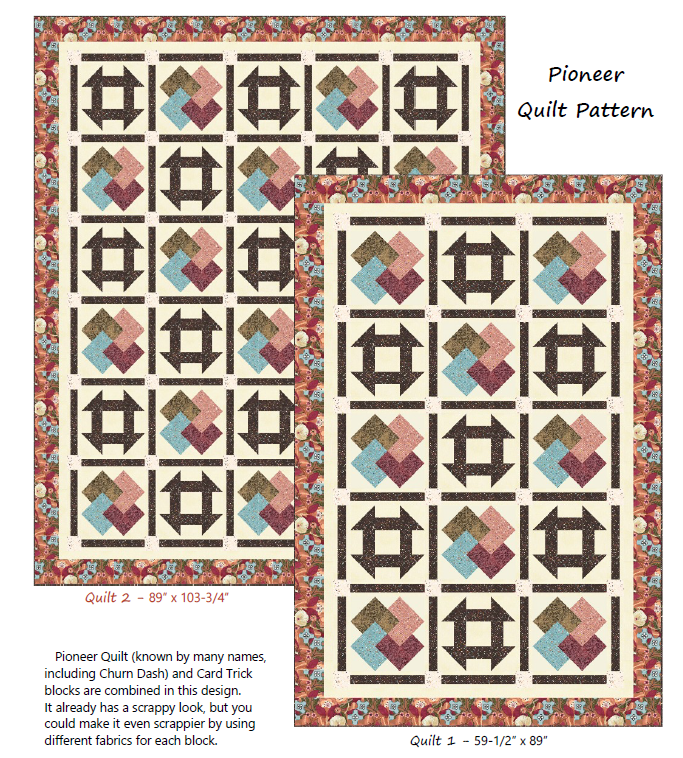
Finished Sizes: 59-1/2” x 89” and 89” x 103-3/4”
Abbreviations:
- HST = half-square triangle
- QST = quarter-square triangle
Designer Note: Please read pattern before starting your project.
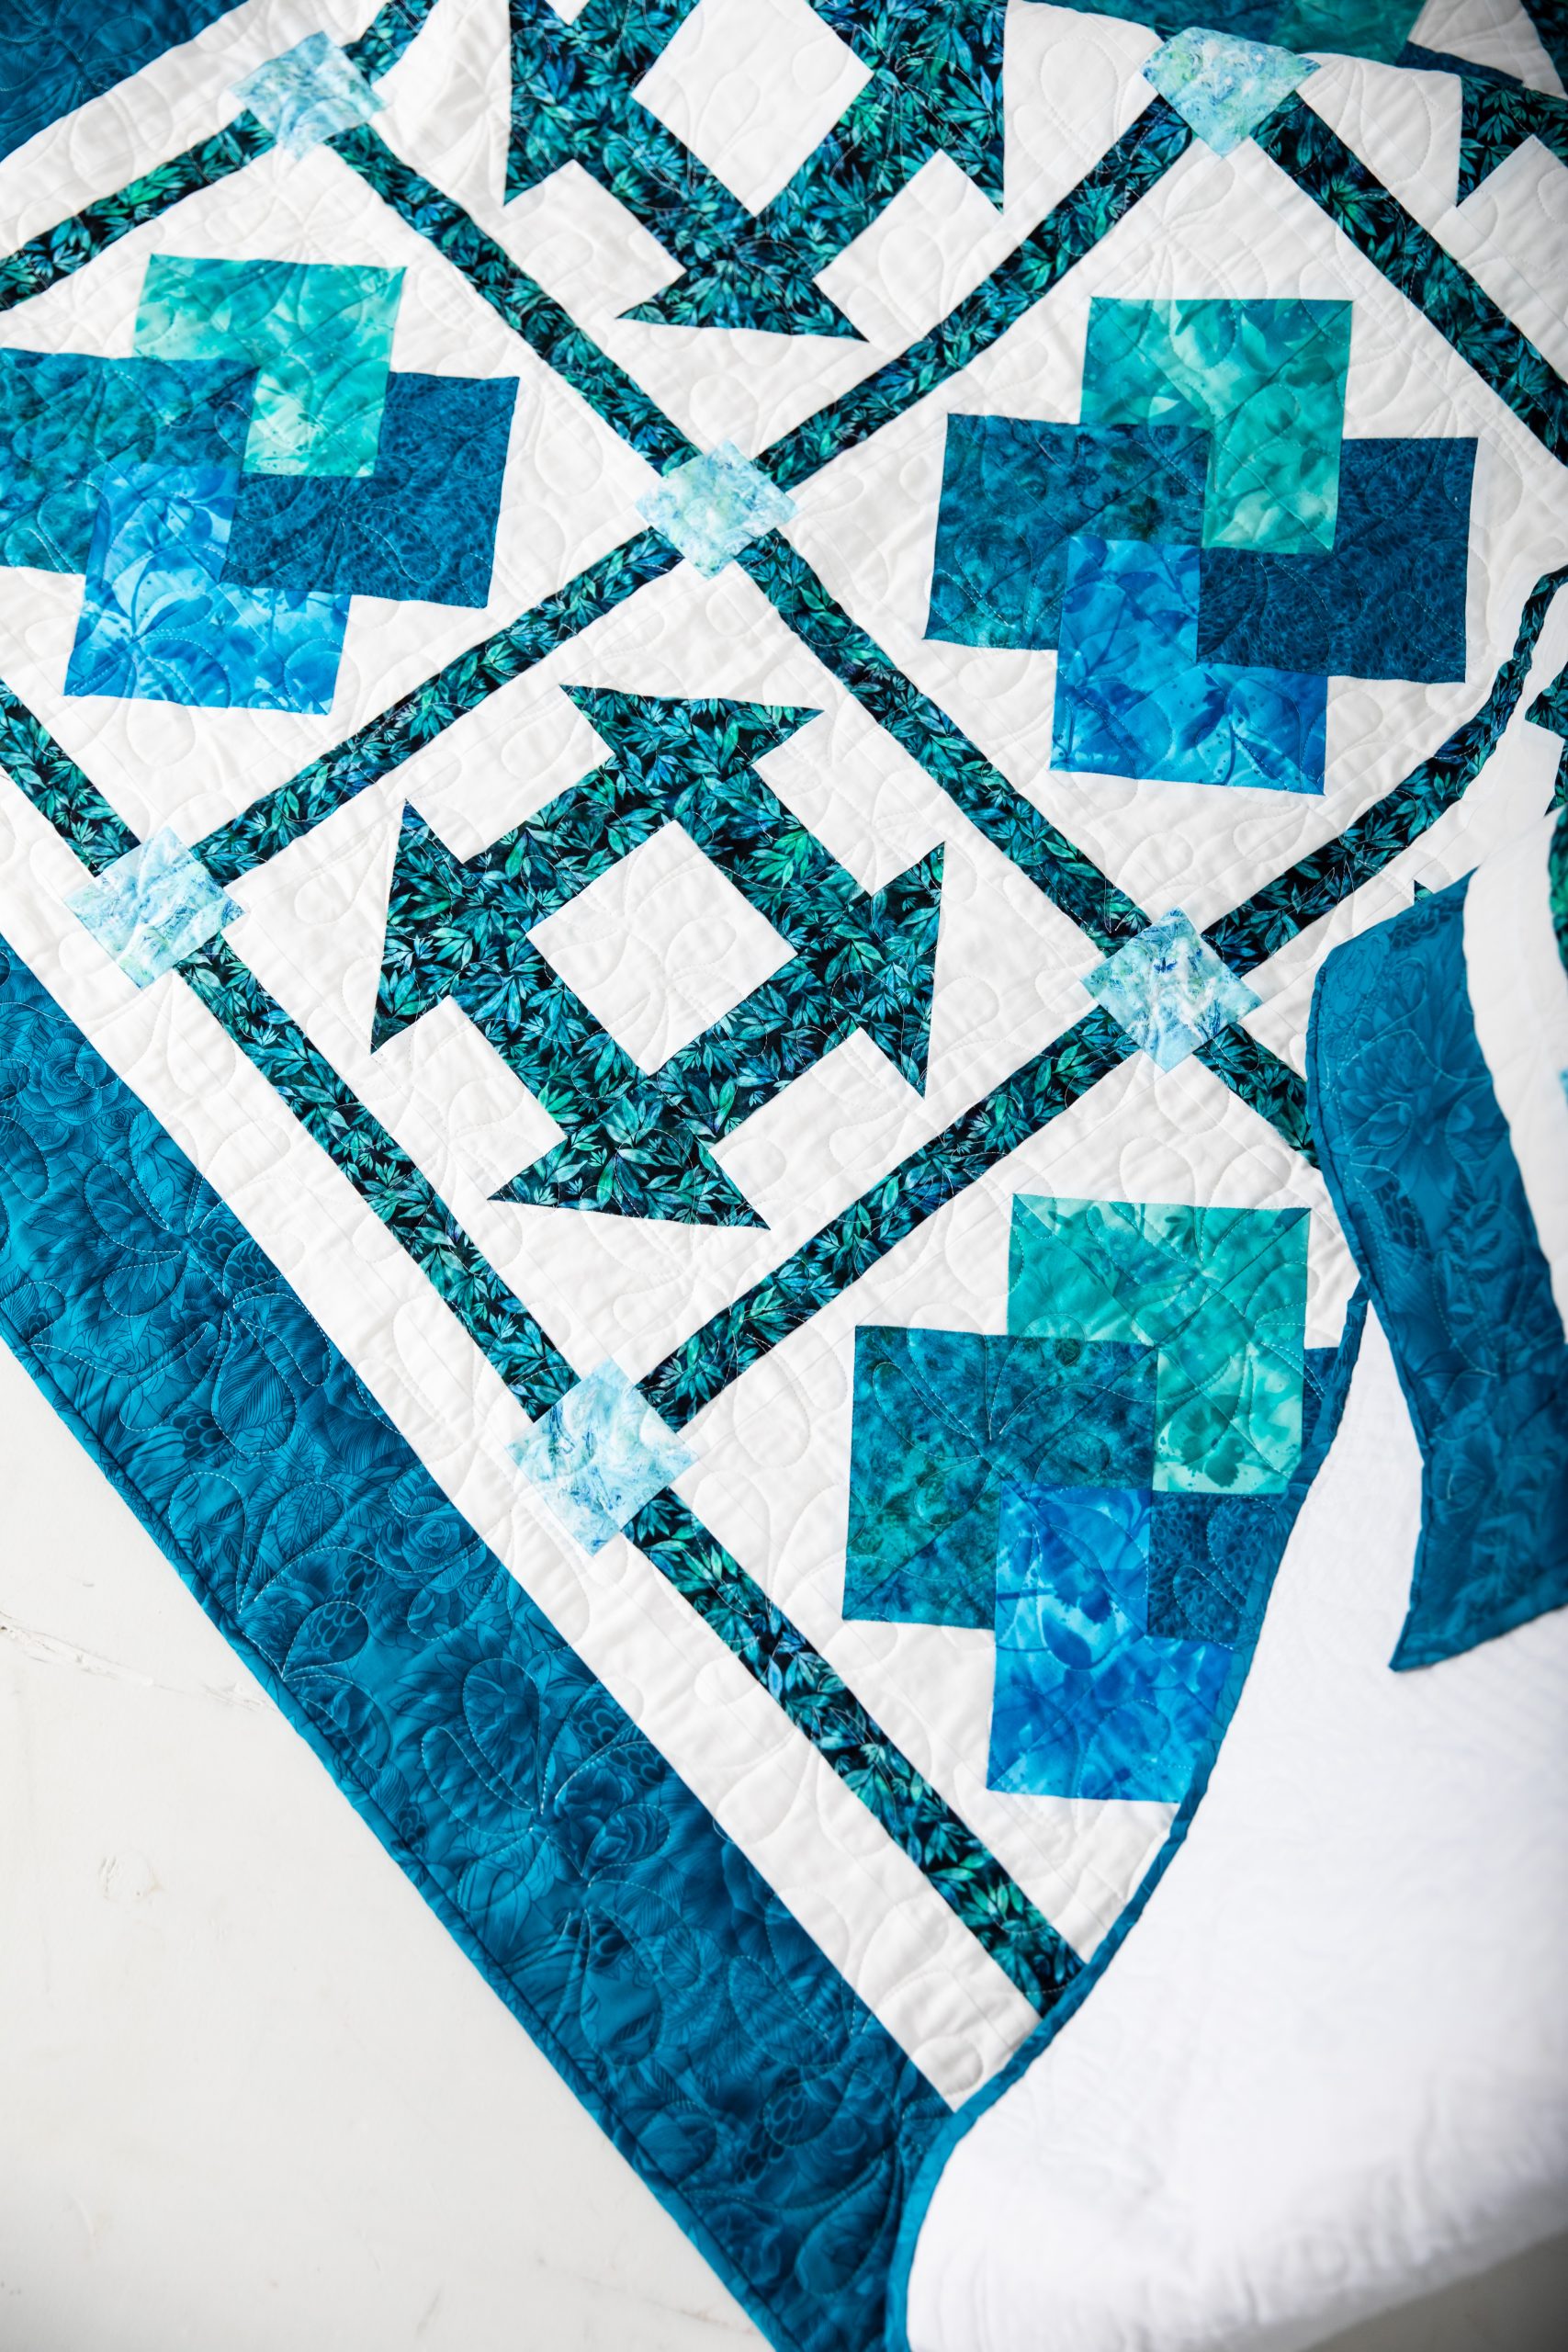
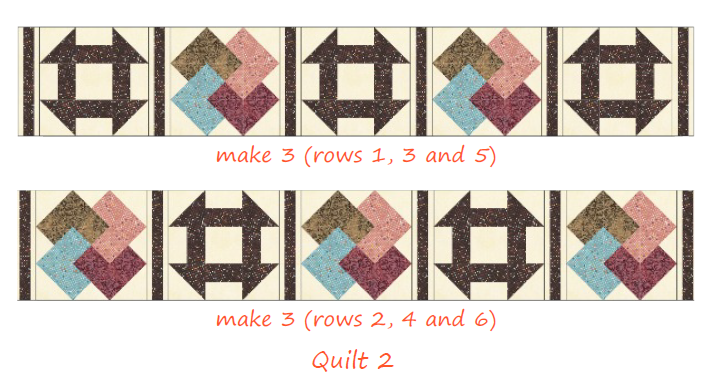
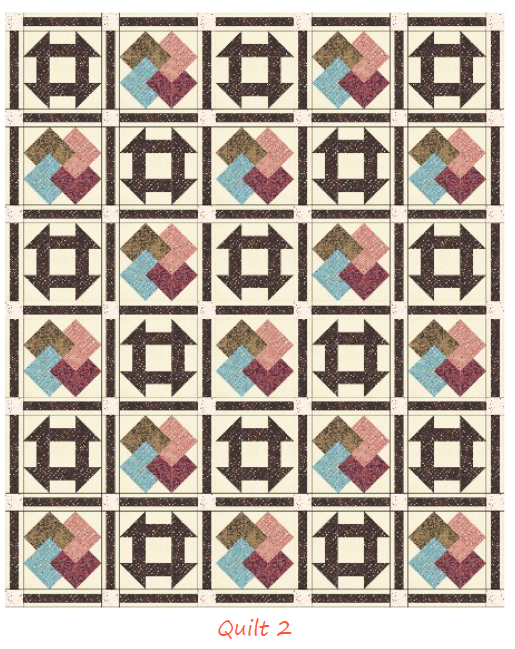
Editor’s Note: The brown and pink version of this pattern in our styled photos is Quilt 1. The blue and white version of this pattern in our styled photos is Quilt 2.
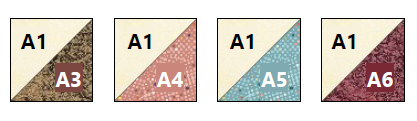
ADDITIONAL COLORWAYS:
The designer has provided fabric information for the samples shown!
The pattern is illustrated in fabrics from the Imperfectly Perfect collection by Michael Miller Fabrics.
Below are alternate colorings of the design. Fabric from QT Fabrics.
PATCH SUMMARY:
Do not cut from this summary; see Fabric Requirements and Cuts. Patch descriptions refer to sizes/shapes used to construct patches, not the finished patch sizes/shapes.

Block 1 – For Quilt 1, make 7 (For Quilt 2, make 15).
Block 2 – For Quilt 1, make 8 (For Quilt 2, make 15).
Notes:
- *each square makes 2 HSTs
- ** strip-pieced
Patch Description: Quilt 1 Patch Count
A: 5” square* – 60 A1, 28 A2, 8 each A3, A4, A5, A6
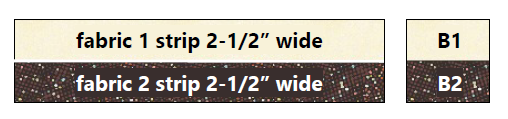
B: 2-1/2” x 4-1/2” rectangle** – 28 B1, 28 B2
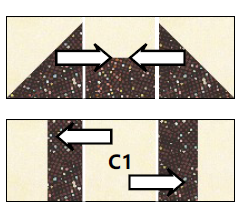
C: 4-1/2” square – 7 C1
D: HST cut from 5” square – 8 each D3, D4, D5, D6
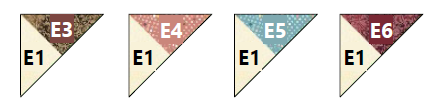
E: QST cut from 5-3/8” square – 32 E1, 16 each E3, E4, E5, E6
F (sashing strip): 1-1/4” x 12-1/2” rectangle ** – 76 F1
G (sashing strip): 1-3/4” x 12-1/2” rectangle ** – 38 G2
H (sashing post): 3-1/4” square – 24 H7
Patch Description: Quilt 2 Patch Count
A: 5” square* – 120 A1, 60 A2, 15 each A3, A4, A5, A6
B: 2-1/2” x 4-1/2” rectangle** – 60 B1, 60 B2
C: 4-1/2” square – 15 C1
D: HST cut from 5” square – 15 each D3, D4, D5, D6
E: QST cut from 5-3/8” square – 60 E1, 30 each E3, E4, E5, E6
F (sashing strip): 1-1/4” x 12-1/2” rectangle ** – 142 F1
G (sashing strip): 1-3/4” x 12-1/2” rectangle ** – 71 G2
H (sashing post): 3-1/4” square – 42 H7
Fabric estimates are based on useable fabric width (selvage to selvage) of at least 42”. Add yardage if you prewash your fabrics or are fussy-cutting.
Cuts across the fabric width are indicated as WOF (width of fabric). Some cuts are lengthwise (parallel to selvage) to enable lengthwise border cuts. This avoids distorted/wavy borders, as fabric does not stretch on the lengthwise grain.
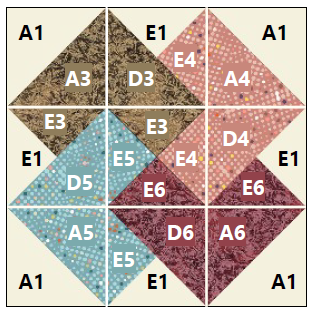
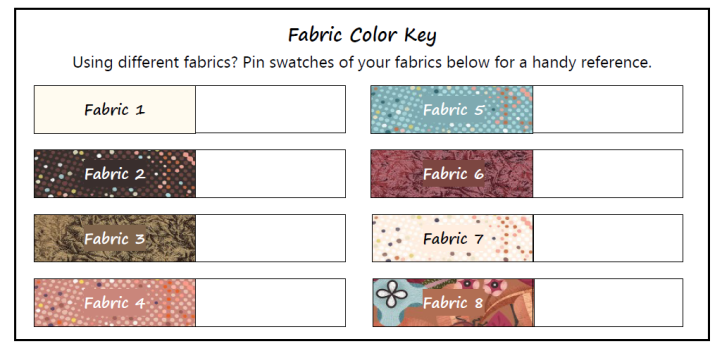
In the patch labels (see Patch Summary), the letter refers to the patch. The number refers to the fabric from which it is cut. For example, A1 is an A patch cut from Fabric 1.
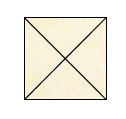
The image below illustrates the instruction to cut a square in half diagonally twice to create quarter-square triangles (QSTs).
Fabric Requirements and Cuts (Quilt 1):
This pattern includes instructions for two sizes. Yardage, cuts, etc. specific to Quilt 2 are listed below the pattern for Quilt 1.
Fabric 1: 2-5/8 yards (Quilt 1)
- B1: Cut WOF [4] 2-1/2” strips.
- F1 (sashing strip): Cut WOF [26] 1-1/4” strips.
- From remaining fabric, cut:
- E1: Cut lengthwise of fabric [1] 5-3/8” strip.
- From this, cut [8] 5-3/8” x 5-3/8” squares.
- Cut each square in half diagonally twice to make [32] QSTs.
- From this, cut [8] 5-3/8” x 5-3/8” squares.
- A1: Cut lengthwise of fabric [3] 5” strips.
- From these, cut [30] 5” x 5” squares.
- C1: Cut lengthwise of fabric [1] 4-1/2” strip.
- From this, cut [7] 4-1/2” x 4-1/2” squares.
- Inner border: Cut lengthwise of fabric [5] 2” strips if sewing straight border seams, 6 if sewing bias border seams.
- E1: Cut lengthwise of fabric [1] 5-3/8” strip.
Fabric 2: 1-3/8 yards
- A2: Cut WOF [2] 5” strips.
- From these, cut [14] 5” x 5” squares.
- B2: Cut WOF [4] 2-1/2” strips.
- G2 (sashing strip): Cut WOF [13] 1-3/4” strips.
Fabrics 3-6: 3/8 yard each
- E: From each fabric, cut WOF [1] 5-3/8” strip.
- From these, cut [4] 5-3/8” x 5-3/8” squares of each fabric. Cut each square in half diagonally twice to make 16 QSTs of each fabric.
- A and D: From each fabric, cut WOF [1] 5” strip. From each strip, cut [4] 5” x 5” A squares and [4] 5” x 5” D squares. Cut each of the D squares in half diagonally once to make [8] D HSTs of each fabric.
Fabric 7: 1/4 yard
- H7 (sashing post): Cut WOF [2] 3-1/4” strips.
- From these, cut [24] 3-1/4” x 3-1/4” squares.
Fabric 8: 1-1/4 yards
- Outer border: Cut lengthwise of fabric [7] 5” strips if sewing straight border seams or [8] 5” seams if sewing bias border seams.
Binding: 5/8yard
- Cut enough 2-1/4” or 2-1/2” (your preference) bias or straight of grain strips to join and make about 310” binding. (The same fabric is used as Fabric 2 and Binding in the illustrated quilt.)
Backing: 5-1/2 yards
- Backing 4” larger on all sides than the top is recommended for longarm quilting (68” x 97-3/4”).
- Cut fabric into two equal lengths and join to make a 83-1/2” x 99” backing. Width is more if fabric is wider than 42”.
Piecing Instructions (Quilt 1):
All seams are 1/4”. Press seams as indicated in instructions or illustrations. Or there’s the option of pressing seams open.
- Draw a diagonal line on the wrong side of the lighter of Fabric 1 or 2 A 5” square.
- Layer right sides together on the remaining square. Sew 1/4” from each side of the drawn line. Press seam toward A2. Sew 14. Cut on the drawn line to make 28 A1/A2 HST squares. Trim to 4-1/2” square.

- Layer right sides together on the remaining square. Sew 1/4” from each side of the drawn line. Press seam toward A2. Sew 14. Cut on the drawn line to make 28 A1/A2 HST squares. Trim to 4-1/2” square.
- Join fabric strips as shown. Sew 4 strip sets. Press seam toward darker fabric. Cut across strip sets at 4-1/2” intervals. Cut 28.
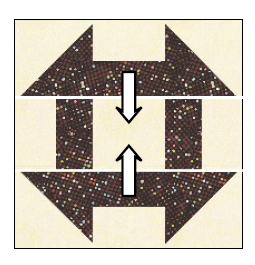
- Sew the A1/A2 HST squares made in Step 1 to sides of B1/B2 rectangles made in Step 2 as shown to make [14] 12-1/2” x 4-1/2” rectangles.
- Sew remaining 14 B1/B2 rectangles made in Step 2 to sides of C1 as shown to make [7] 12-1/2” x 4-1/2” rectangles.
- Join these units as shown to complete [7] 12-1/2” x 12-1/2” Block 1 blocks.
- Sew remaining 14 B1/B2 rectangles made in Step 2 to sides of C1 as shown to make [7] 12-1/2” x 4-1/2” rectangles.
- In the same way you made the A1/A2 HST squares in Step 1, make the HST squares as shown. Press seam toward A1. Sew [8] 4-1/2” squares of each combination.
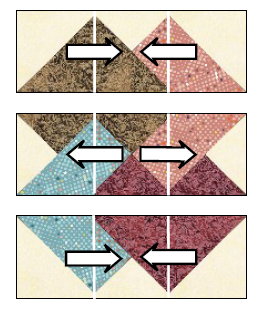
- Join the E QSTs as shown. Press seam away from E1. Make 8 of each combination.
- Sew the D HSTs to these units as shown. Press seam toward D. Make 8 of each combination. Trim these split-triangle squares to 4-1/2” square.

- For each square: Aligning the 45-degree line on your ruler with one of the square’s seams, measure from the center of the square to each of the square’s edges. Trim so that the square measures 2-1/4” from the center on all four sides. The resulting unit should measure 4-1/2” square.

- Sew the D HSTs to these units as shown. Press seam toward D. Make 8 of each combination. Trim these split-triangle squares to 4-1/2” square.
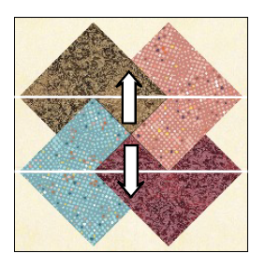
- Join remaining E3 and E5 QSTs, then remaining E4 and E6 QSTs as shown. Press seam as shown. Join these units as shown. Press seam to either side or open. Make 8. Trim these quarter-square triangles as you did the split-triangle squares in Step 5 to 4-1/2” square.

- Paying attention to their placement and orientation, combine the units made in Steps 4, 5 and 6 as shown.
- Join these rows as shown to complete [8] 12-1/2” x 12-1/2” Block 2 blocks.
- Join these rows as shown to complete [8] 12-1/2” x 12-1/2” Block 2 blocks.
- Join the 1-1/4” Fabric 1 and 1-3/4” Fabric 2 strips as shown. Sew 13 strip sets. Measure the blocks. Cut across strip sets to that measure (12-1/2”). Cut 38.

- Join the sashing strips made in Step 8 and H7 (sashing posts) as shown to make sashing rows. Sew 6. Press seams toward sashing posts.

- Join remaining sashing strips made in Step 9 and blocks made in Steps 3 and 7 as shown to make block rows. Press seams toward sashing.
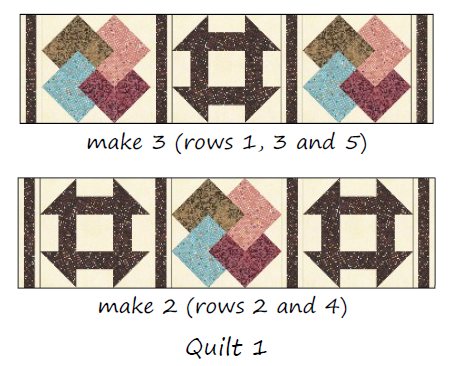
- Join sashing rows made in Step 9 and block rows made in Step 10 to complete quilt center. Press seams toward sashing rows.
- Measure length of quilt. Cut 2 inner border strips to this length. Sew to sides of quilt.
- Measure width of quilt. Cut 2 inner border strips to this length. Sew to top and bottom of quilt.
- Add outer border in the same way.
- Layer top, batting and backing. Quilt as desired. Bind with binding.
Fabric Requirements and Cuts (Quilt 2):
Fabric 1: 4-5/8 yards (Quilt 2)
- E1: Cut WOF [3] 5-3/8” strips. From these, cut [15] 5-3/8” x 5-3/8” squares. Cut each square in half diagonally twice to make [60] QSTs.
- A1: Cut WOF [2] 5” strips. From these, cut [16] 5” x 5” squares. (Remaining A1 cuts are made LOF below.)
- C1: Cut WOF [2] 4-1/2” strips.
- From these, cut [15] 4-1/2” x 4-1/2” squares.
- B1: Cut WOF [7] 2-1/2” strips.
- Cut remaining fabric into two equal lengths, each about 56” long. From these, cut:
- A1: Cut lengthwise of fabric [4] 5” strips.
- From these, cut [44] 5” x 5” squares.
- Inner border: Cut lengthwise of fabric [7] 2” strips.
- F1 sashing strip: Cut lengthwise of fabric [36] 1-1/4” strips.
- A1: Cut lengthwise of fabric [4] 5” strips.
Fabric 2: 2-1/2 yards
- A2: Cut WOF 4 5” strips.
- From these, cut 30 5” x 5” squares.
- B2: Cut WOF 7 2-1/2” strips.
- G2 (sashing strip): Cut WOF 18 1-3/4” strips.
Fabrics 3-6: 5/8 yard each
- E: From each fabric, cut WOF 2 5-3/8” strips.
- From these, cut 8 5-3/8” x 5-3/8” squares of each fabric. Cut each square in half diagonally twice to make 32 QSTs of each fabric. (Two QSTs will not be used.)
- A and D: From each fabric, cut WOF [1] 5” strip. From each strip, cut 8 5” x 5” A squares and 8 5” x 5” D squares. Cut each of the D squares in half diagonally once to make 16 D HSTs of each fabric. (One HST will not be used.)
Fabric 7: 1/2 yard
- H7 (sashing post): Cut WOF 4 3-1/4” strips.
- From these, cut 42 3-1/4” x 3-1/4” squares.
Fabric 8: 1-1/2 yards
- Outer border: Cut lengthwise of fabric [7] 5” strips if sewing straight border seams or [8] 5” seams if sewing bias border seams.
Binding: 3/4 yard
- Cut enough 2-1/4” or 2-1/2” (your preference) bias or straight of grain strips to join and make about 395″ binding. (The same fabric is used as Fabric 2 and Binding in the illustrated quilt.)
Backing: 8-1/8 yards
- Backing 4” larger on all sides than the top is recommended for longarm quilting (97” x 111-3/4”).
- Cut fabric into three equal lengths and join to make a 97-1/2” x 125” backing. Length is more if fabric is wider than 42”.
Piecing Instructions (Quilt 2):
All seams are 1/4”. Press seams as indicated in instructions or illustrations. Or there’s the option of pressing seams open.
- Draw a diagonal line on the wrong side of the lighter of Fabric 1 or 2 A 5” square.
- Layer right sides together on the remaining square. Sew 1/4” from each side of the drawn line. Press seam toward A2. Sew 30. Cut on the drawn line to make 60 A1/A2 HST squares. Trim to 4-1/2” square.
- Layer right sides together on the remaining square. Sew 1/4” from each side of the drawn line. Press seam toward A2. Sew 30. Cut on the drawn line to make 60 A1/A2 HST squares. Trim to 4-1/2” square.
- Join fabric strips as shown. Sew 7 strip sets. Press seam toward darker fabric. Cut across strip sets at 4-1/2” intervals. Cut 60.
- Sew the A1/A2 HST squares made in Step 1 to sides of B1/B2 rectangles made in Step 2 as shown to make [30] 12-1/2” x 4-1/2” rectangles.
- Sew remaining 30 B1/B2 rectangles made in Step 2 to sides of C1 as shown to make [15]12-1/2” x 4-1/2” rectangles.
- Join these units as shown to complete [15] 12-1/2” x 12-1/2” Block 1 blocks.
- Sew remaining 30 B1/B2 rectangles made in Step 2 to sides of C1 as shown to make [15]12-1/2” x 4-1/2” rectangles.
- In the same way you made the A1/A2 HST squares in Step 1, make the HST squares as shown. Press seam toward A1. Sew [15] 4-1/2” squares of each combination.
- Join the E QSTs as shown. Press seam away from E1. Make 15 of each combination.
- Sew the D HSTs to these units as shown. Press seam toward D. Make 15 of each combination. Trim these split-triangle squares to 4-1/2” square.
- For each square: Aligning the 45-degree line on your ruler with one of the square’s seams, measure from the center of the square to each of the square’s edges. Trim so that the square measures 2-1/4” from the center on all four sides. The resulting unit should measure 4-1/2” square.
- Sew the D HSTs to these units as shown. Press seam toward D. Make 15 of each combination. Trim these split-triangle squares to 4-1/2” square.
- Join remaining E3 and E5 QSTs, then remaining E4 and E6 QSTs as shown. Press seam as shown. Join these units as shown. Press seam to either side or open. Make 15. Trim these quarter-square triangles as you did the split-triangle squares in Step 5 to 4-1/2” square.
- Paying attention to their placement and orientation, combine the units made in Steps 4, 5 and 6 as shown.
- Join these rows as shown to complete [15] 12-1/2” x 12-1/2” Block 2 blocks.
- Join these rows as shown to complete [15] 12-1/2” x 12-1/2” Block 2 blocks.
- Join the 1-1/4” Fabric 1 and 1-3/4” Fabric 2 strips as shown. Sew 18 strip sets. Measure the blocks. Cut across strip sets to that measure (12-1/2”). Cut 71.
- Join the sashing strips made in Step 8 and H7 (sashing posts) as shown to make sashing rows. Sew 7. Press seams toward sashing posts.

- Join remaining sashing strips made in Step 9 and blocks made in Steps 3 and 7 as shown to make block rows. Press seams toward sashing.
- Join sashing rows made in Step 9 and block rows made in Step 10 to complete quilt center. Press seams toward sashing rows.
- Measure length of quilt. Cut 2 inner border strips to this length. Sew to sides of quilt. Measure width of quilt. Cut 2 inner border strips to this length. Sew to top and bottom of quilt. Add outer border in the same way.
- Layer top, batting and backing. Quilt as desired. Bind with binding.
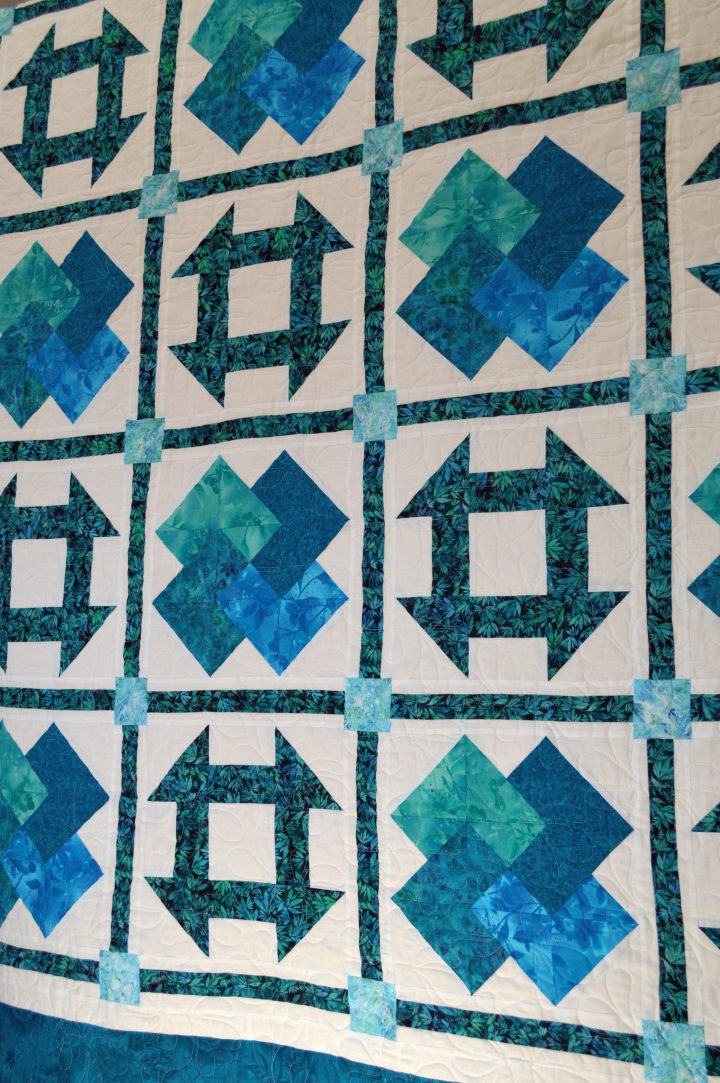
Details of the Quilt 2 pattern (Carol Sebald).
This pattern was tested by Carol Sebald, Sheila Ciechoski, and Jan Graham. Thank you!