Stock photos provided by Canva.
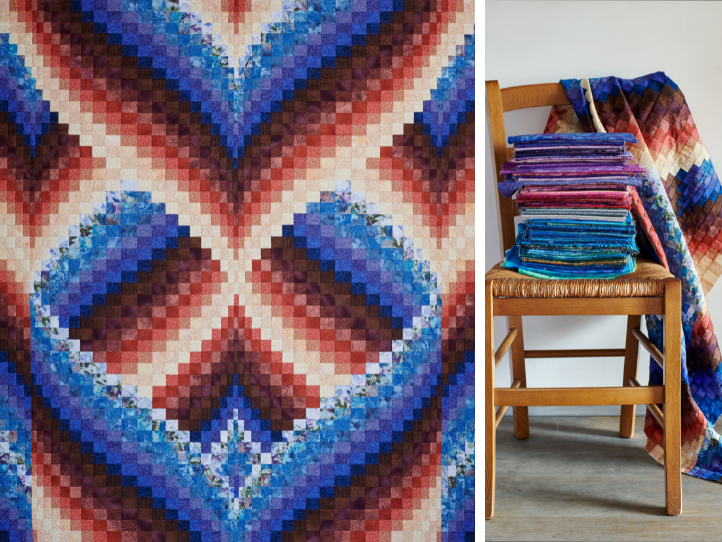
A Bargello quilt is a type of quilt that features an intricate design created by sewing strips of fabric together in a way that forms flowing, wave-like patterns. The term “Bargello” comes from a type of needlepoint embroidery originating in Florence, Italy, which is characterized by geometric, flame-like patterns. Quilters have adapted this concept to fabric to create stunning visual effects in quilts, pillows, wall hangings and even wearable art. While Bargello may look intimidating and intricate, it truly is easy when you take your time and do not rush through the steps. The results are simply wonderful each and every time…you will be hooked!
Characteristics of a Bargello Quilt
Strip Piecing Technique: Fabric strips are cut, sewn together, and then re-cut into smaller sections to form the basis of the design. The strips are then rearranged to create characteristic movement and wave-like patterns.
Use of Color Gradients: Bargello quilts often use a range of colors, from light to dark, to create depth and visual interest. It is the careful placement of colors that enhances the illusion of motion and fluidity.
Wave and Flame Patterns: The design usually consists of repeating wave or flame shapes that flow across the quilt. Some also include zigzags, arches, or diamond shapes in the patterns.
Complex but Simple Construction: Despite its intricate appearance, the construction of a Bargello quilt is simply based on a process of cutting and piecing fabric strips.
Types of Bargello Quilt Designs
- Traditional Bargello: Features symmetrical, flowing wave patterns.
- Curved Bargello: Uses intricate curves to create added complexity.
- Modern Bargello: Includes asymmetry, bold color choices, or non-traditional layouts.
Why Make a Bargello Quilt
- Visual Impact: The striking patterns and vibrant colors make Bargello quilts a standout piece.
- Satisfying: While they require precision, the entire process can be deeply rewarding.
- Versatility: Once learned, the technique can be used for so many projects, from wall hangings and table runners to pillows and full-size quilts, each with their own unique style.
- Simply Said, They’re Beautiful: A Bargello quilt is both a beautiful piece of art and a showcase of the quilter’s skill in color placement and precision piecing.
Fabric Selection
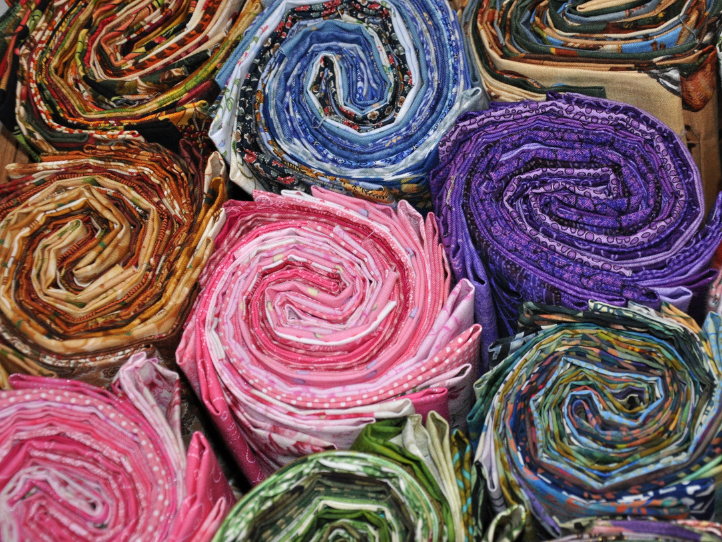
Photo provided by Canva
Prewash Fabrics: I know some will say prewashing your fabrics is not necessary, but this is something I have always done. Prewashing can prevent bleeding and shrinking later, especially when using bold bright colors; it is well worth the time to do this in the beginning.
Choose a Range of Colors: For the best results, start with 5-10 different fabrics that range from light to dark. This gradient helps to create the wave effect.
Contrast and Color Value: Pay attention to the contrast and value (lightness and darkness) of your color choices. High contrast creates bold patterns, while low contrast will create a more subtle and soft design.
Complementary Colors: Experiment with complementary colors (colors that are opposite each other on the color wheel) for a vibrant, eye-catching design.
Batiks: Batik fabrics are often used in Bargello quilting because of their subtle color variations, which can add depth and interest to your quilt.
Monochromatic Colors: Try experimenting with a monochromatic color scheme, using different shades of the same color for a unique, upscale look.
Hand-Dyed Fabrics: Hand-dyed fabrics often have unique color variations that can add depth and interest to your Bargello design.
Ombre Fabrics: Think about using ombre fabric (fabric that gradually changes color across its width). This can create a striking effect without the need to cut and sew as many individual strips together.
Transparency Illusion: Use fabrics with varying levels of opacity to create an illusion of transparency, where some layers appear to be “see-through” over others.
Cutting Strips
Tools: It is best to use a rotary cutter, ruler and a mat to ensure your strips are all straight and even. Use a large cutting mat to accommodate long strips.
Consistency: Cut strips to uniform widths as specified in your pattern. Double-check your measurements before cutting and sewing to avoid mistakes that could disrupt the pattern.
Label Your Strips: It is a good idea to label or number your fabric strips as you cut them to keep track of their order.
Stacking: To prevent tangling, stack your strips neatly.
Starch Your Fabrics: Before cutting, starch your fabrics to keep them crisp and prevent stretching, especially with narrower strips.
Cutting Segments: Cut varying widths for the wave effect.
Sewing Strips Together
Chain Piecing: This technique speeds up the sewing process and keeps your strips organized.
Consistent Seam Allowance: Use a 1/4” seam allowance to maintain the design’s integrity.
Pressing Seams: Press seams to one side, preferably the dark side, rather than open. This helps with accuracy when matching points. Alternate seam directions in adjacent strips to reduce bulk.
Creating the Bargello Pattern
- Design Wall: Use a design wall, or large flat surface, to lay out your strips out. This allows you to step back and see the overall flow of the pattern, making it easier to spot any adjustments that may be needed.
- Audition Your Layout: Before committing to sewing, “audition” different layouts by pinning them to the design wall, or laying them out on a large flat surface, and rearranging as needed to see what you like best.
- Vary Segment Widths: To create more dynamic movement, vary the width of the segments you cut. This can add complexity and a unique twist to the traditional Bargello look.
- Wave Effects: For a more fluid look, vary the heights of your strip segments to create a wave effect rather than a stepped one.
- Symmetry vs. Asymmetry: Both symmetrical (mirror image) or asymmetrical can be beautiful but give very different effects. Try both and decide what you like the best.
- Offset Rows: Instead of lining up your rows exactly, try offsetting them slightly to create a staggered, cascading effect.
- Vertical vs. Horizontal: Rotate your Bargello quilt to see if it looks better oriented vertically or horizontally. Sometimes a simple change in orientation can dramatically change the quilt’s impact.
Assembling the Quilt Top:
- Align Points: When sewing the segments together, carefully align the points where the strips meet to maintain the flowing design.
- Pin Strategically: When matching seams, place pins at critical points where the fabrics meet to ensure accuracy. Pinning every inch or so can help prevent shifting while sewing.
- Use a Walking Foot: A walking foot can help feed the fabric evenly through the machine, reducing the chances of misalignment, especially with thicker seams.
- Bias Edges: Handle any bias edges with care to avoid stretching. You can stabilize edges with starch or staystitching, if needed.
Quilting Techniques:
- Simple: Simple straight-line quilting works great to enhance the wave effect without distracting from the design.
- Matchstick Quilting: For a modern look, try matchstick quilting (which is closely spaced straight lines) as this can complement the linear nature of Bargello patterns.
- Directional Quilting: Consider the direction of your quilting lines. Quilting parallel to the Bargello lines can enhance the flow, while perpendicular lines can add interesting contrast.
- Quilt-As-You-Go: To make working on a large project easier, consider the quilt-as-you-go method, where you quilt each section separately and then join them together.
- Echo Quilting: Echo quilt around the waves or curves to enhance the 3D effect of the Bargello pattern.
Binding Choices:
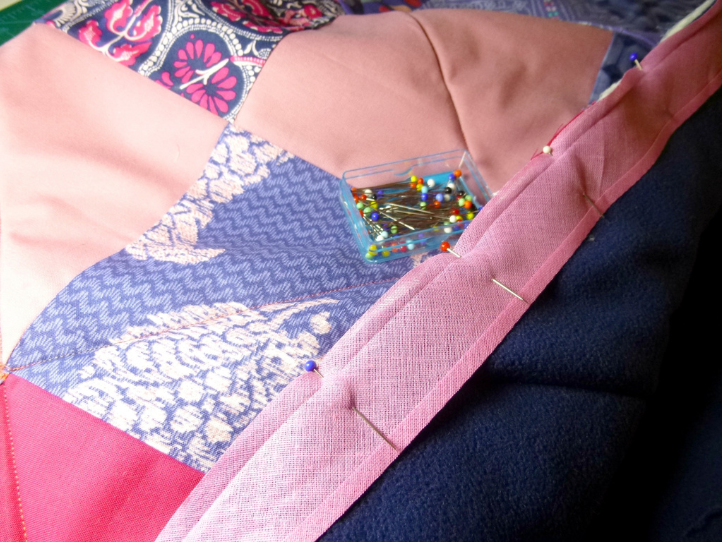
Photo provided by Canva.
- Bias Binding: Use bias binding if your Bargello quilt has curved edges. This type of binding stretches and conforms to curves better than straight-grain binding.
- Framing: Choose a binding that either blends with the outermost fabric or provides a sharp contrast to frame the design effectively.
- Piped Binding: Add a piped binding for a professional finish. This adds a thin, contrasting line around the edge of your quilt, enhancing its visual appeal.
- Facing Instead of Binding: For a more modern finish, consider facing your quilt instead of traditional binding, which gives a clean finished edge without a visible frame.
Troubleshooting Tips:
- Fixing Mistakes: Seam rippers are your friend; if needed, carefully undo the seam and resew, ensuring everything lines up correctly.
- Color Bleeding: If you do not prewash your fabrics, use color catchers during the first wash to hopefully prevent bleeding.
- Adjustments: If segments do not align properly, check the seam allowances for accuracy and resew if needed.
Don’t rush! By breaking the process into simple steps, you can focus on mastering each aspect of Bargello quilting, from beginning to end. Take breaks as needed so that you can enjoy the process and not feel rushed. You will be happy with the results if you take your time.