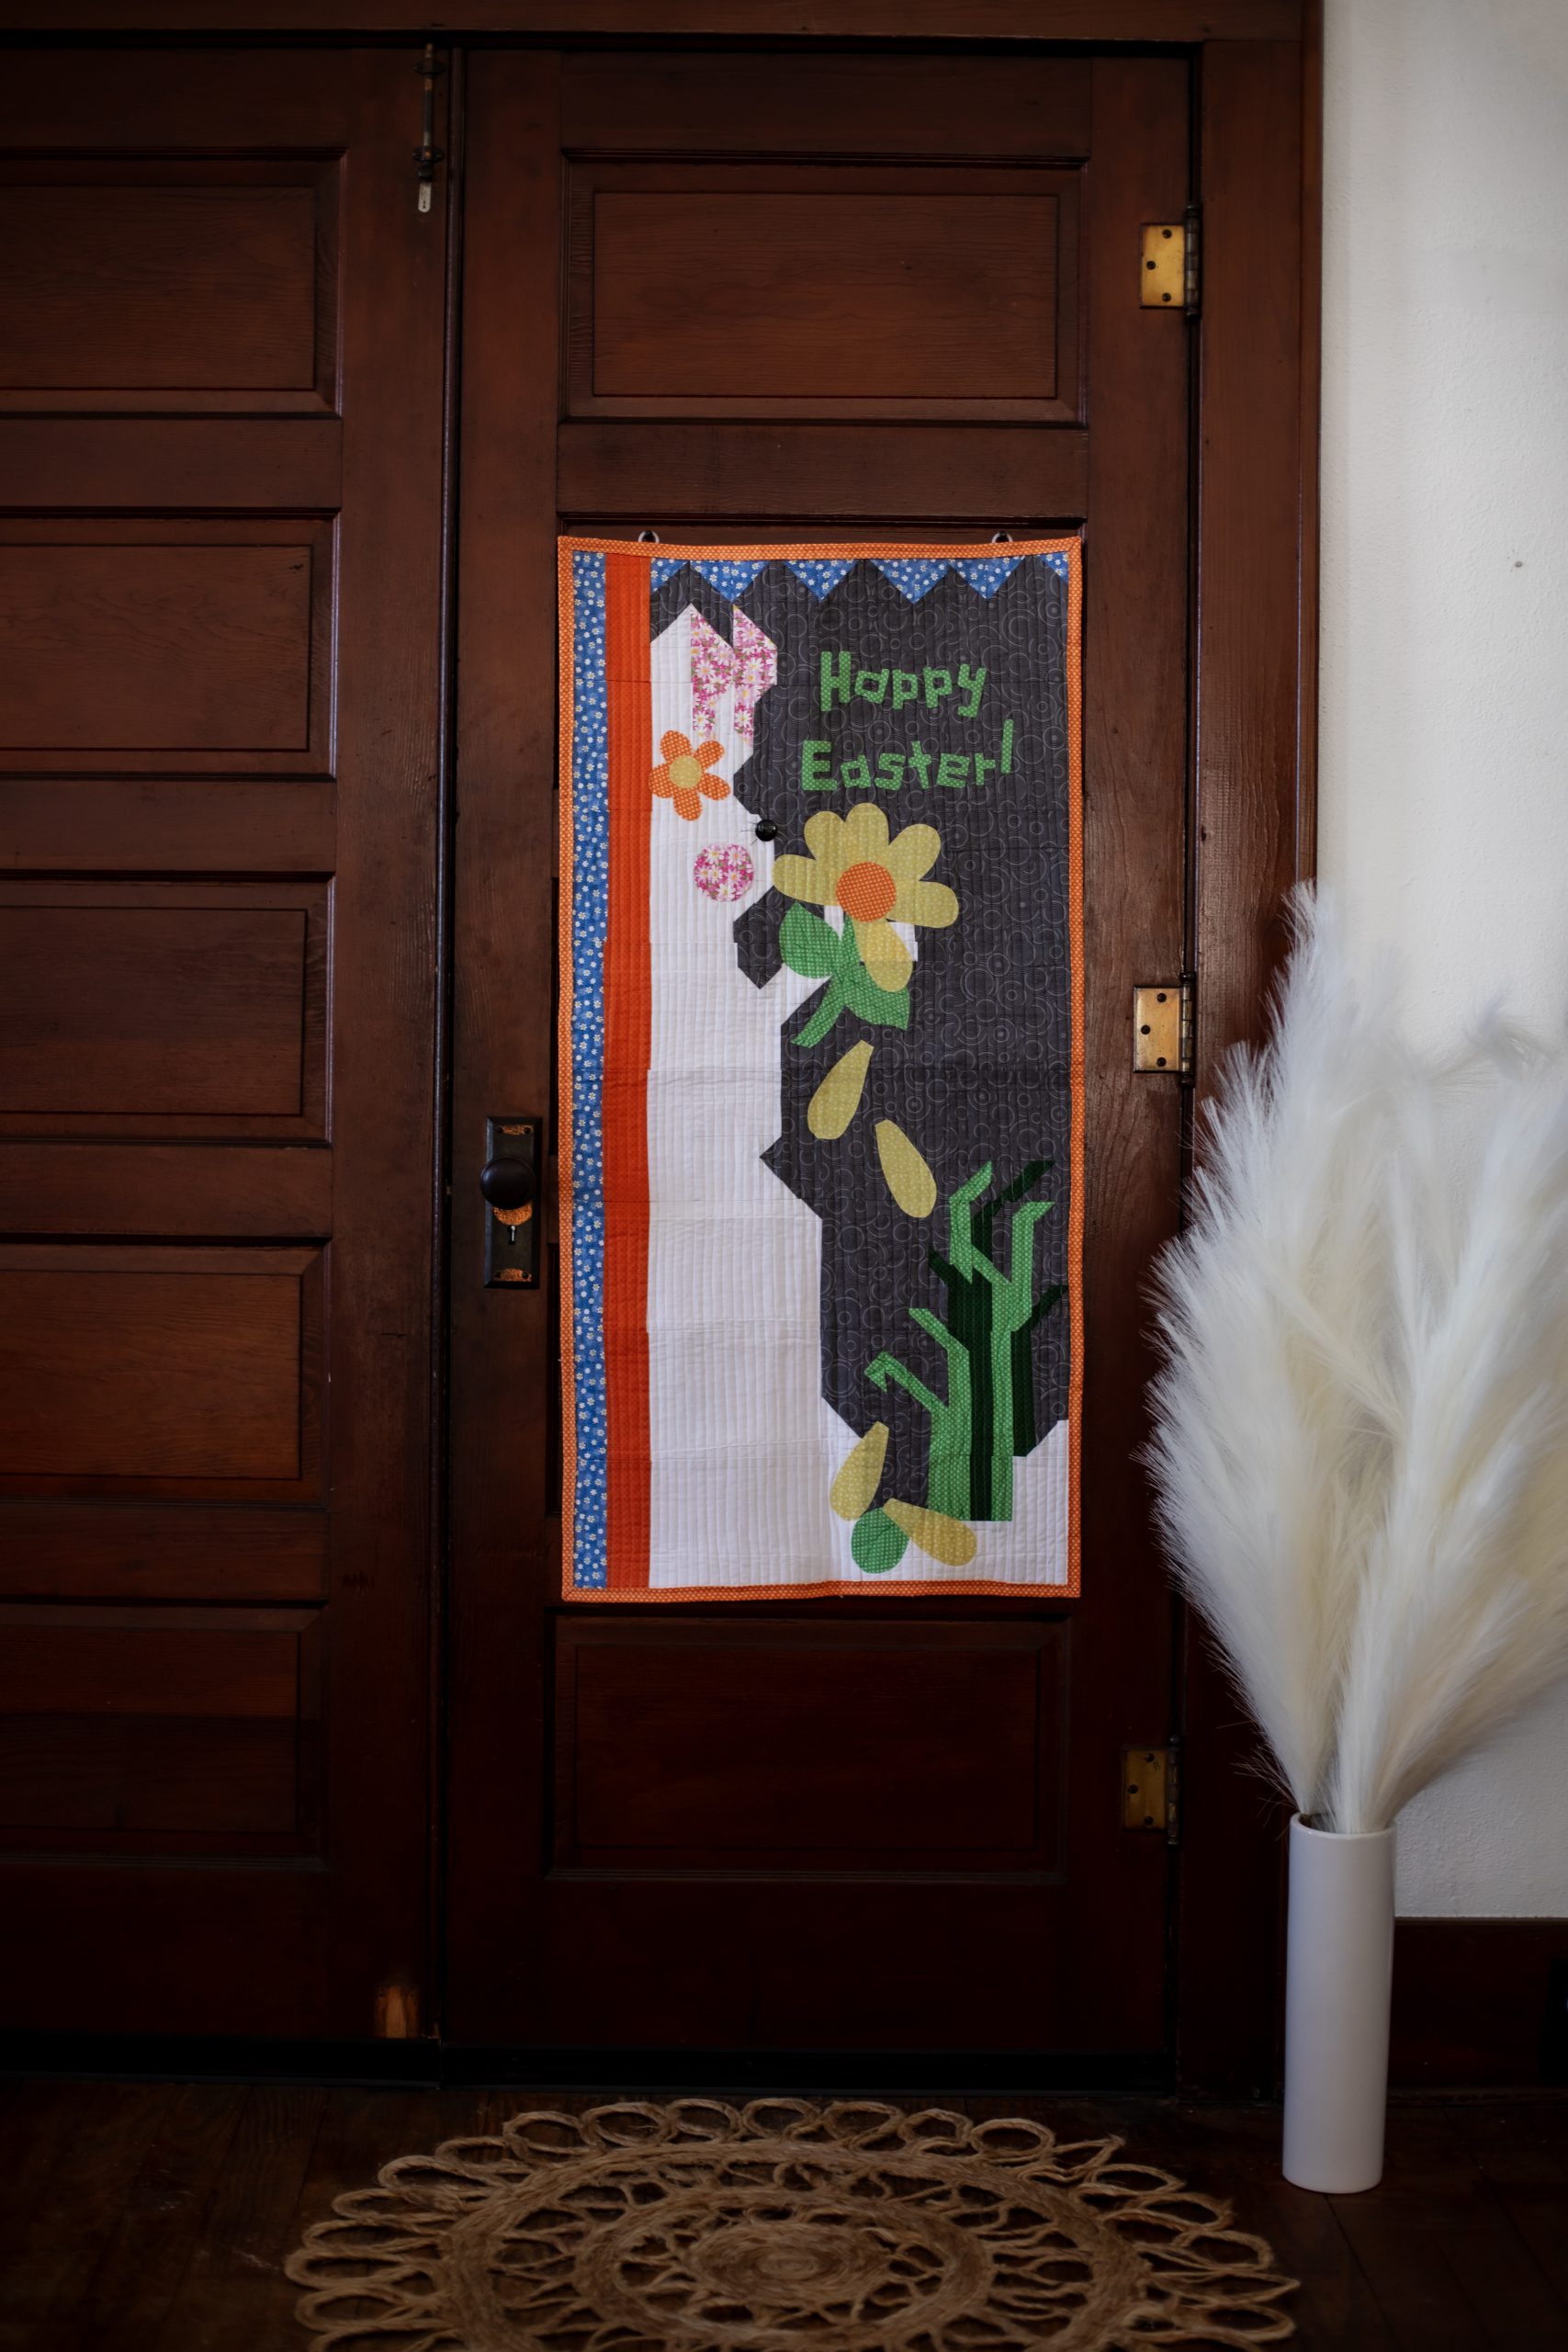
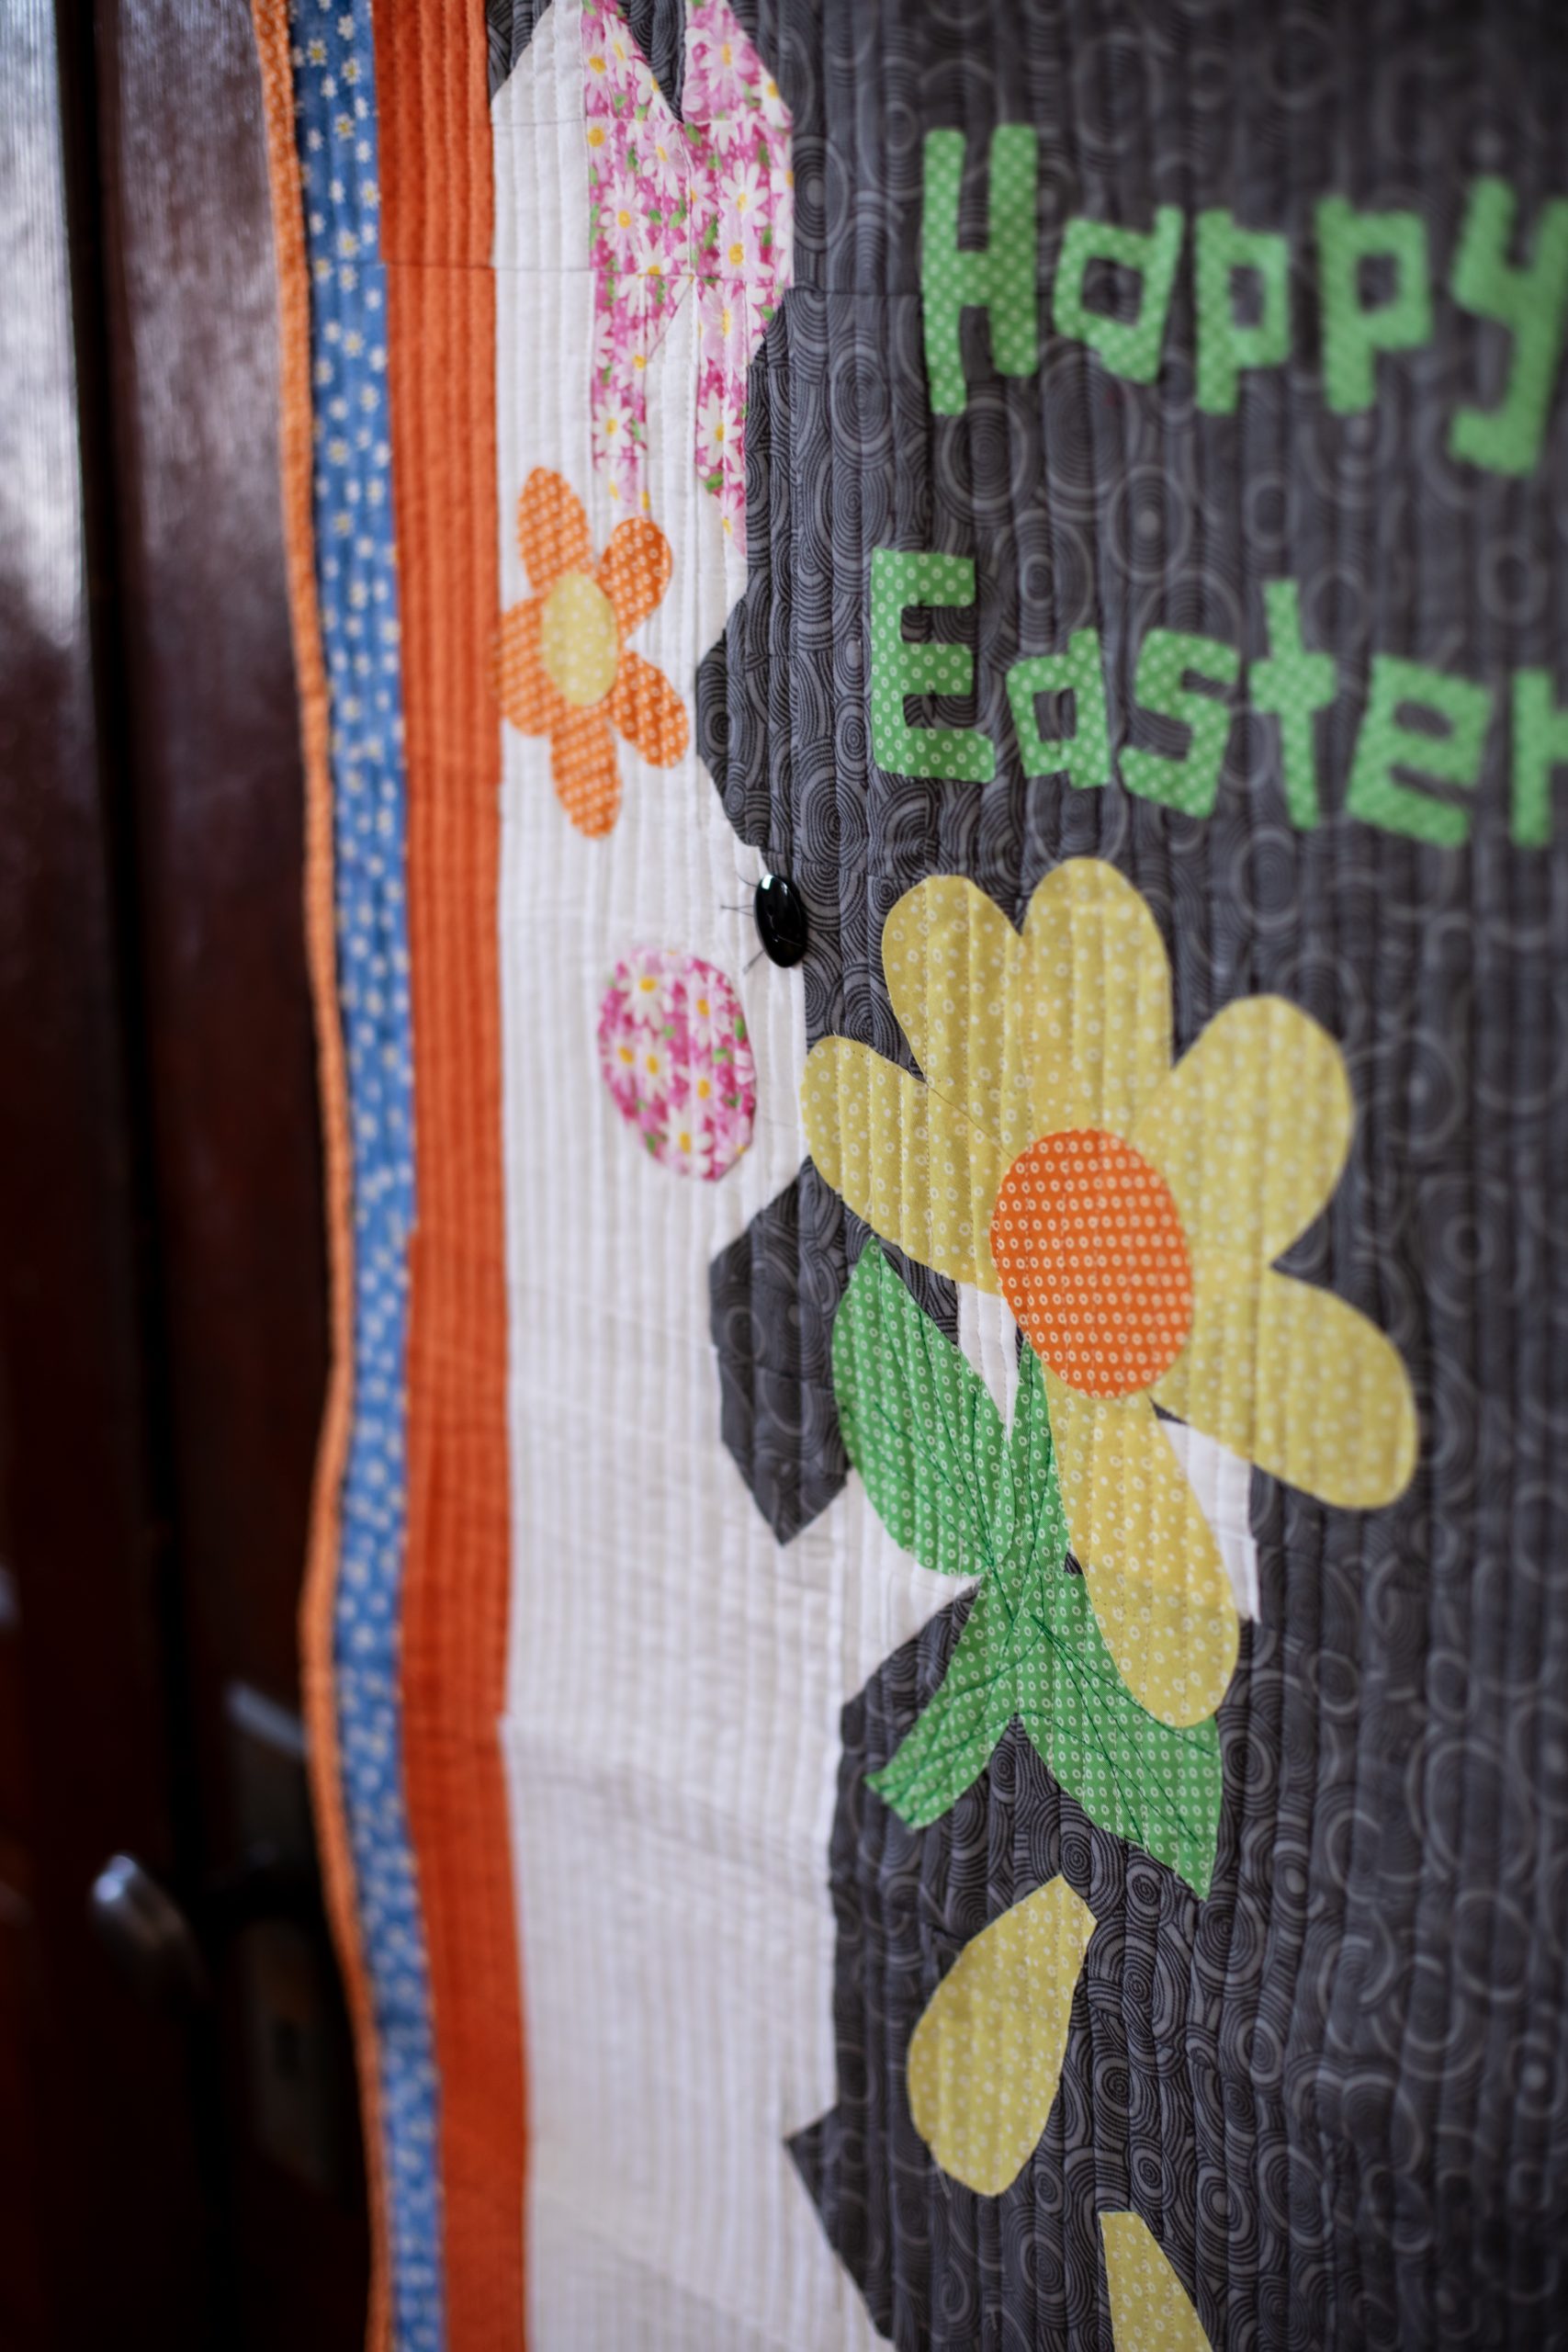
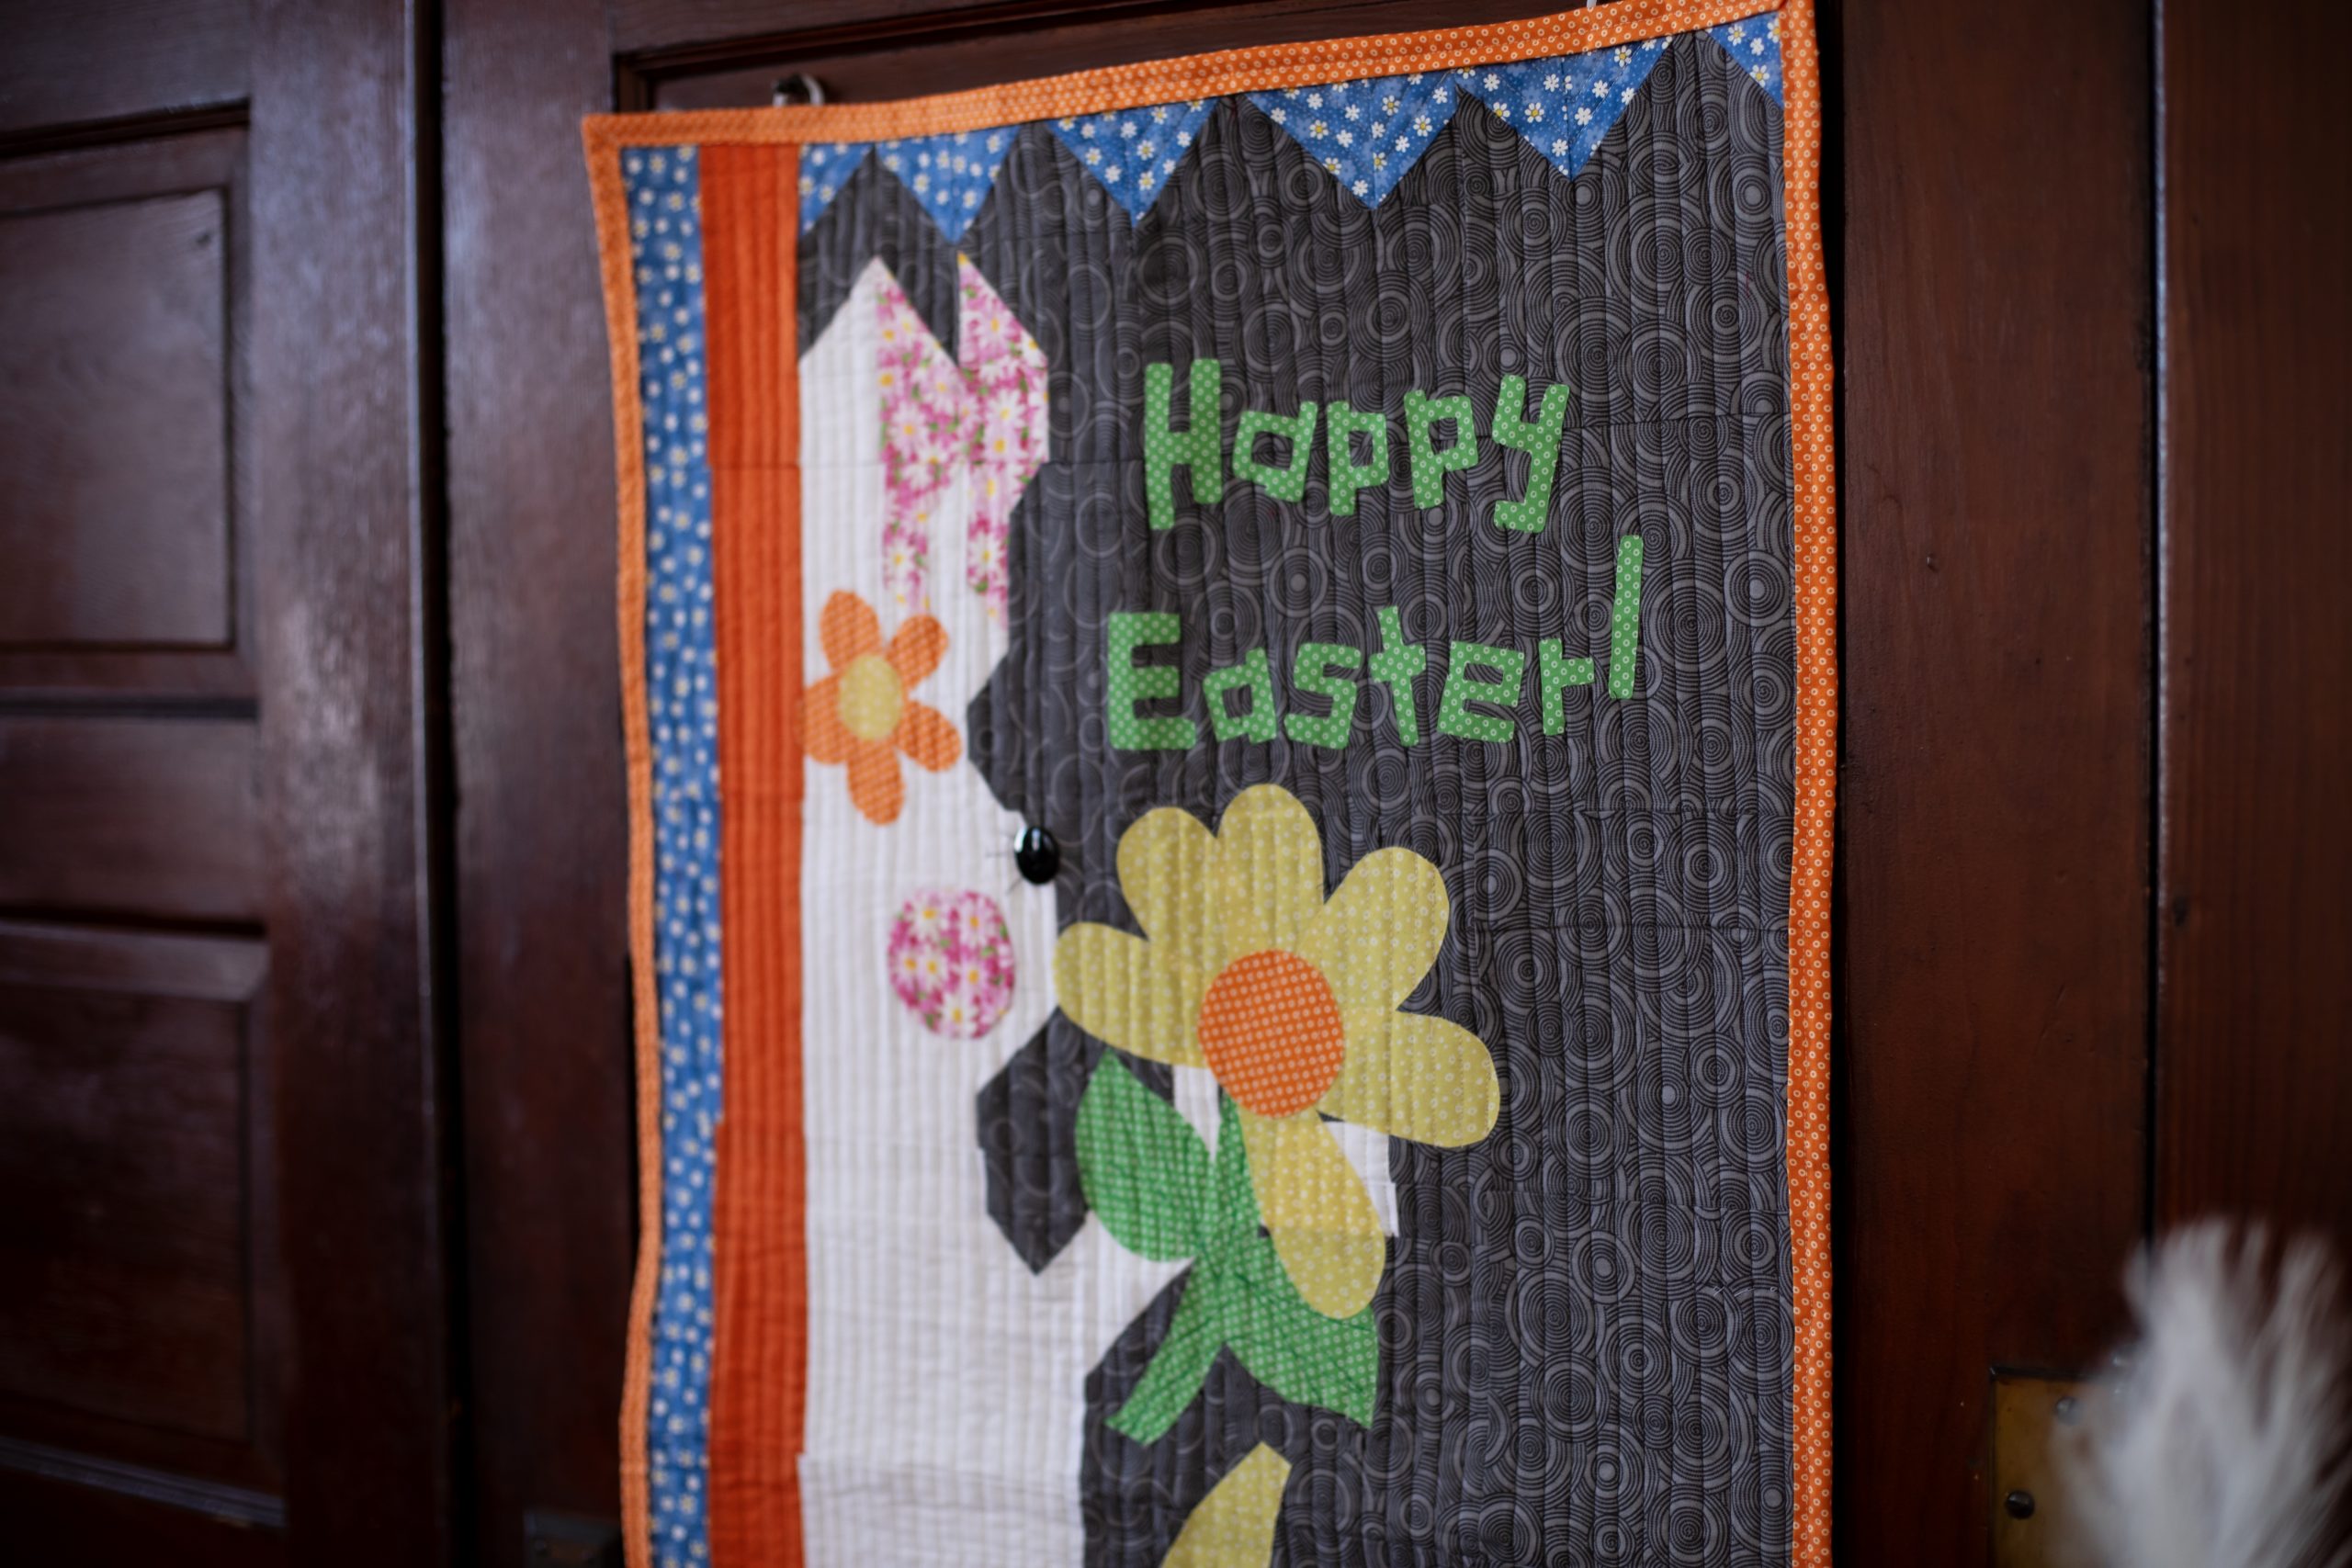
Welcome guests into your home this spring with a delightful Easter door banner. Featuring spring flowers, an Easter message and giant white bunny, this quilted Easter pattern from Debi Schmitz bursts with color and excitement. This door quilt pattern is completed with a black button for your bunny’s eye, giving this festive spring pattern a cute textural element.
Designer Notes:
- HST = Half Square Triangle
- ” = inches
- HB = Heat n Bond on back
Materials:
- Blue print fabric: 1/3 yard
- Orange solid fabric: 1/4 yard (binding not included in yardage)
- Light green print fabric: 1/3 yard
- Dark green print fabric: 1/4 yard
- Gray print fabric: 1 yard
- White print fabric: 1/3 yard
- Pink print fabric: 1/4 yard
- Yellow print fabric: 1/4 yard
- White thread
- Light tan thread
- (1) 1” black button
- PDF Templates – These are located at the bottom of this page. See printing instructions below.
Tools:
- Sewing machine
- Cutting mat
- Rotary cutter
- Acrylic ruler
- Scissors
- Pins
- Hand sewing needle
- Iron
PRINTING INSTRUCTIONS:
To download the PDF templates, click on the download button at the bottom of the page. We recommend opening your download using Adobe Acrobat.
Cutting Instructions:
Blue:
- (8) 2 1/2” x 6 1/2”
- (5) 3” x 3” for (10) 2 1/2” HST
- (1) 8” x 8” cut into Letters with HB
Orange:
- (8) 2 1/2” x 6 1/2”
- (1) 5” x 5” for Pattern B- Small Flower (with HB)
- (1) 2” Circle (with HB)
Light green:
- (10) 2” x 2” for (20) 1 1/2” HST
- (2) 1 1/2” x 2 1/2”
- (4) 1 1/2” x 3 1/2”
- (1) 1 1/2” x 4 1/2”
- (1) 1 1/2” x 5 1/2”
- (1) 1 1/2” x 6 1/2”
- (3) 4” x 4” for Pattern C- Round Leaf (with HB)
Dark green:
- (8) 2” x 2” for (16) 1 1/2” HST
- (1) 1 1/2” x 1 1/2”
- (1) 1 1/2” x 3 1/2”
- (1) 1 1/2” x 5 1/2”
- (1) 1 1/2” x 6 1/2”
- (1) 2 1/2” x 2 1/2”
Gray:
- (7) 3” x 3” for (14) 2 1/2” HST
- (21) 2” x 2” for (42) 1 1/2” HST
- (8) 1 1/2” x 1 1/2”
- (9) 1 1/2” x 2 1/2”
- (2) 1 1/2” x 4 1/2”
- (1) 1 1/2” x 5 1/2”
- (3) 2 1/2” x 2 1/2”
- (2) 2 1/2” x 4 1/2”
- (1) 2 1/2” x 5 1/2”
- (3) 2 1/2” x 6 1/2”
- (1) 3 1/2” x 5 1/2”
- (4) 4 1/2” x 6 1/2”
- (5) 6 1/2” x 6 1/2”
White:
- (9) 2” x 2” for (18) 1 1/2” HST
- (5) 3” x 3” (For 2 1/2” HST)
- (5) 1 1/2” x 1 1/2”
- (6) 1 1/2” x 2 1/2”
- (3) 1 1/2” x 3 1/2”
- (1) 1 1/2” x 4 1/2”
- (1) 1 1/2” x 5 1/2”
- (5) 2 1/2” x 2 1/2”
- (1) 2 1/2” x 4 1/2”
- (9) 2 1/2” x 6 1/2”
- (1) 3 1/2” x 3 1/2”
- (2) 3 1/2” x 4 1/2”
- (2) 3 1/2” x 6 1/2”
- (1) 5 1/2” x 6 1/2”
Pink:
- (2) 2” x 2” for (4) 1 1/2” HST
- (2) 1 1/2” x 2 1/2”
- (1) 4” Circle (with HB)
Yellow:
- (1) 1” Circle (with HB)
- (8) Pattern A- Petal (with HB)
HST SQUARES COMPLETED NEEDED:
- (13) 1 1/2” x 1 1/2” white/gray
- (3) 1 1/2” x 1 1/2” white/pink
- (16) 1 1/2” x 1 1/2” light green/gray
- (12) 1 1/2” x 1 1/2” dark green/gray
- (1) 1 1/2” x 1 1/2” pink/gray
- (5) 1 1/2” x 1 1/2” light green/dark green
- (10) 2 1/2” x 2 1/2” blue/gray
- (2) 2 1/2” x 2 1/2” pink/gray
- (3) 2 1/2” x 2 1/2” white/gray
Piecing Instructions:
Note: Seams are 1/4” and should be pressed as this banner is constructed.
- For the following blocks, stitch the pieces together in the written order for best results. Use each block diagram to complete the blocks.
- Block 1:
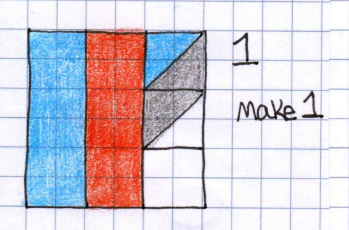
- (1) 2 1/2” blue/gray square
- (1) 2 1/2” gray/white square
- Stitch the blue/gray square to the gray/white square as shown.
- Stitch (1) 2 1/2” white square as shown. Right column completed.
- Stitch (1) 2 1/2” x 6 1/2” orange strip to the left side of the right completed column.
- Stitch (1) 2 1/2” x 6 1/2” blue strip to the left side of the orange strip.
- Block 1 completed.
- Block 2:
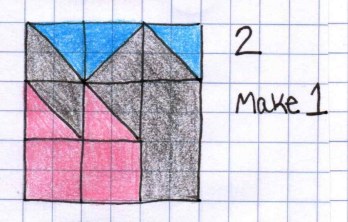
- Stitch (1) 2 1/2” blue/gray square to (1) 2 1/2” gray/pink square as shown. Stitch (1) 2 1/2” pink square to the bottom, completing left column.
- Repeat for the middle column except rotate the top square as shown.
- The right column is made of (1) 2 1/2” blue/gray square and (1) 2 1/2” x 4 1/2” gray strip.
- Stitch the three columns together as shown. Block 2 completed.
- Block 3:
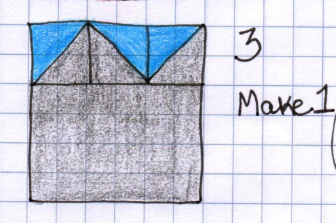
- Stitch (1) 2 1/2” blue/gray square to (1) 2 1/2” blue/gray square. Stitch (1) 2 1/2” blue/gray square to the last. This is the top row of the block.
- Stitch the top row of the block to (1) 4 1/2” x 6 1/2” gray strip. Block 3 completed.
- Block 4:
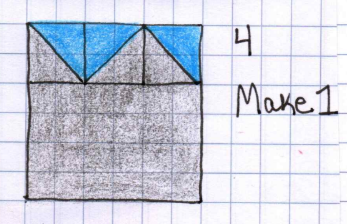
- This block is completed the same as Block 3, but with rotated 2 1/2” blue/gray squares on top.
- Block 5:
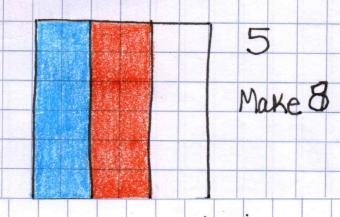
- Stitch (1) 2 1/2” x 6 1/2” blue strip to (1) 2 1/2” x 6 1/2” orange strip. Stitch (1) 2 1/2” x 6 1/2” white strip to the right side of the orange strip. Block 5 is completed. Make (8) of this block.
- Block 6:
- Stitch (1) 1 1/2” pink/white square to (1) 1 1/2” white square. Stitch (1) 1 1/2” x 2 1/2” pink strip to the end. Set aside as Strip A.
- Stitch (1) 1 1/2” pink/white square to (1) 1 1/2” x 3 1/2” pink strip. Set aside as Strip B.
- Stitch Strip A to Strip B as shown. Stitch (1) 2 1/2” white square to the bottom. This completes left side of the block.
- Stitch (1) 1 1/2” pink/white square to (1) 1 1/2” white/gray square. Stitch to (1) 1 1/2” gray square. Stitch (1) 1 1/2” white/gray square to the solid gray square. Stitch (1) 1 1/2” x 2 1/2” pink strip. Set aside as Strip C.
- Stitch (1) 1 1/2” pink/gray square to (1) 1 1/2” x 5 1/2” gray strip. Set aside as Strip D.
- Stitch Strip C to Strip D for the center column of the block.
- Stitch the left column of the block to the center column. Stitch to (1) 2 1/2” x 6 1/2” gray strip. Block 6 completed.
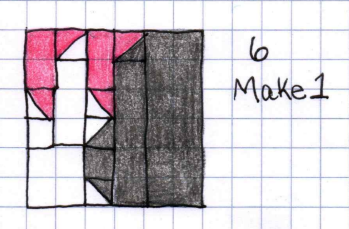
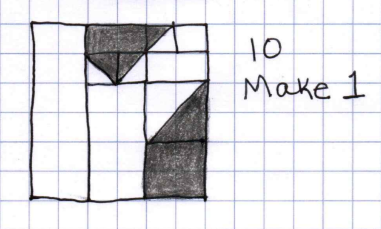
- Block 7:
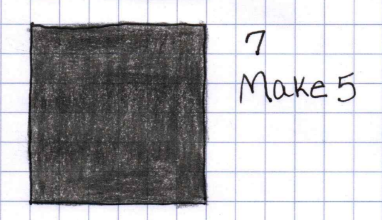
- Block 7 is a 6 1/2” x 6 1/2” gray square. Make sure to have 5 on hand.
- Block 8:
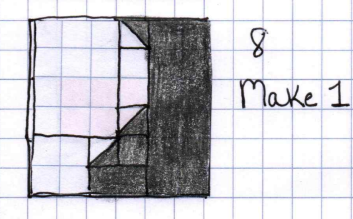
- Stitch (1) 1 1/2” gray/white square to (1) 1 1/2” x 2 1/2” white strip. Stitch (1) 1 1/2” gray/white square to the other side of the white strip. Set aside for Strip A.
- Stitch (1) 1 1/2” gray/white square to (1) 1 1/2” gray square. Stitch (1) 1 1/2” x 2 1/2” gray strip along one side of last sewn pieces. Stitch (1) 2 1/2” white square to the end. Set aside for Strip B.
- Stitch Strip A to (1) 3 1/2” x 4 1/2” white strip. Stitch Strip B to the bottom. Stitch (1) 2 1/2” x 6 1/2” gray strip. Block 8 completed.
- Block 9:
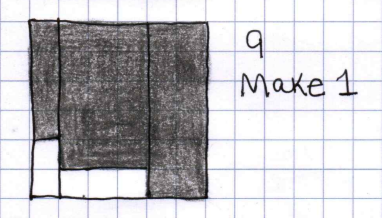
- Stitch (1) 1 1/2” x 4 1/2” gray strip to (1) 1 1/2” x 2 1/2” white strip for Column 1.
- Stitch (1) 3 1/2” x 5 1/2” gray strip to (1) 1 1/2” x 3 1/2” white strip for Column 2.
- Column 3 is (1) 2 1/2” x 6 1/2” gray strip.
- Stitch the columns together. Block 9 completed.
- Block 10:
- Stitch (2) 1 1/2” white/gray squares together as shown.
- Stitch to (1) 1 1/2” x 2 1/2” strip. Stitch (1) 2 1/2” x 4 1/2” white strip to the other end of this column. The center column is completed.
- Stitch (1) 1 1/2” white/gray square to (1) 1 1/2” x 1 1/2” white square.
- Stitch to (1) 1 1/2” x 2 1/2” white strip. Stitch to 2 1/2” white/gray square. Stitch to (1) 2 1/2” x 2 1/2” gray square. Right Column completed.
- Left column is (1) 2 1/2” x 6 1/2” white strip. Stitch the columns together as shown. Block 10 completed.
- Block 11:
- Stitch (1) 1 1/2” white/gray square to (1) 1 1/2” x 4 1/2” gray strip. Stitch to (1) 5 1/2” gray square. Set aside; this is the bottom of the block.
- Stitch (1) 1 1/2” x 2 1/2” gray strip to (1) 1 1/2” x 4 1/2” white strip. This is the top of the block.
- Stitch the top of the block to the bottom of the block. Block 11 Complete.
- Block 12:
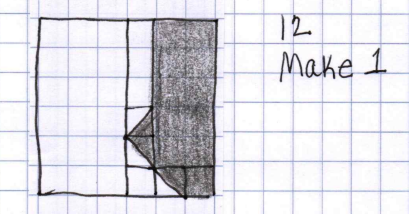
- Stitch (2) 1 1/2” white/gray squares together as shown. Stitch (1) 1 1/2” x 3 1/2” white strip to one end. Stitch (1) 1 1/2” white square to the other side. Set aside for center of strip.
- Stitch (1) 1 1/2” white/gray square to (1) 1 1/2” gray square.
- Stitch to (1) 2 1/2” x 5 1/2” gray strip. This is the right side of the block.
- The left side of the block is (1) 3 1/2” x 6 1/2” white strip. Stitch sections together as shown. Block 12 completed.
- Block 13:
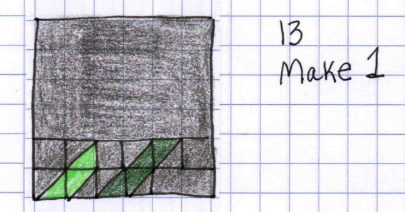
- Stitch (1) 1 1/2” gray square to (1) 1 1/2” light green/gray square. Stitch to (1) 1 1/2” gray square. Stitch to (1) 1 1/2” dark green/gray square. Stitch to (1) dark green/gray square and then to (1) 1 1/2” gray square as shown. Set aside as center row.
- Stitch (2) 1 1/2” light green/ gray squares together. Stitch to (1) 1 1/2” dark green/gray square. Stitch to (1) 1 1/2” dark green/gray square. Stitch to (1) 1 1/2” x 2 1/2” gray strip. Set aside as bottom row.
- Top row is (1) 4 1/2” x 6 1/2” gray strip.
- Stitch the rows together. Block 13 Completed.
- Block 14:
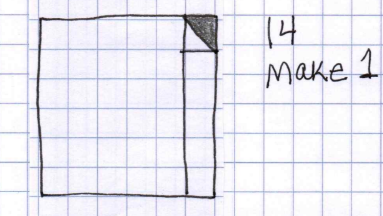
- Stitch (1) 1 1/2” white/gray square to the end of (1) 1 1/2” x 5 1/2” white strip. Stitch to (1) 5 1/2” x 6 1/2” piece. Block 14 complete.
- Block 15:
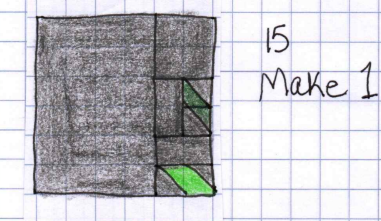
- Stitch (2) 1 1/2” light green/gray squares together. Stitch to (1) 1 1/2” x 2 1/2” gray strip. Set aside; this is the bottom third of the right column.
- Stitch (2) 1 1/2” dark green/gray squares together. Stitch to (1) 2 1/2” gray square as shown. Set aside as middle third of right column.
- The top of the right column is (1) 2 1/2” gray square.
- Stitch the three sections of the right column together. Stitch to (1) 4 1/2” x 6 1/2” gray strip. Block 15 completed.
- Block 16:

- Stitch (1) 1 1/2” x 3 1/2” light green strip to (1) 1 1/2” light green/dark green square. Set aside as Strip A.
- Stitch (1) 1 1/2” dark green/gray square to (1) 1 1/2” dark green square. Stitch to (1) 1 1/2” dark green/light green square. Stitch to (1) 1 1/2” dark green/light green square. Set aside as Strip B.
- Stitch Strips A and B together and then to (1) 2 1/2” dark green square. This is the left column of the block.
- Stitch (1) 1 1/2” light green/dark green square to (1) 1 1/2” x 2 1/2” gray strips. Stitch to (1) 1 1/2” x 1 1/2” light green/gray HST square. Stitch to (1) 1 1/2” x 2 1/2” light green strip. Set aside as Strip C.
- Stitch (1) 1 1/2” light green/gray square to (1) 1 1/2” x 4 1/2” light green strip. Stitch to (1) 1 1/2” light green/dark green square. Set aside as Strip D.
- Stitch Strips C and D together for the center column of the block.
- Stitch (1) 1 1/2” light green/gray square to (1) 1 1/2” gray square. Stitch this to (1) 1 1/2” x 2 1/2” gray strip. Stitch this to (1) 2 1/2” gray square. Set aside as Strip E.
- Stitch (2) 1 1/2” dark green/gray squares together. Set aside, for Strip F.
- Stitch (1) 1 1/2” dark green/gray square to (1) 1 1/2” gray square. Set aside for Strip G.
- Stitch Strips E, F, and G together as shown. This completes the right column of the block.
- Stitch the columns together. Block 16 completed.
- Block 17:
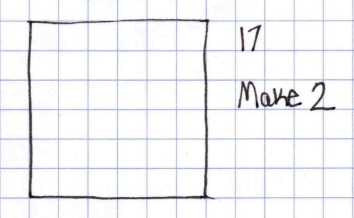
- Block 17 is (1) 6 1/2” white square. Make sure to have 2 of this block on hand.
- Block 18:
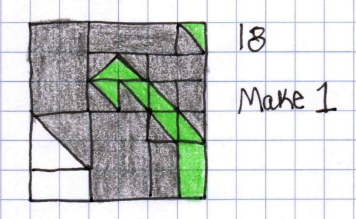
- Stitch 2 1/2” white/gray square to 2 1/2” x 3 1/2” gray strip. Stitch (1) 1 1/2” x 2 1/2” white strip to the other end. This is left column.
- Stitch (2) 1 1/2” light green/gray squares together as shown. Set aside as Strip A.
- Stitch (2) 1 1/2” light green/gray squares together as shown. Set aside as Strip B.
- Stitch Strips A and B together for part of the center column. Stitch 2 1/2” x 3 1/2” gray strip to the bottom of strip A and B.
- Stitch (2) 1 1/2” light green/gray squares together. Set aside as Strip C.
- Stitch (1) 1 1/2” light green/gray squares to (1) 1 1/2” gray square. Set aside as Strip D.
- Stitch (1) 1 1/2” x 2 1/2” gray to (1) 1 1/2” x 2 1/2” light green strip. Set aside as Strip E.
- Stitch (1) 1 1/2” x 4 1/2” gray to 1 1/2” light green square together. Set aside as Strip F.
- Stitch Strips C, D, and E together as shown. Stitch (1) 1 1/2” x 2 1/2” gray strip to top. Part of Right Column has been formed.
- Stitch Column B to C. Stitch Strip F on the top.
- Stitch the three columns together. Block 18 completed.
- Block 19:
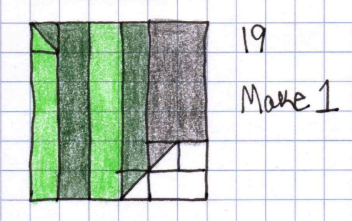
- Stitch (1) 1 1/2″ dark green/light green square to (1) 1 1/2” x 5 1/2” light green strip. Column A.
- Stitch (1) 1 1/2” dark green/white HST square to (1) 1 1/2” x 5 1/2” dark green strip. Column D.
- Stitch (1) 1 1/2” white/gray square to (1) 1 1/2” white square.
- Stitch to (1) 1 1/2” x 2 1/2” white strip. Stitch (1) 2 1/2” x 4 1/2” gray piece on the other end. Column E.
- Stitch Column A to (1) 1 1/2” x 6 1/2” dark green strip. Stitch to (1) 1 1/2” x 6 1/2” light green strip. These two strips are Column B and C. Stitch to Column D. Stitch to Column E. Block 19 completed.
- Block 20:
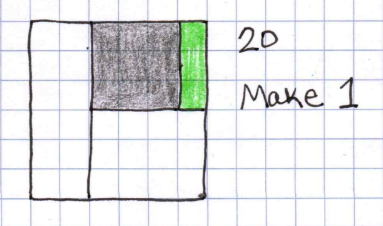
- Stitch (1) 1 1/2” x 3 1/2” light green strip to (1) 3 1/2” x 3 1/2” gray square. Stitch to (1) 3 1/2” x 4 1/2” white piece. Stitch to (1) 2 1/2” x 6 1/2” white strip. Block 20 complete.
- Block 21:
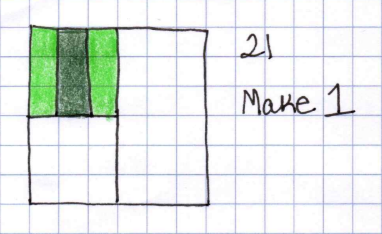
- Stitch (1) 1 1/2” x 3 1/2” light green strip to (1) 1 1/2” x 3 1/2” dark green strip. Stitch to (1) 1 1/2” x 3 1/2” light green. Stitch to (1) 3 1/2” x 3 1/2” white square. Stitch to (1) 3 1/2” x 6 1/2” white strip. Block 21 complete.
- Block 1:
- Stitch the blocks together in rows first and then stitch the rows together. Be sure to match seams as you go. Bind edges to your preferred method.
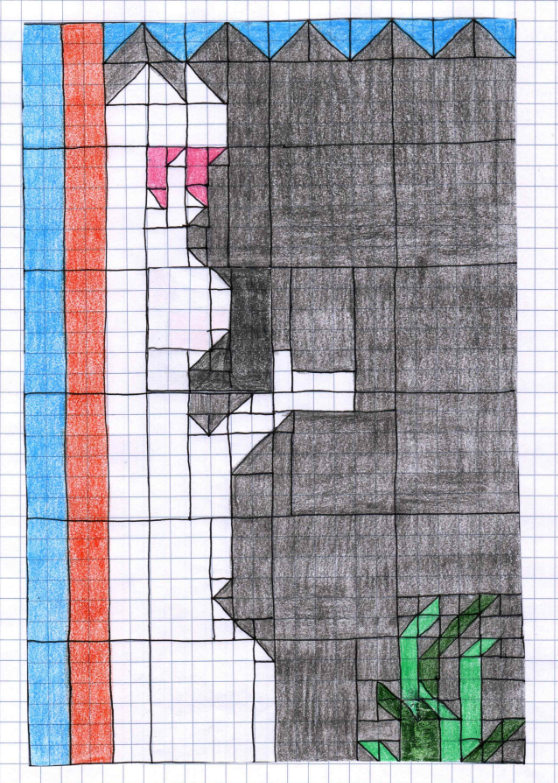
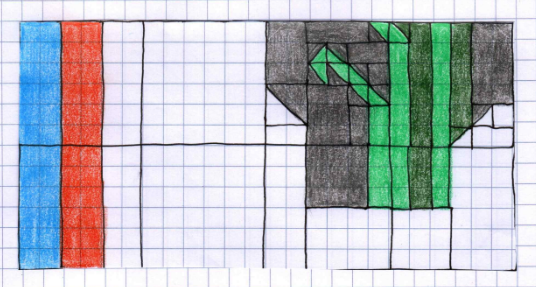
Top of Bunny Banner
Bottom of Bunny Banner