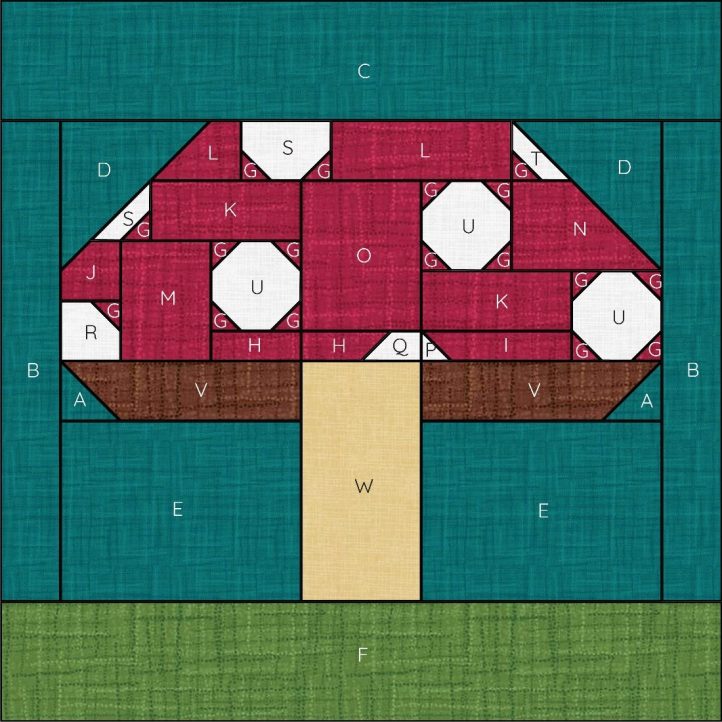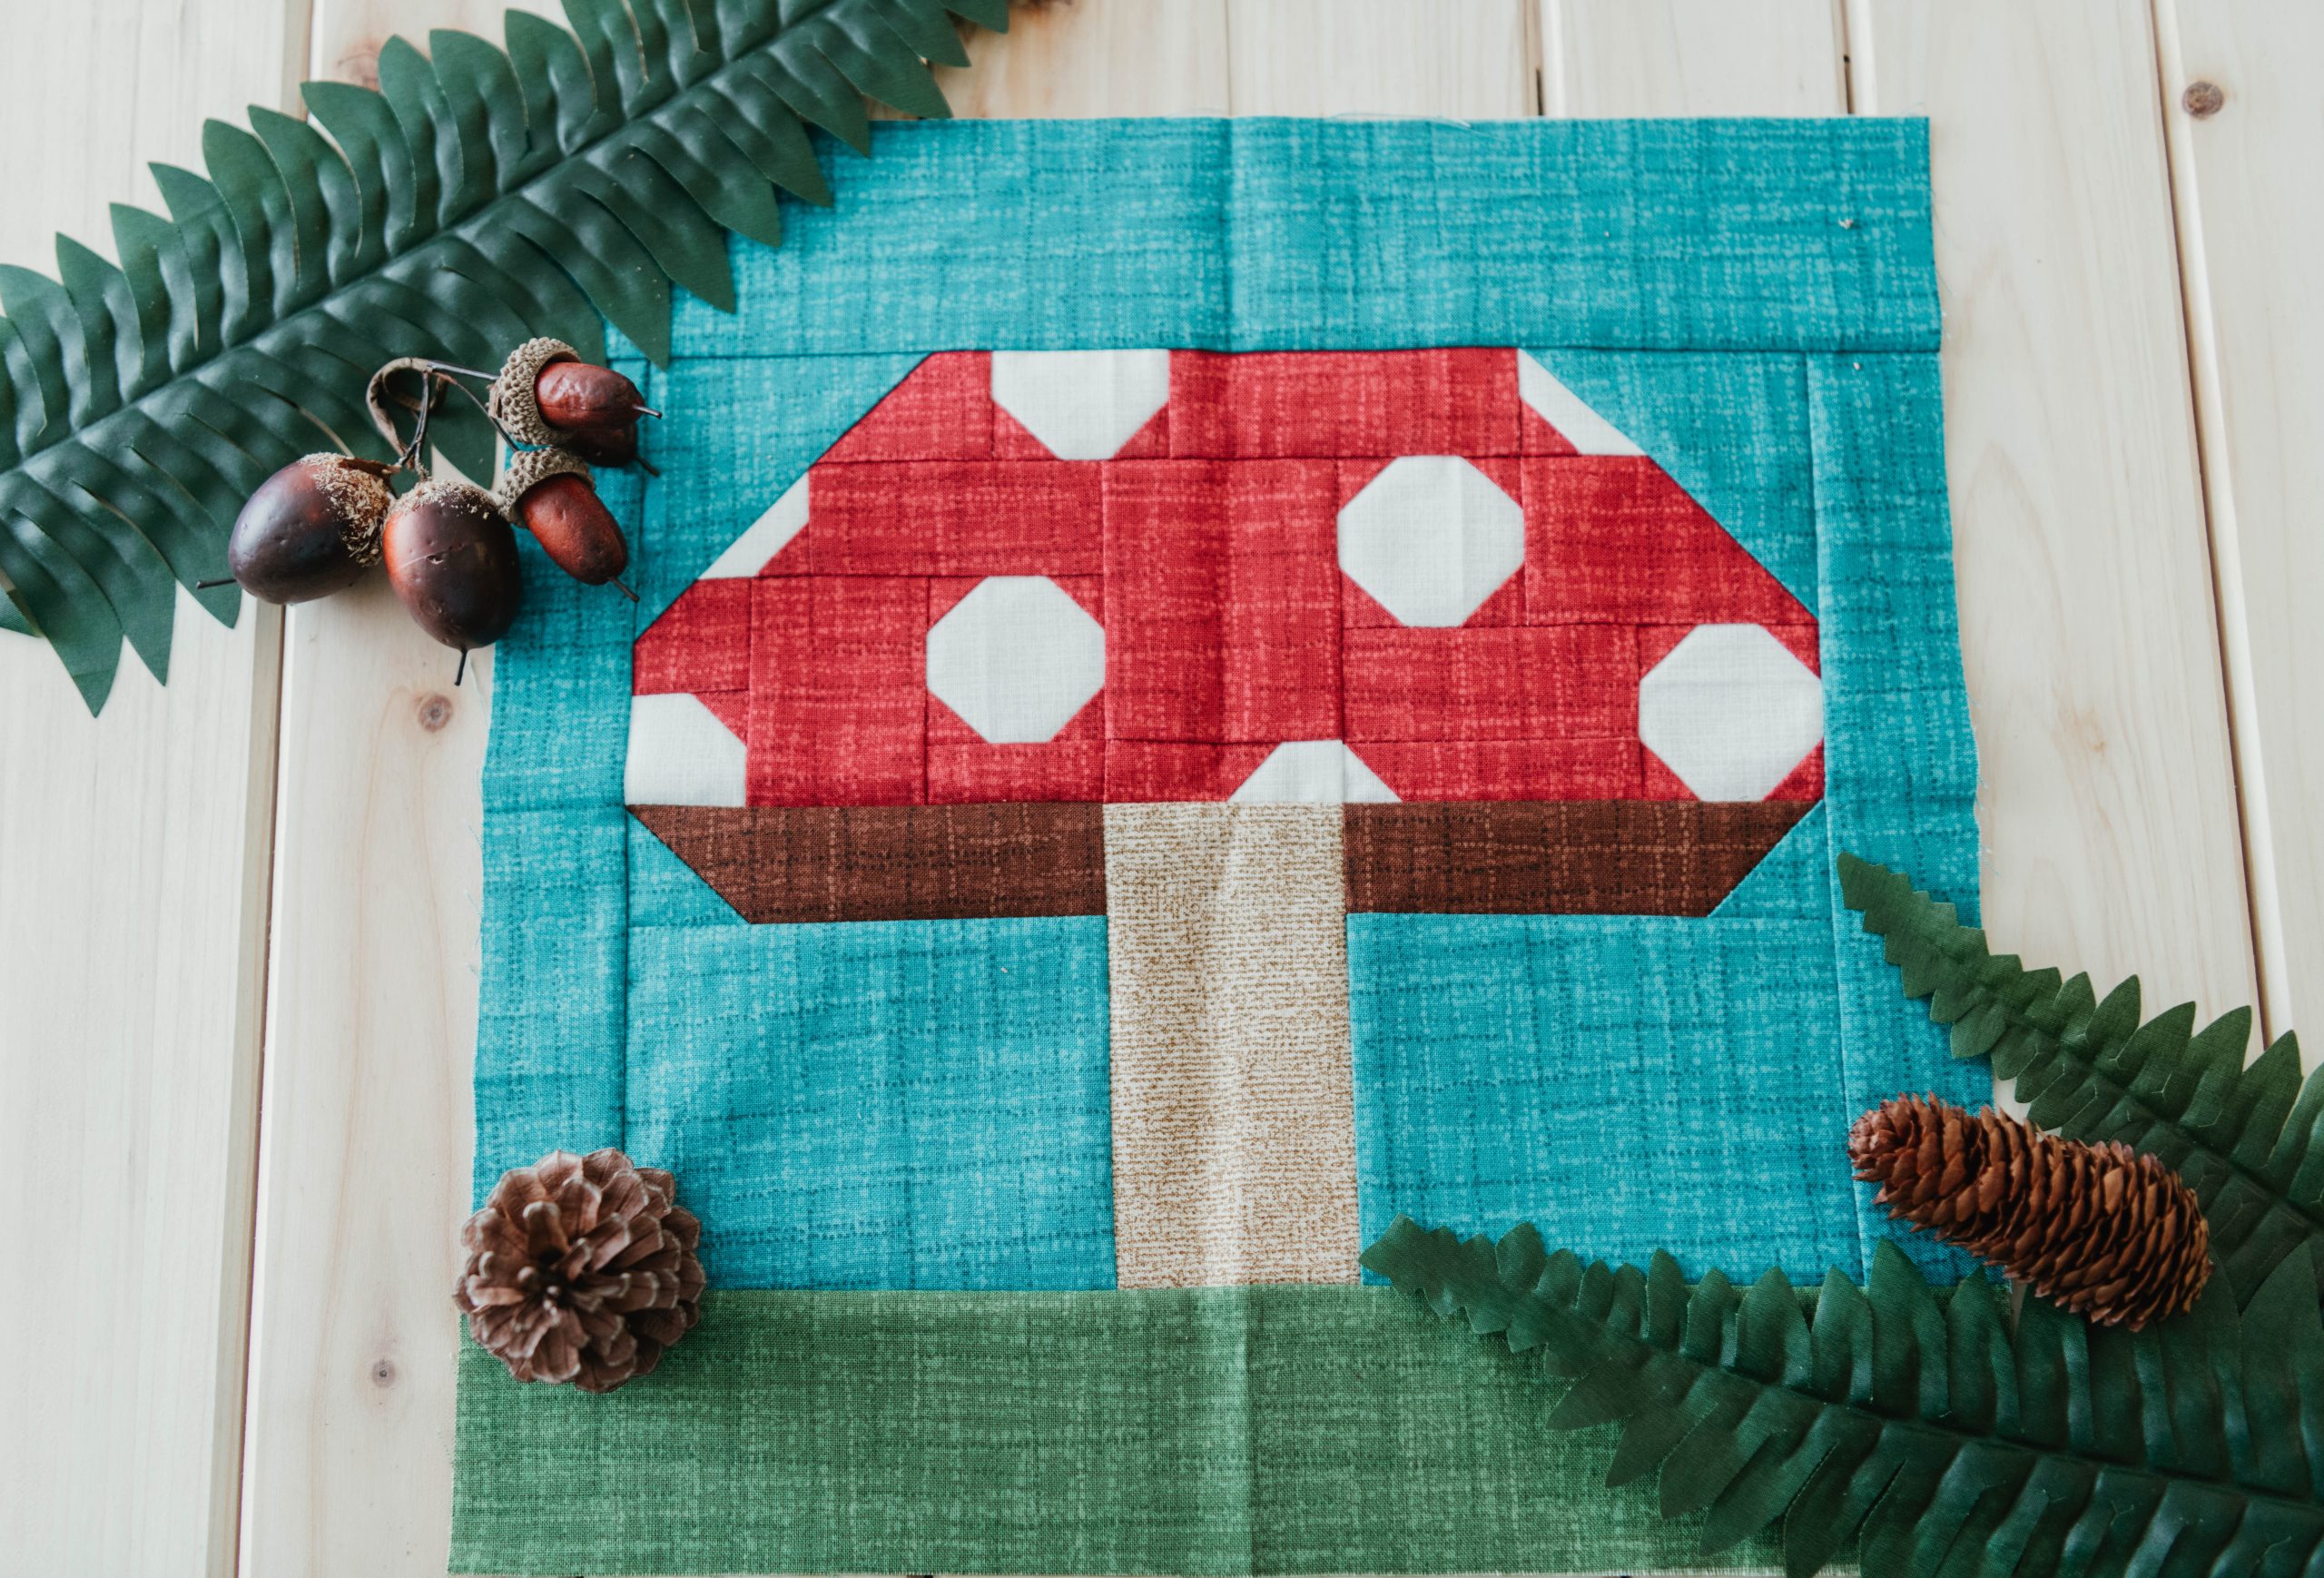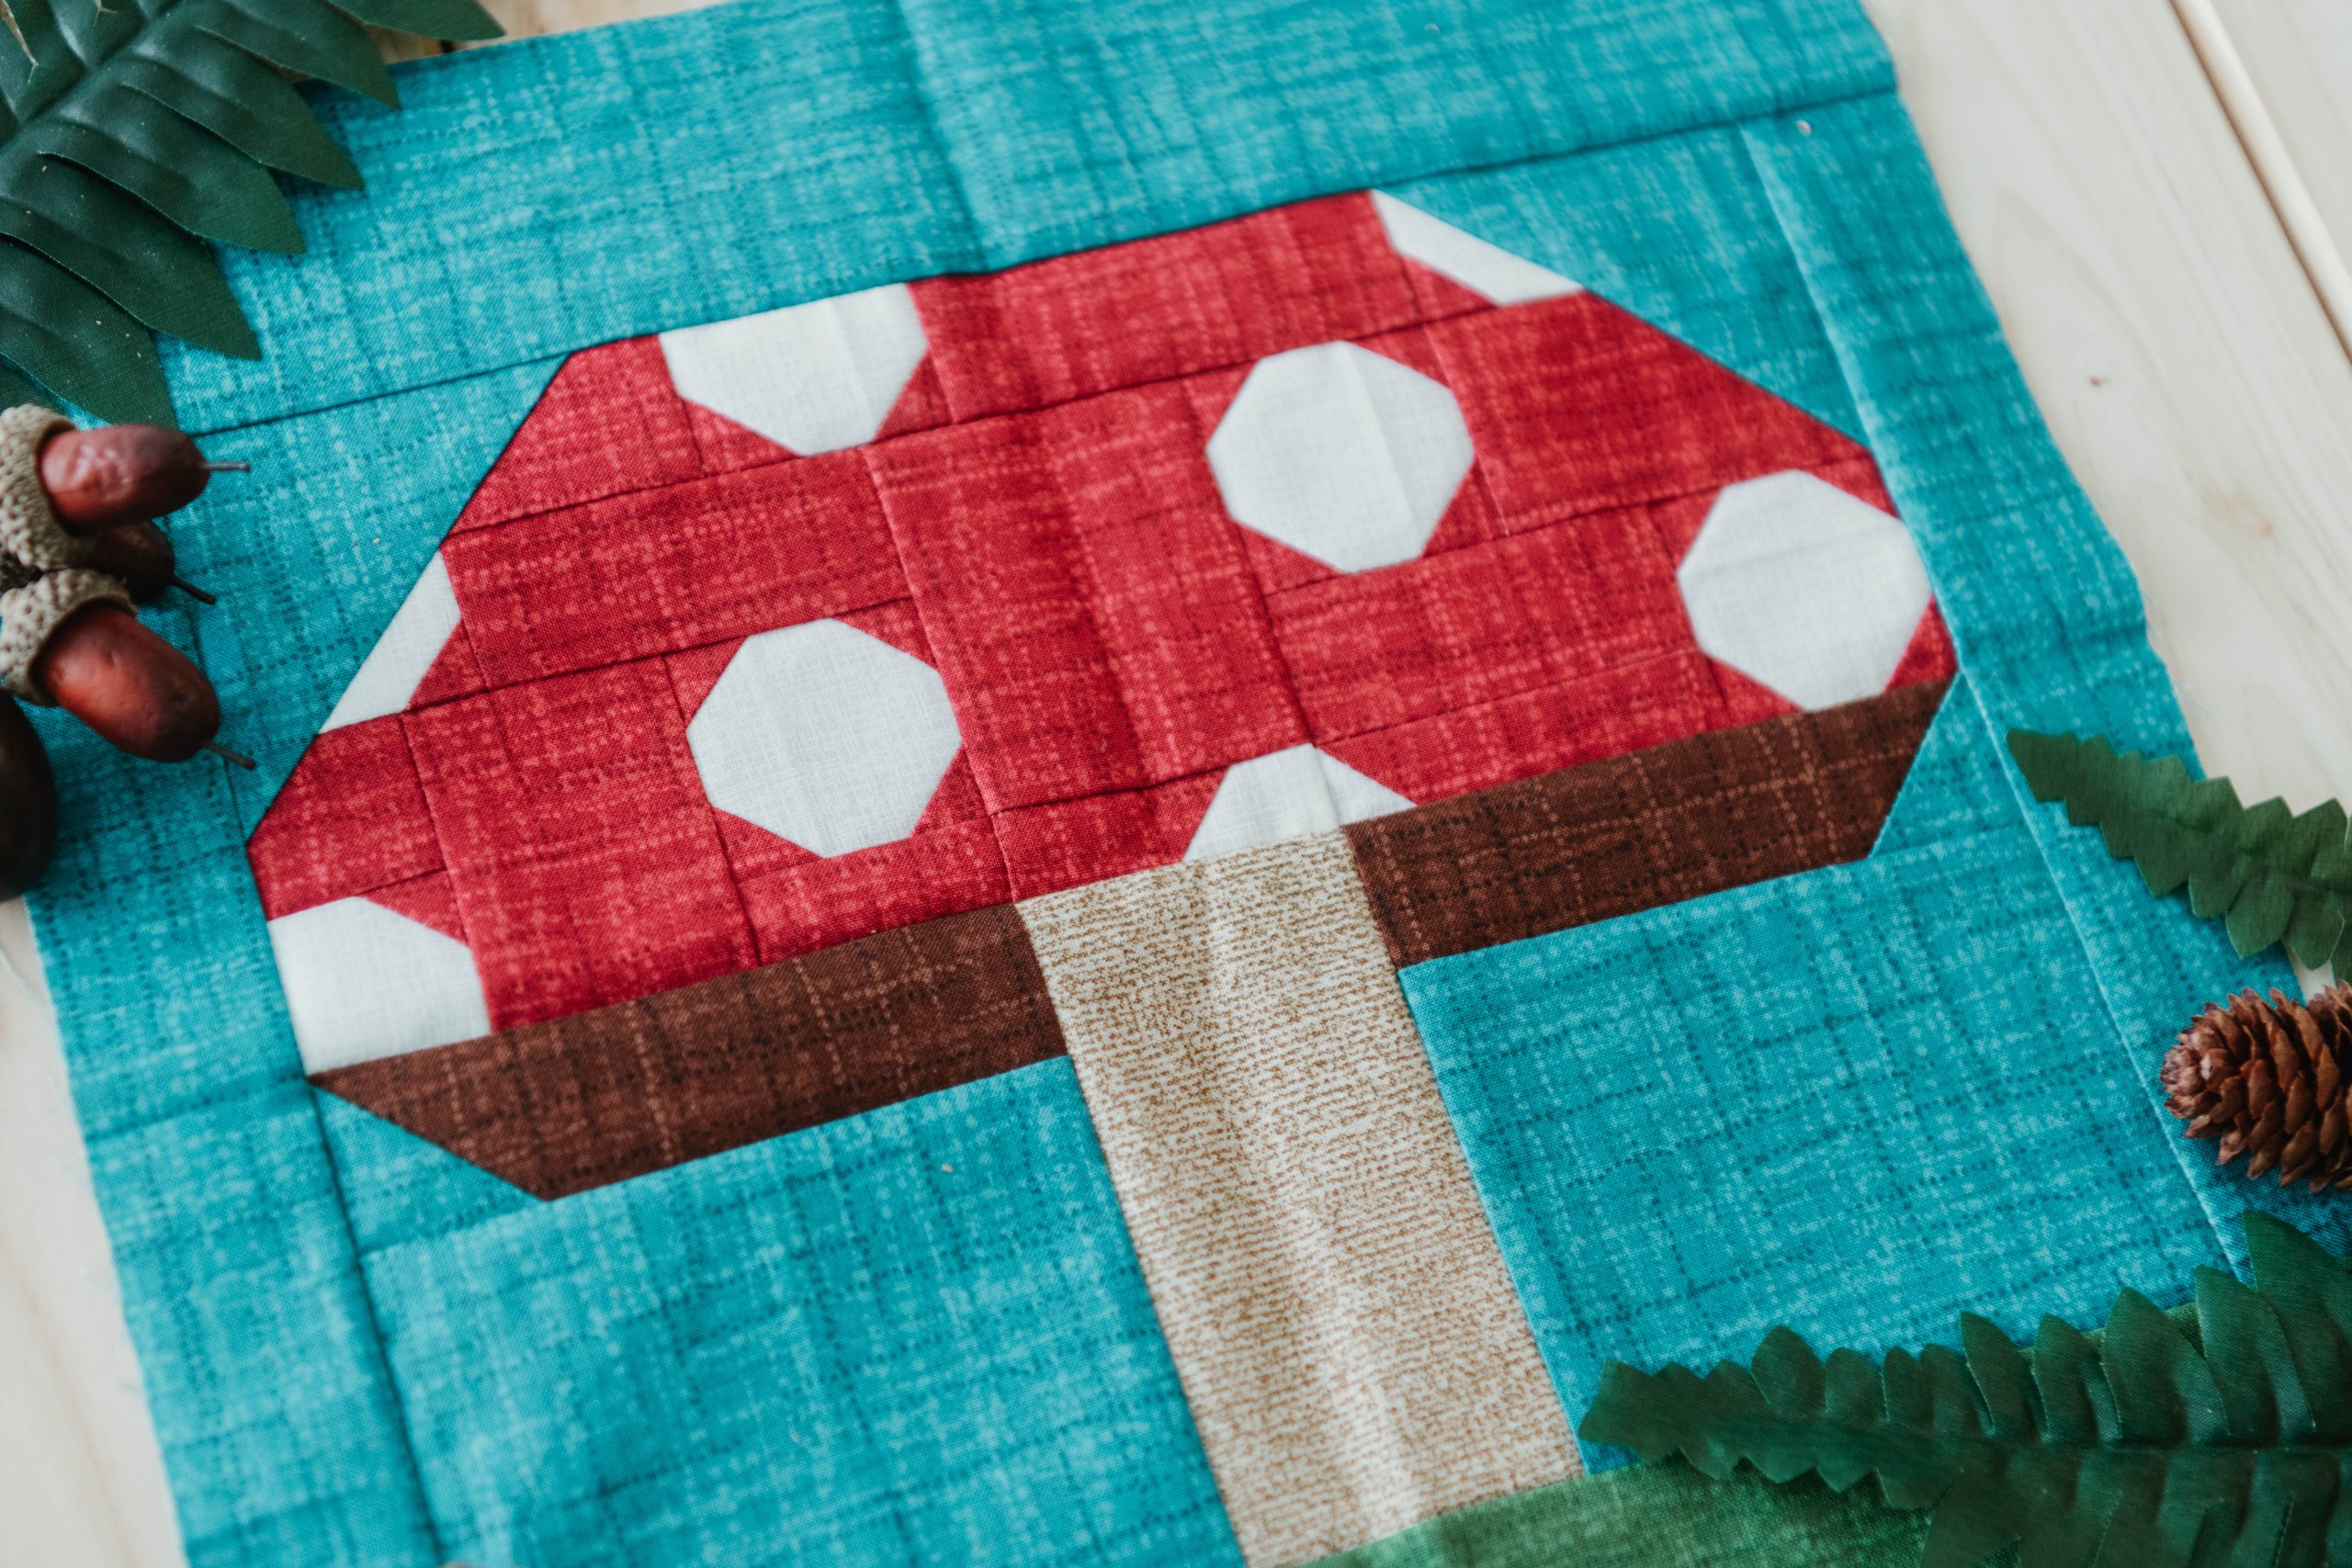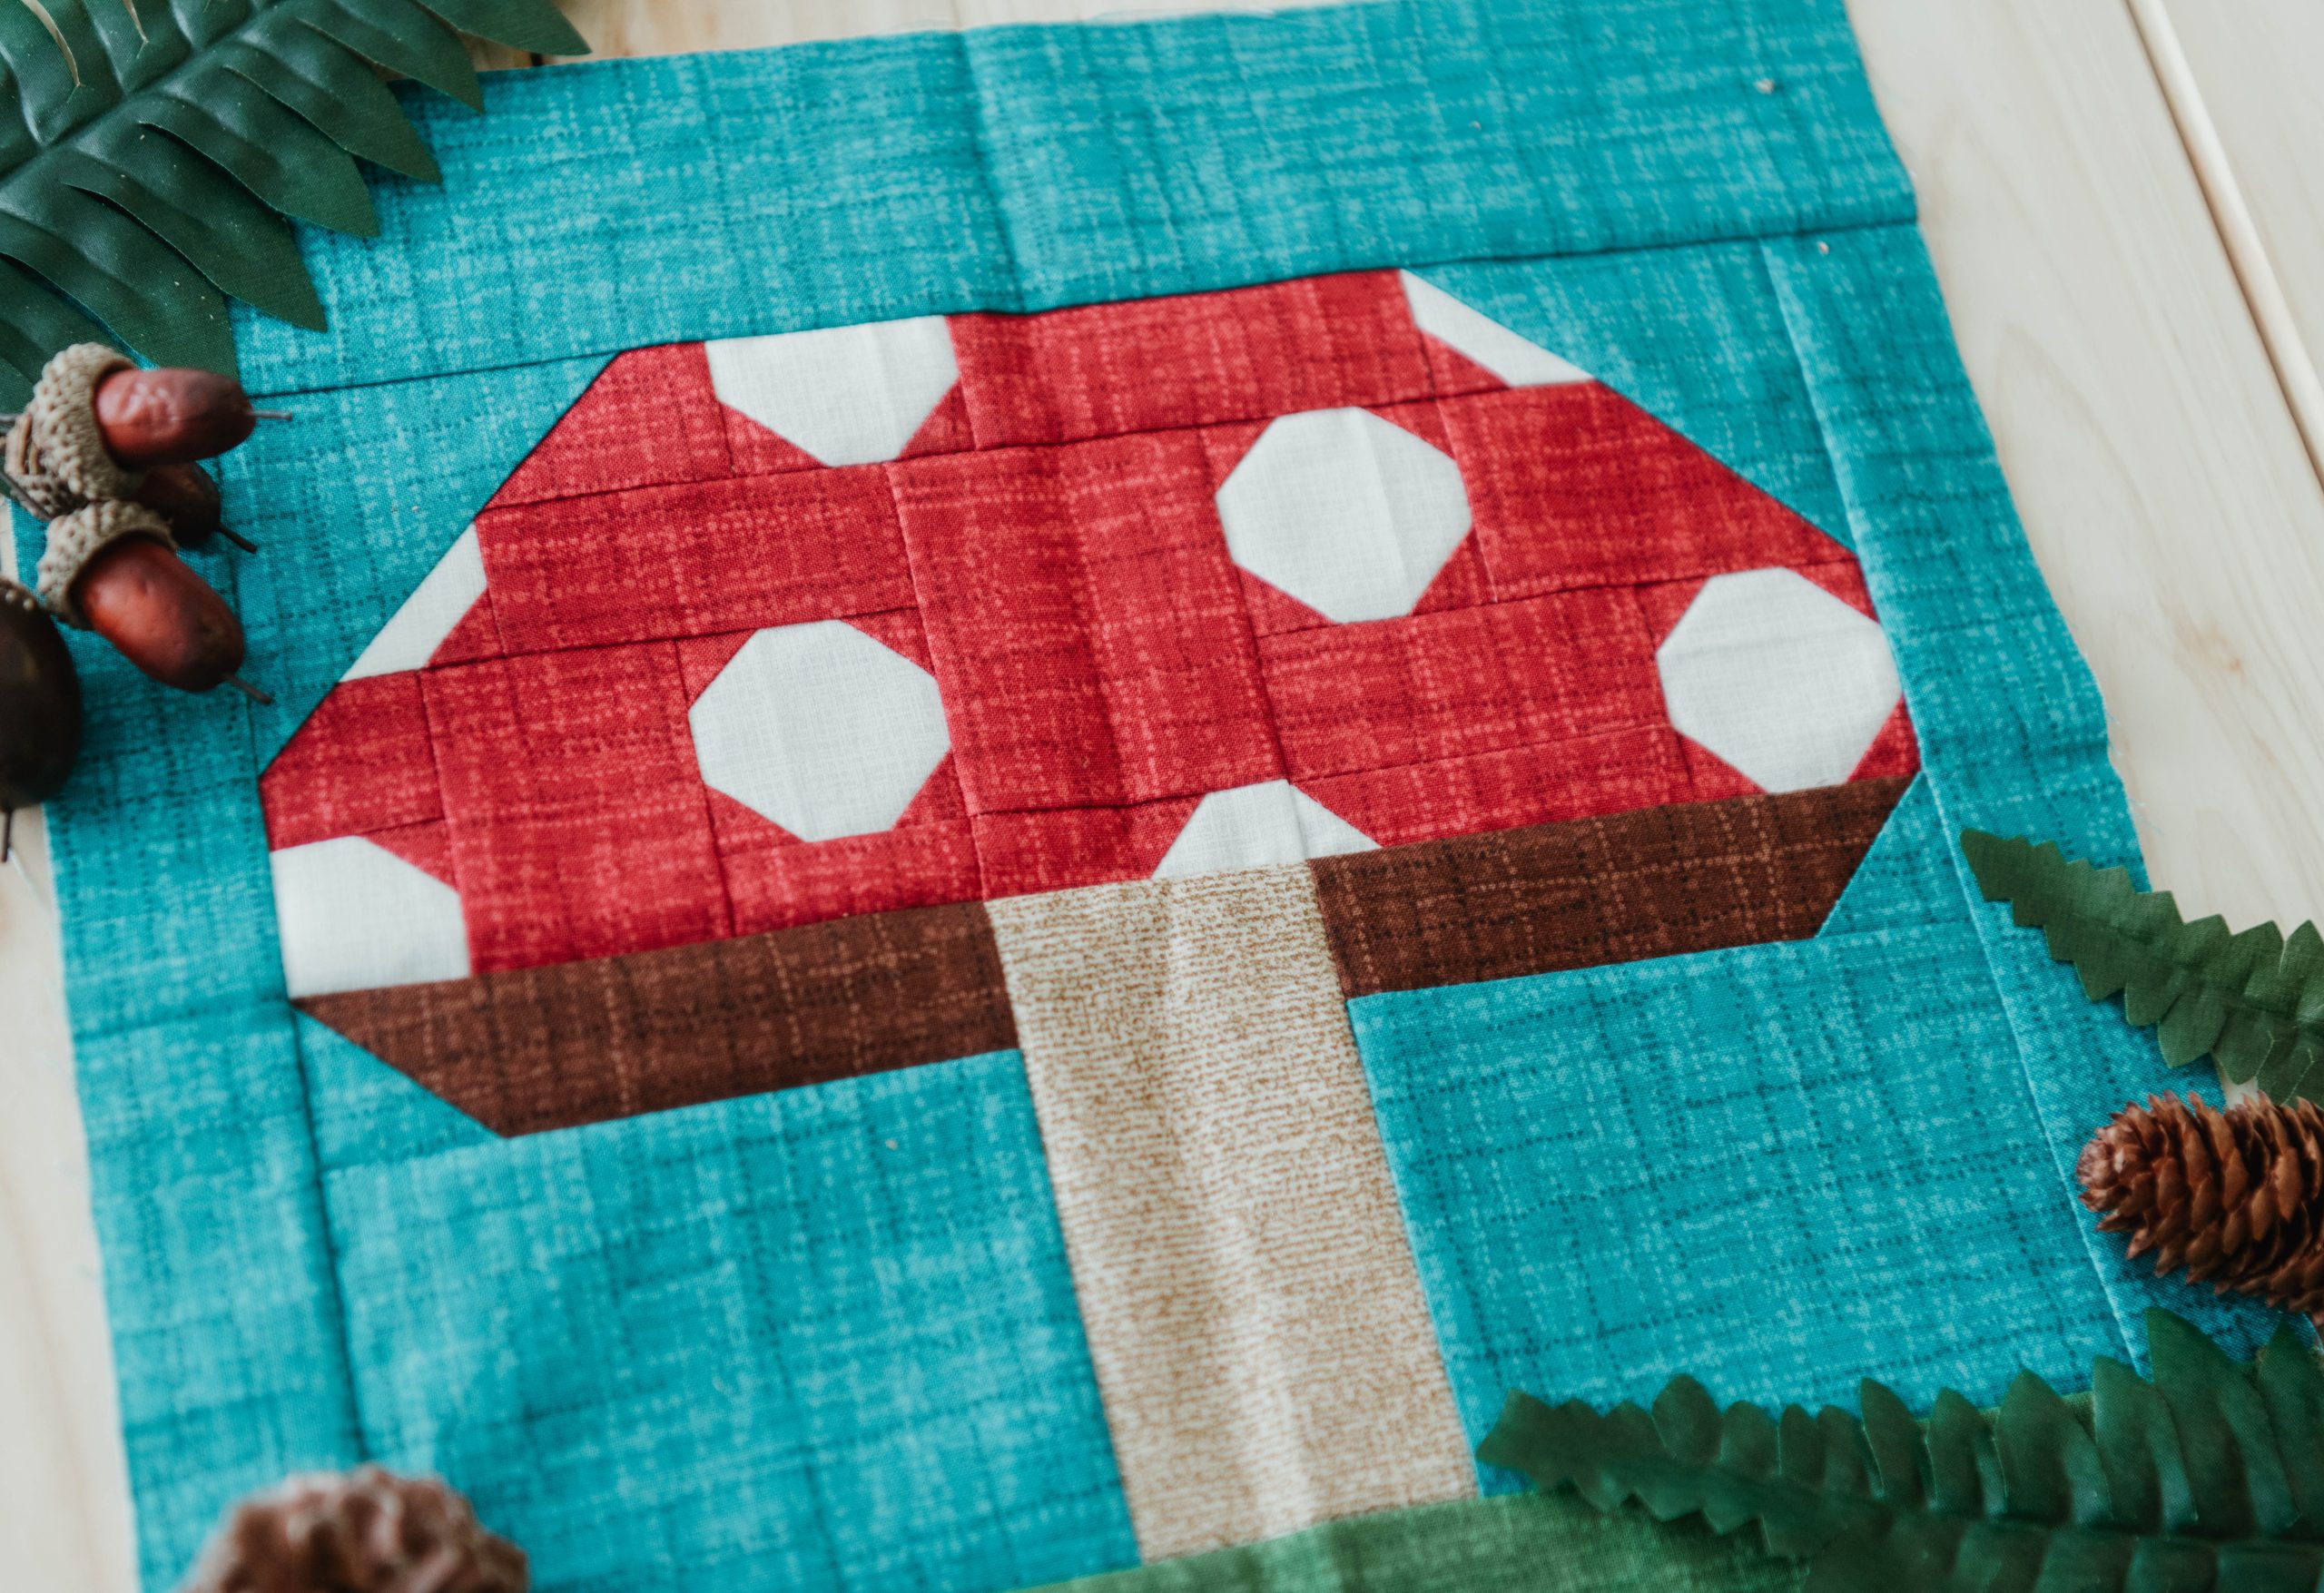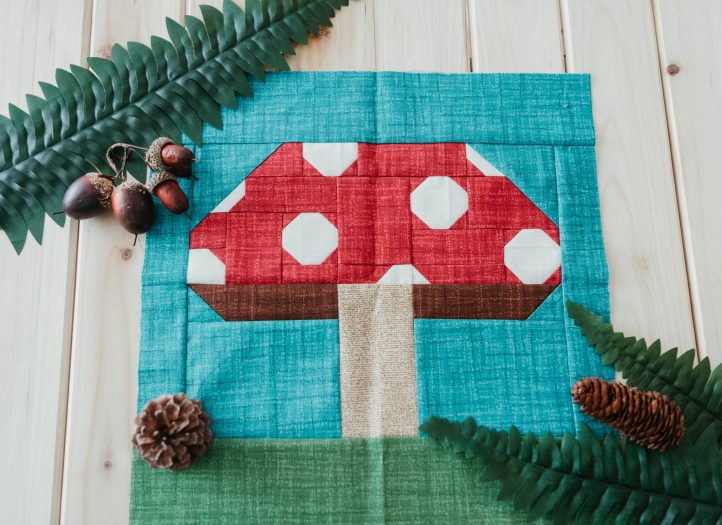
One design motif that we can’t get enough of: mushrooms! If you’re like us and are obsessed with adorable cottagecore ‘shrooms, then you don’t want to miss this whimsical quilt block from Staci Wendland. Using 1/8 yards of different solids, this fall quilt block pattern measures at a 12” square and features a charming mushroom design, complete with polka dots on the cap. Start your fall quilting today with this playful mushroom block pattern.
Finished Size: 12″ x 12″ (12 1/2” x 12 1/2” unfinished)
Seam Allowances: 1/4″
Abbreviations:
- RST = right sides together
- WS = wrong side of the fabric
Designer Notes:
- All pieces are sewn right sides together (RST).
- When instructed to trim, that means trim 1/4” from the stitching line, unless indicated otherwise.
- When instructed to press to a color, direction, or the name of a piece, that refers to the direction for pressing the seam.
Materials:
Cotton Fabric Requirements:
- Blue (sky): 1/8 yd
- Green (grass): 1/8 yd
- Red (mushroom): 1/8 yd
- White (dots on mushroom): 1/8 yd
- Brown (under mushroom): 1/8 yd
- Tan (mushroom stem): 1/8 yd
Cutting Instructions:
Blue:
- A: (2) 1 1/2″ x 1 1/2″
- B: (2) 1 1/2″ x 8 1/2″
- C: (1) 2 1/2″ x 12 1/2″
- D: (2) 3″ x 3″
- E: (2) 3 1/2″ x 4 1/2″
Green:
- F: (1) 2 1/2″ x 12 1/2″
Red:
- G: (17) 1″ x 1″
- H: (2) 1″ x 2″
- I: (1) 1″ x 3″
- J: (1) 1 1/2″ x 1 1/2″
- K: (2) 1 1/2″ x 3″
- L: (2) 1 1/2″ x 3 1/2″
- M: (1) 2″ x 2 1/2″
- N: (1) 2″ x 3″
- O: (1) 2 1/2″ x 3″
White:
- P: (1) 1″ x 1″
- Q: (1) 1″ x 1 1/2″
- R: (1) 1 1/2″ x 1 1/2″
- S: (2) 1 1/2″ x 2″
- T: (1) 1 1/2″ x 3″
- U: (3) 2″ x 2″
Brown:
- V: (2) 1 1/2″ x 4 1/2″
Tan:
- W: (1) 2 1/2″ x 4 1/2″
Piecing Instructions:
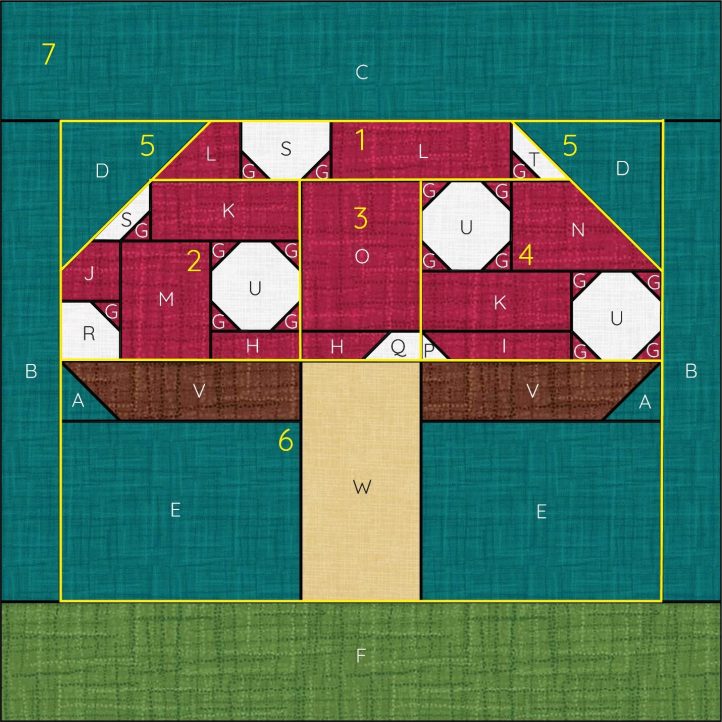
UNIT 1:
- Gather the pieces shown in Unit 1 on the diagram.
- Using a fabric safe marker, draw a diagonal line on the WS of (3) G.
- Place (1) G on the lower left corner of (1) S with the line from the upper left to lower right. Sew on the line. Trim. Press to G.
- Place (1) G on the lower right corner of same S with the line from the lower left to upper right. Sew on the line. Trim. Press to G.
- Place (1) G on the lower left corner of (1) T with the line from the upper left to lower right. Sew on the line. Trim. Press to G.
- Lay out pieces to match Unit 1 on the diagram. Sew into a row. Press to L.

UNIT 2:
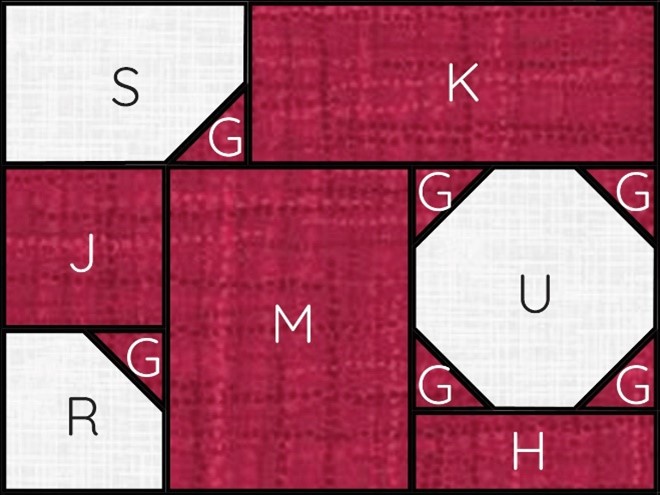
- Gather the pieces shown in Unit 2 on the diagram.
- Draw a diagonal line on the WS of (6) G.
- Place (1) G on the lower right corner of (1) S with the line from the lower left to upper right. Sew on the line. Trim. Press to G.
- Place (1) G on the upper right corner of (1) R with the line from the upper left to lower right. Sew on the line. Trim. Press to G.
- Place (4) G on the corners of (1) U – upper left with line lower left to upper right, upper right with line upper left to lower right, lower left with line upper left to lower right, and lower right with line lower left to upper right. Sew on the lines. Trim. Press to G.
- Lay out pieces to match Unit 2 on the diagram. Sew S/G to K. Press to K.
- Sew J to the top of G/R. Press to J.
- Sew U/G to the top of H. Press to H.
- Sew J/G/R to the left of M. Press to M.
- Sew H/U/G to the right of M. Press to M.
- Sew S/G/K to the top. Press to the top.
UNIT 3:
- Gather the pieces shown in Unit 3 on the diagram.
- Lay out (1) Q vertically with WS up. Draw a diagonal line from the lower left corner to 1” up from the lower right corner.
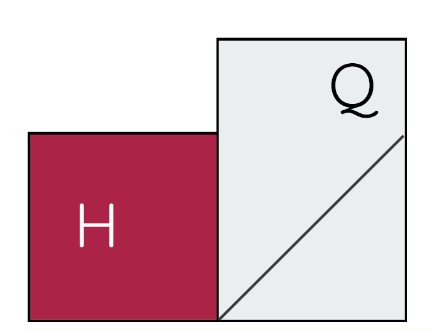
- Place Q perpendicular on top of (1) H with the bottom and right edges even and the line from the lower left to upper right. Sew on the line. Trim. Press to H.
- Sew (1) O to the top of H/Q. Press to O.
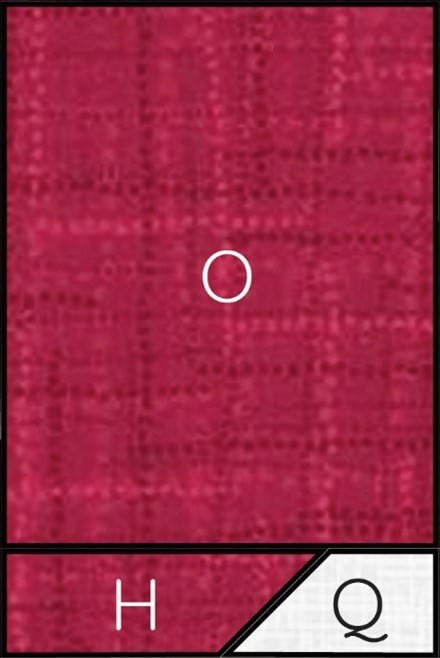
UNIT 4:
- Gather the pieces shown in Unit 4 on the diagram.
- Draw a diagonal line on the WS of (8) G and (1) P. Place (1) P on the left end of (1) I with the line from the upper left to lower right. Sew on the line. Trim. Press to I.
- Repeat Step 5 in the Unit 2 section twice with (8) G and (2) U.
- Sew N to the right of (1) U/G. Press to N.
- Sew K to the top of P/I. Press to P/I.
- Sew second U/G to the right of K/P/I. Press to K/P/I.
- Sew N/U/G to the top. Press to N/U/G.
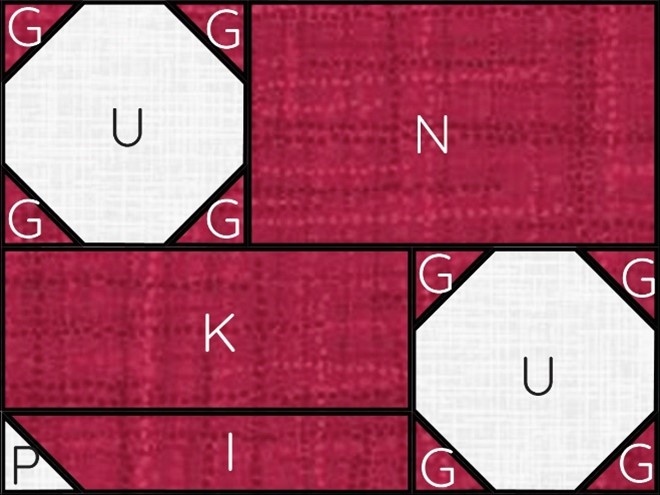
ASSEMBLING UNITS 1-4:
- Gather Units 1-4.
- Sew Unit 2 to the left of Unit 3. Press to Unit 3.
- Sew Unit 4 to the right of Unit 3. Press to Unit 3.
- Sew Unit 1 to the top. Press to Unit 1.
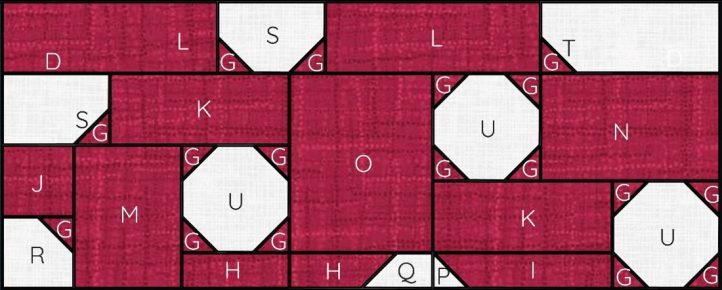
UNIT 5:
- Gather (2) D. Draw a diagonal line on the WS of each.
- Place (1) D on the upper left corner of Units 1-4 with the line from the lower left to the upper right. Sew on the line. Trim. Press to D.
- Place (1) D on the upper right corner of Units 1-4 with the line from the upper left to the lower right. Sew on the line. Trim. Press to D. Set Units 1-5 aside.
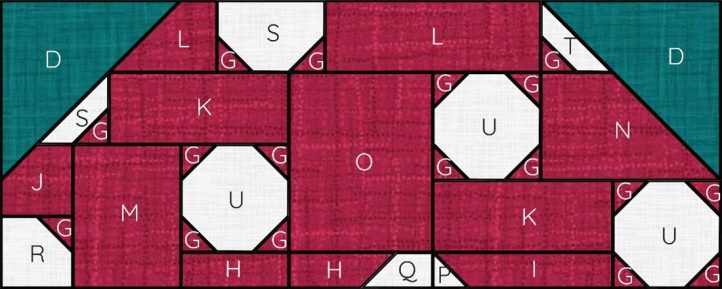
UNIT 6:
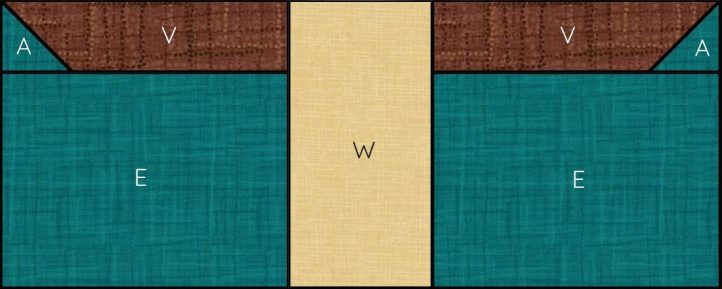
- Gather the pieces shown in Unit 6 on the diagram.
- Draw a diagonal line on the WS of (2) A.
- Place (1) A on the left side of (1) V with the line from the upper left to lower right. Sew on the line. Trim. Press to A.
- Place (1) A on the right side of the second V with the line from the lower left to upper right. Sew on the line. Trim. Press to A.
- Sew each A/V to the top of E. Press to E.
- Sew (1) A/V/E to the left of (1) W. Press to A/V/E.
- Sew second A/V/E to the right of W. Press to second A/V/E.
- Sew Unit 6 to the bottom of the Units 1-5. Press to Unit 6.
UNIT 7:
- Sew (1) B to the left of Units 1-6. Press to B.
- Sew (1) B to the right of Units 1-6. Press to B.
- Sew (1) C to the top of Units 1-6. Press to C.
- Sew (1) F to the bottom of Units 1-6. Press to F.
