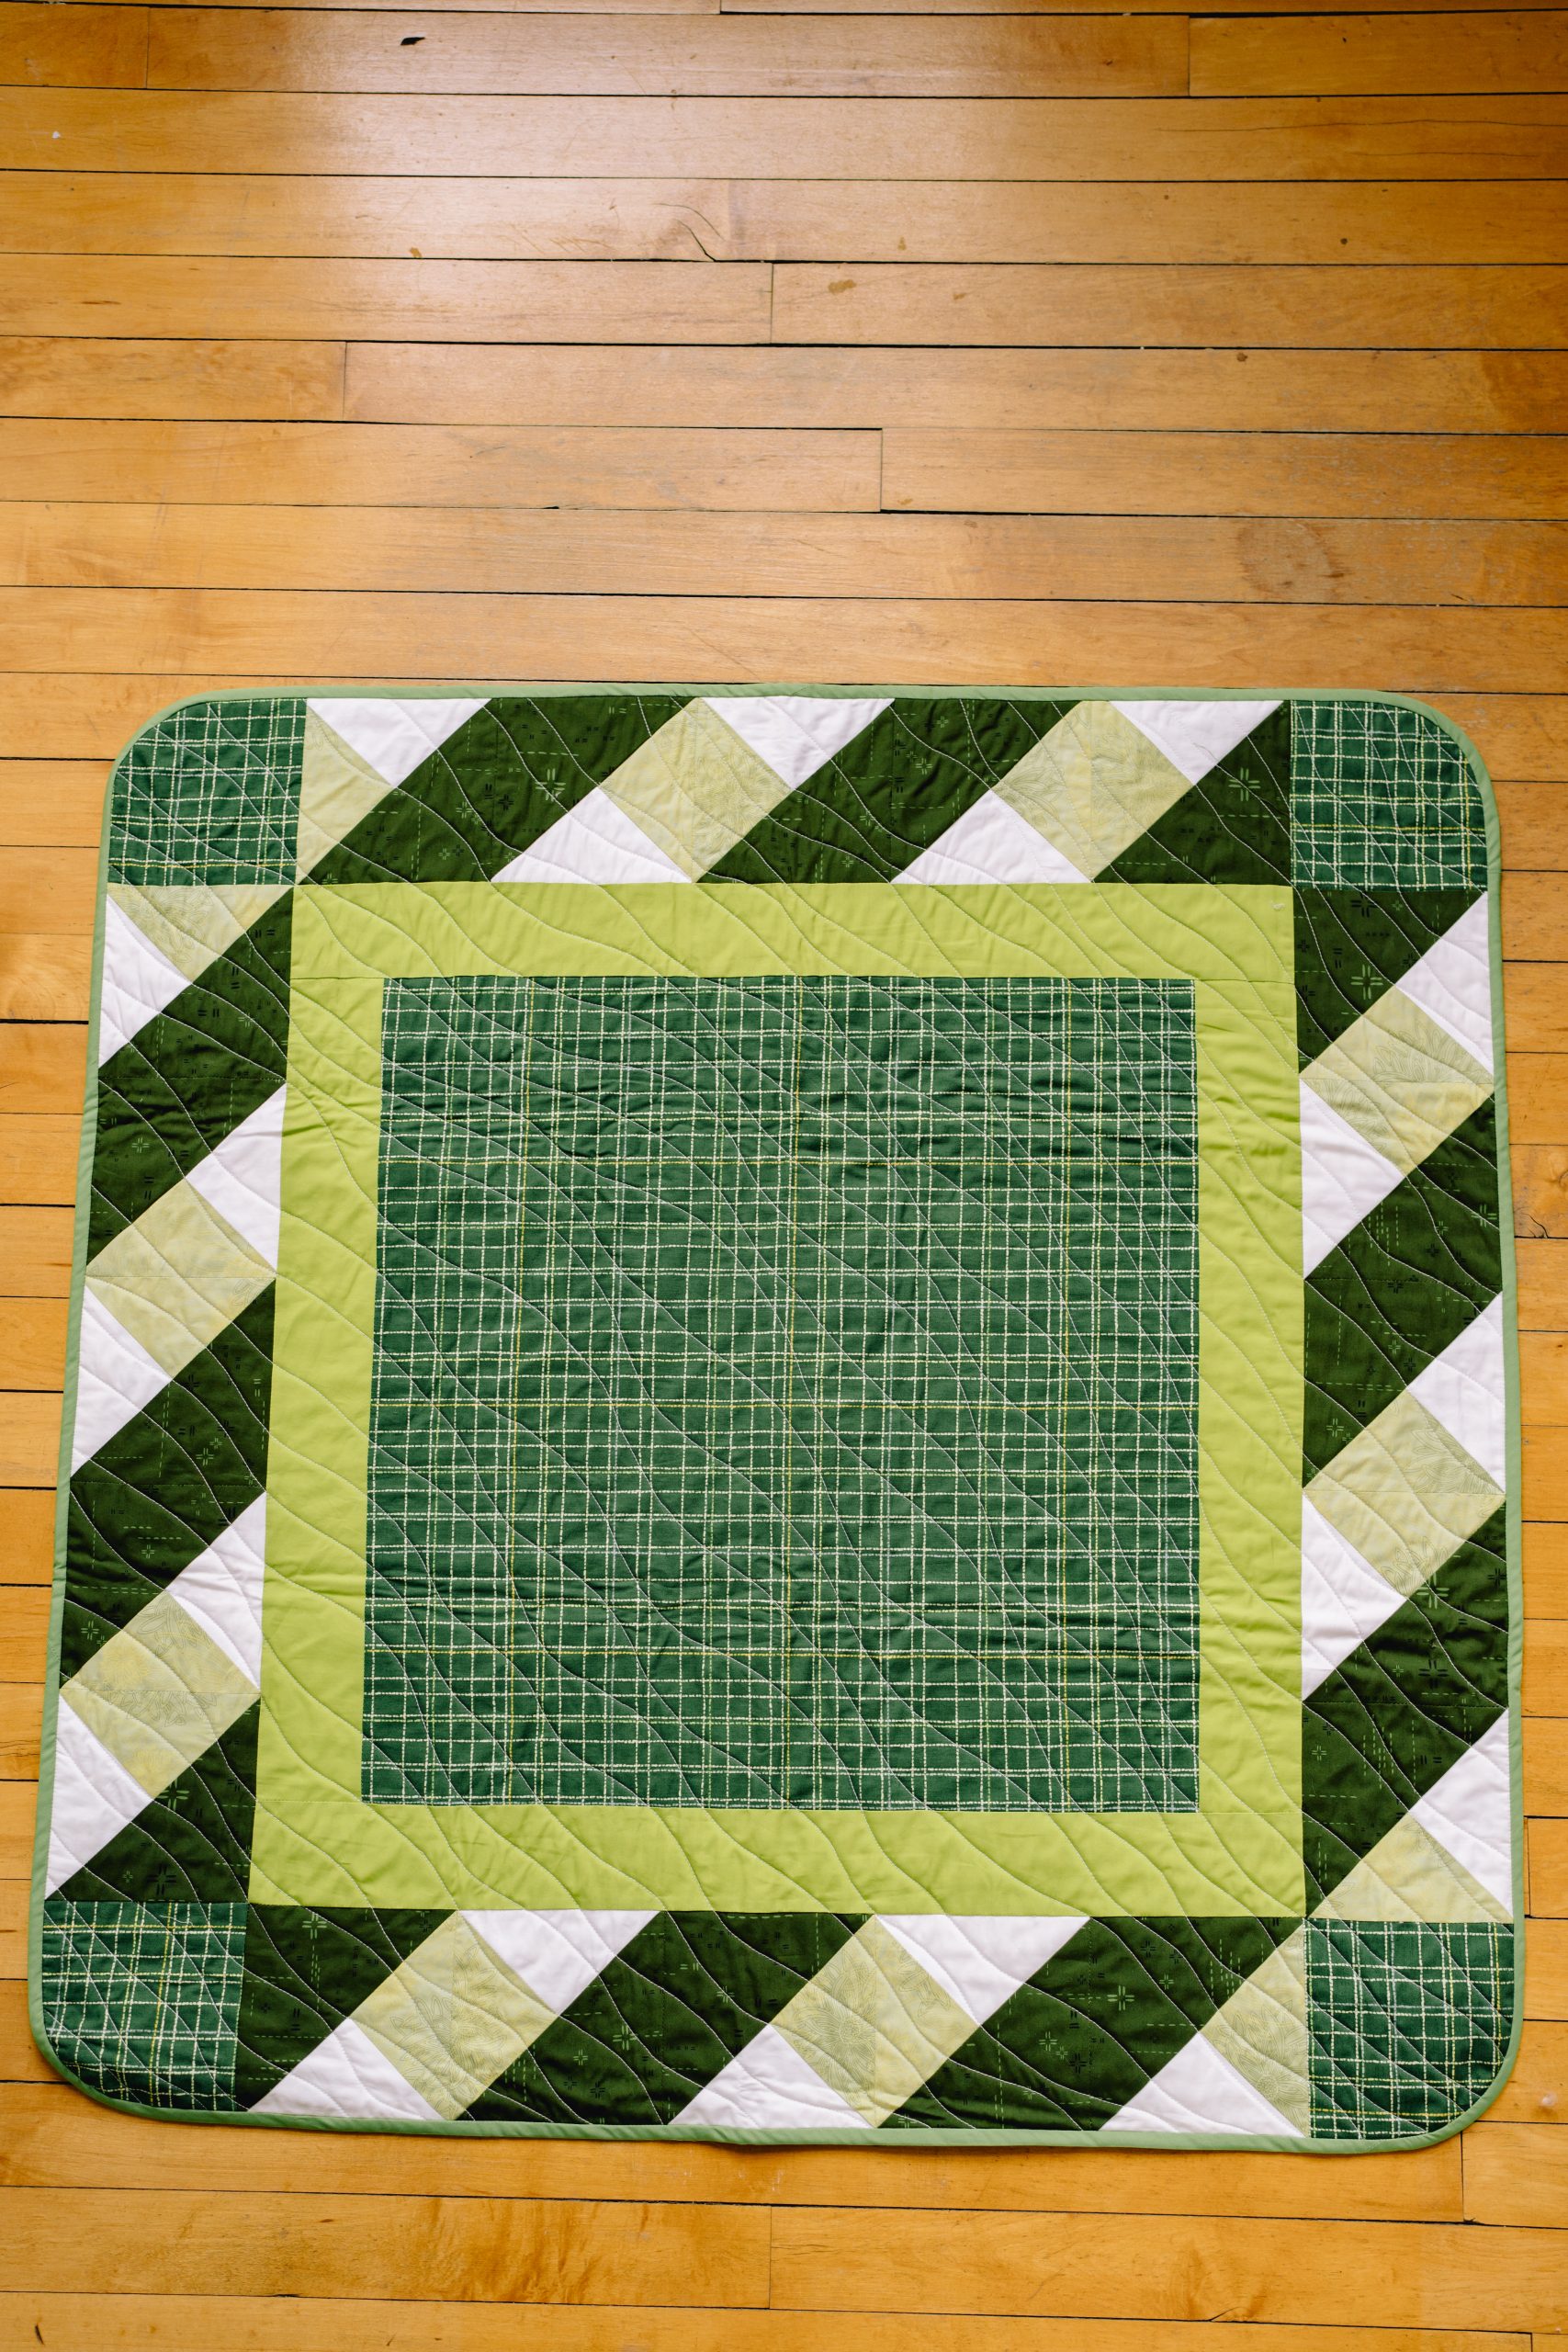
Decorate your dining room in shades of green for St. Patrick’s Day by making your own festive table topper. Designed in shades like citron and pear, this table topper pattern from Debbie von Grabler-Crozier features a stunning lattice-inspired design on its borders. Complete your table topper with playful free motion details like waves to give your home décor project some eye-catching texture.
Designer Notes: Please read all instructions and assembly requirements before beginning the pattern. Seam allowances are all 1/4” and have already been added.
Materials:
- Fabric: All fabrics are by Art Gallery Fabrics.
- 1/2 yd. plaid fabric for the center panel. The designer loves Lined Seedbed Fresh from the Grow and Harvest collection by Alexandra Bordallo for AGF.
- 1/2 yd. light green solid. Debbie choses Dark Citron from the Pure Elements collection.
- 1/2 yd. mid green solid. This time, Asparagus from the Pure Elements collection.
- 1/2 yd. white solid. Always has to be Snow from the Pure Elements collection.
- 1/2 yd. light green blender. The designer used Pear Green from the Floral Elements collection.
- 1/2 yd. dark green blender. It had to be Topiary from the Deco stitch Elements collection.
- 40” coordinating fabric for the backing fabric. The designer adores Happy Plaid Vert from the Storyteller Plaids collection by Maureen Cracknell.
- Interfacing:
- 42” #279 80/20 cotton mix batting (Vlieseline)
- Scissors
- Fabric markers
- Extra feet for your sewing machine (walking foot, for example)
Cutting Instructions:
From the center fabric:
- 1 piece 20 3/4” sq. for the center.
- 4x cornerstones 5 1/2” sq.
From the light green solid:
- 2x sashes 3 1/4” wide x 20 3/4” long for the center square border, top and bottom.
- 2x sashes 3 1/4” wide x 26” long for the center square border, left and right.
From the white solid:
- 6 squares 6 1/2” sq. for the border.
From the light green blender:
- 6 squares 6 1/2” sq. for the border.
From the dark green blender:
- 10 squares 6” sq. for the border.
From the mid green solid:
- Strips cut 1 1/2” wide on the bias and joined to make a continuous strip 140” long.
From the backing fabric:
- 1 piece 40” sq.
From the batting:
- 1 piece 38” sq.
Sewing Instructions:
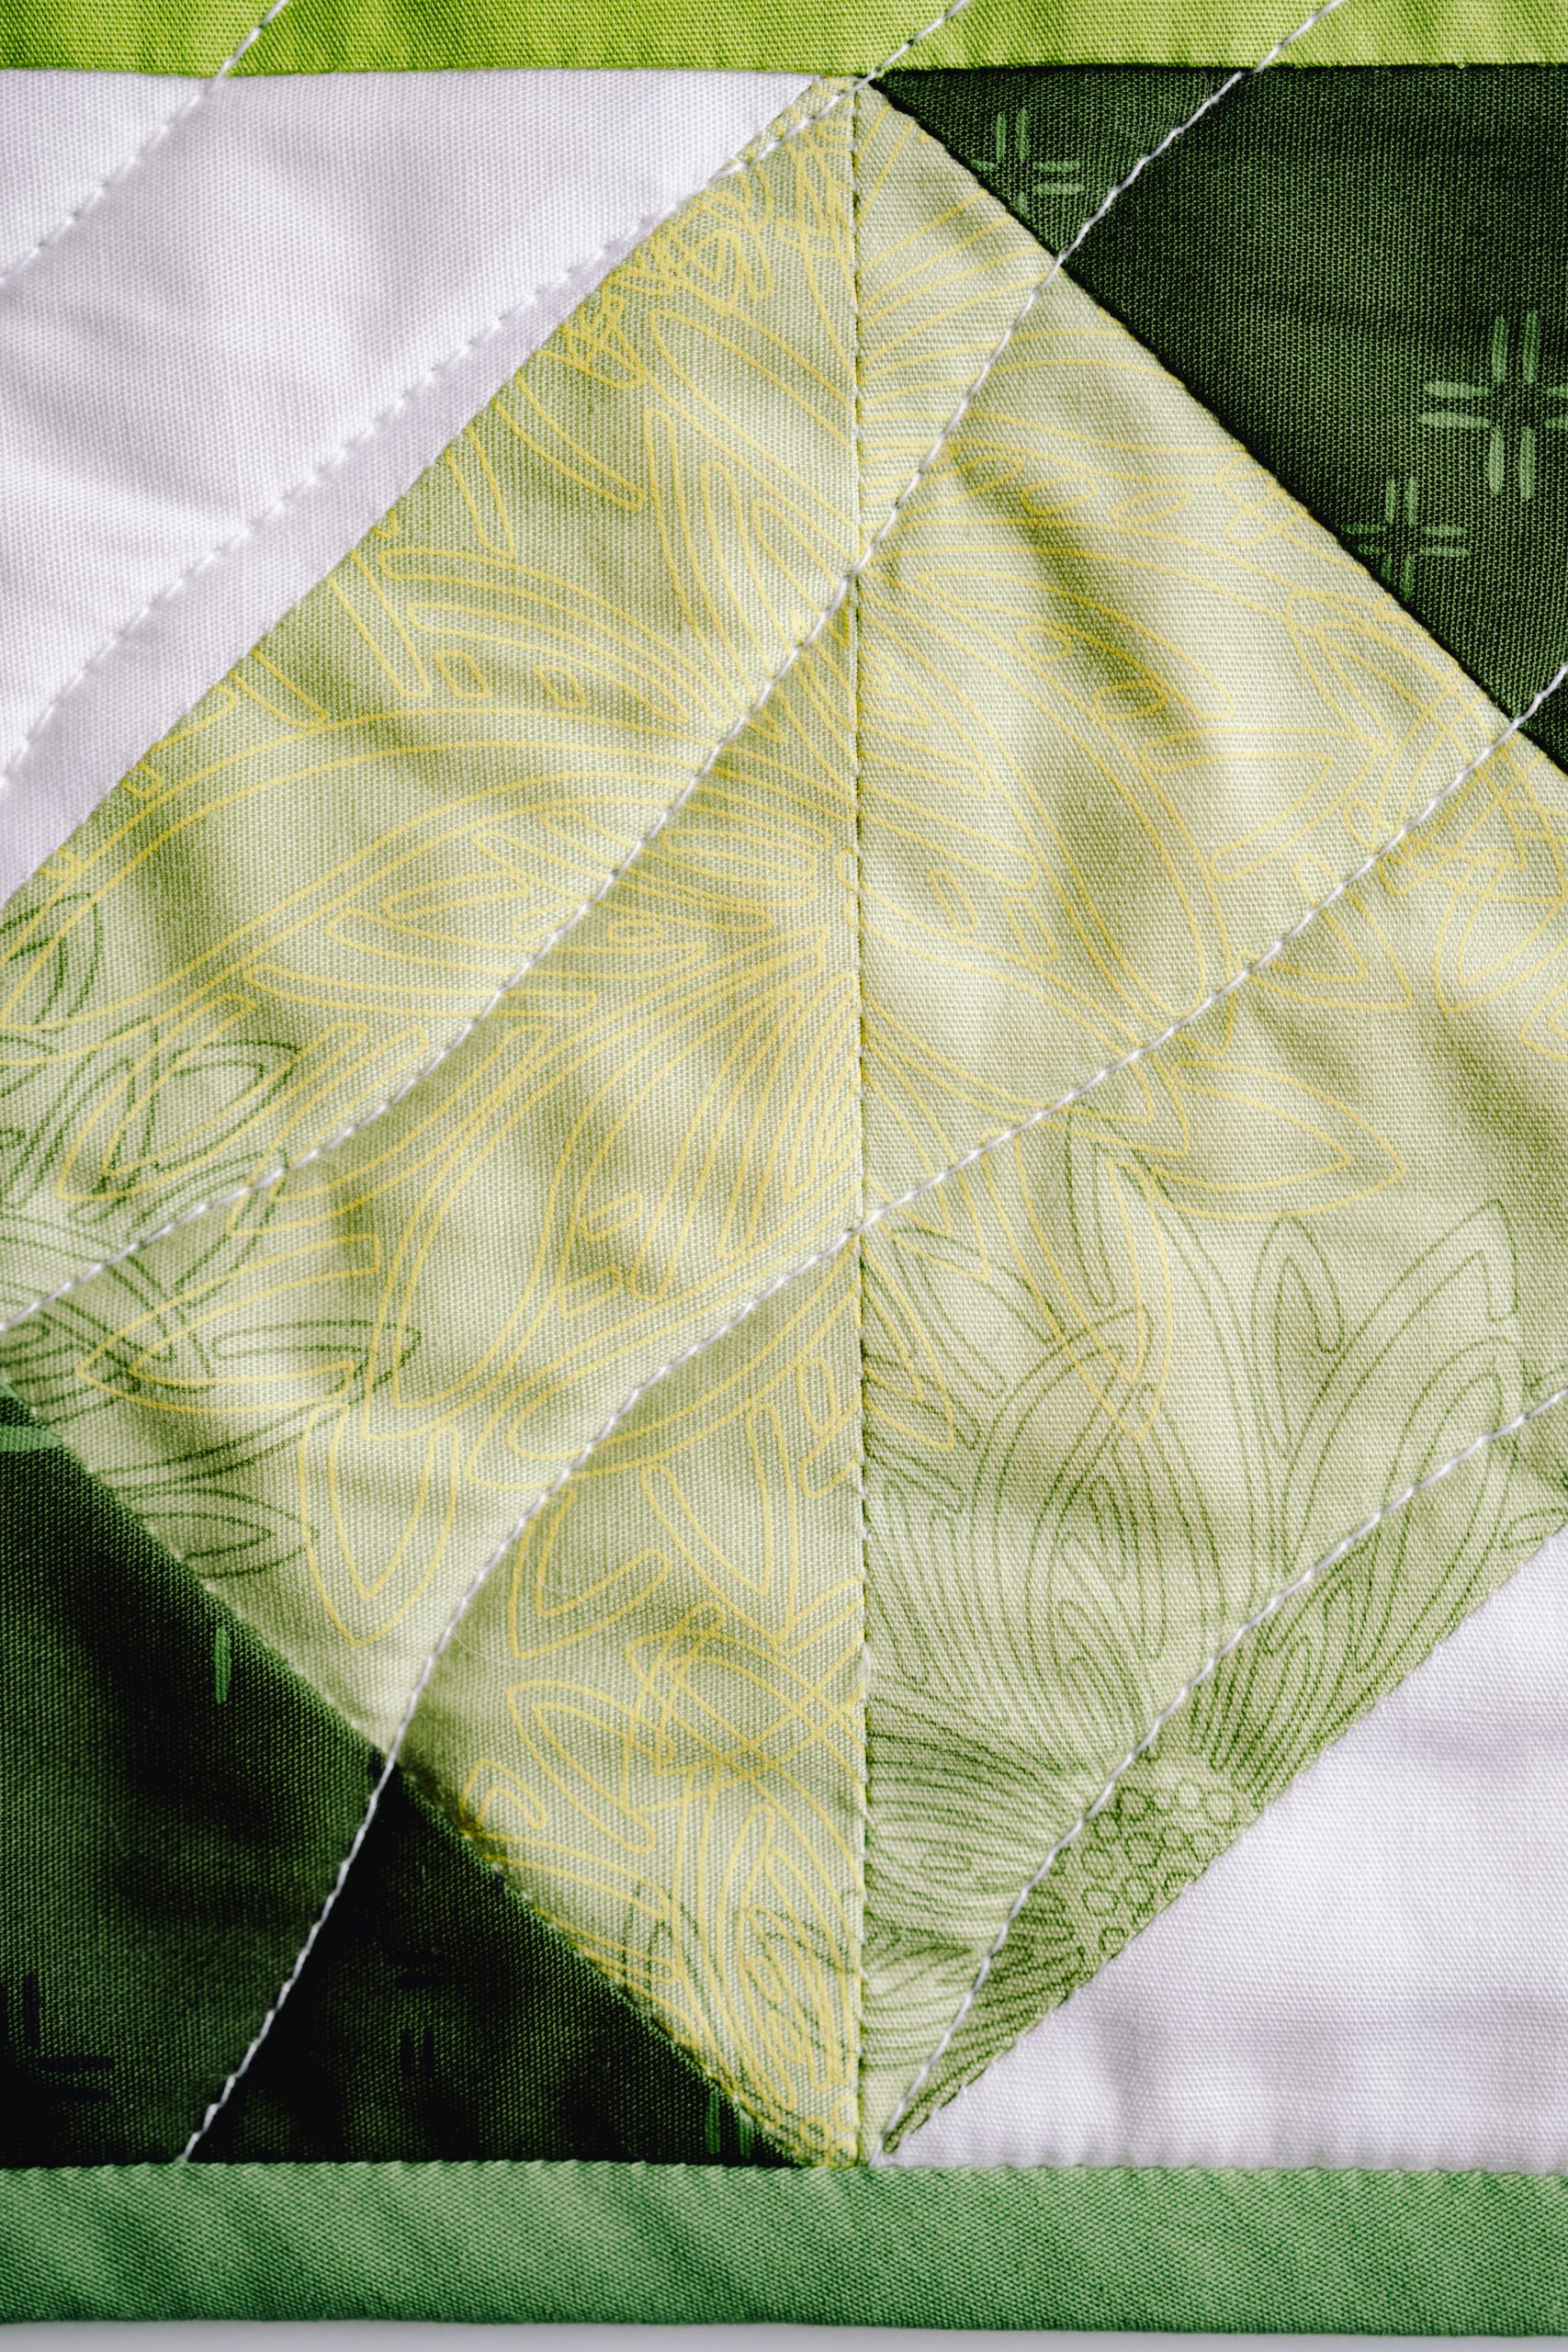
- To make the border twist, you will need the white squares and the light and dark green blender squares.
- To begin with, we have to make half square triangle blocks (HSTs). Lay the light green blender onto the white solid, right sides facing and draw a diagonal line from corner to corner.
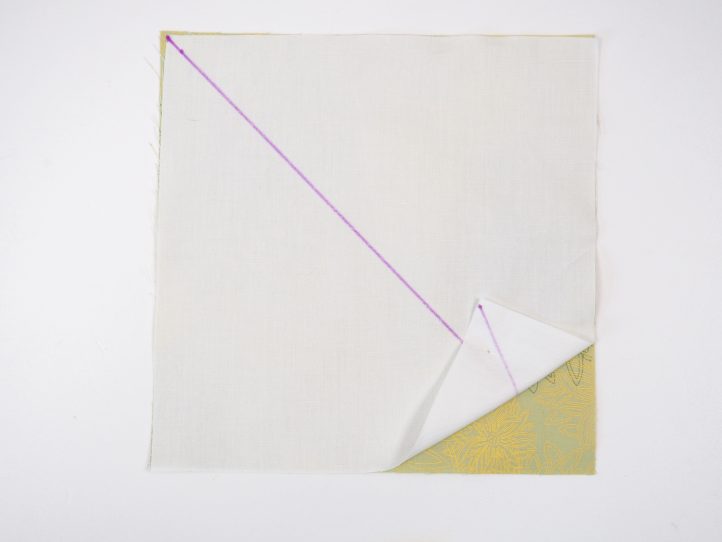
- Sew a seam either side of this line and then cut along the original line.
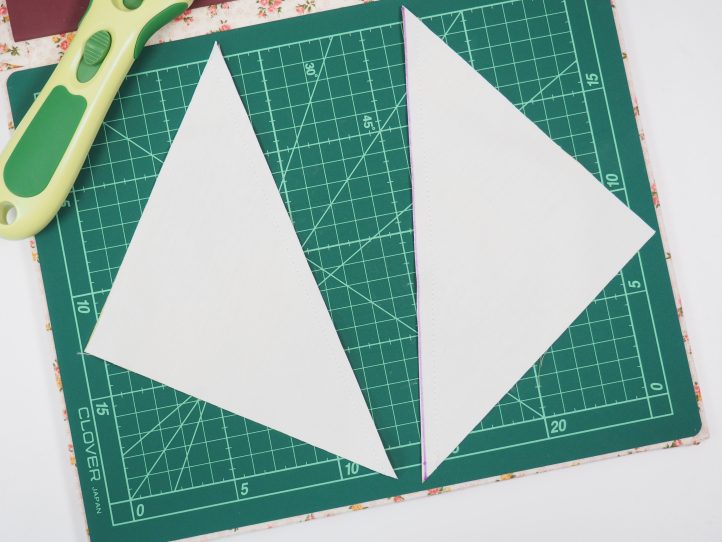
- TIP: To make the border twist, these HST units all require a bit of sewing and then cutting. Shorten your stitch length so that they do not come undone so easily and watch for the bias edges which can stretch.
- Open out the two halves, press the seam open and trim. The HST units will be 6” square.
- Lay one of these HST units onto a dark green blender square and draw the diagonal line again but this time, at 90° to the seam.

- Sew either side of the seam again and cut along the original line. Open the pieces out, press and trim. The squares will now be 5 1/2” square.
- TIP: It becomes harder to press the seams open when there are many pieces involved. If this happens, press the seam to the side and choose, wherever possible to press to the dark side.
- Repeat this until you have 20 of these blocks, pressed and trimmed.
- Join them to make four strips, 6 blocks long.
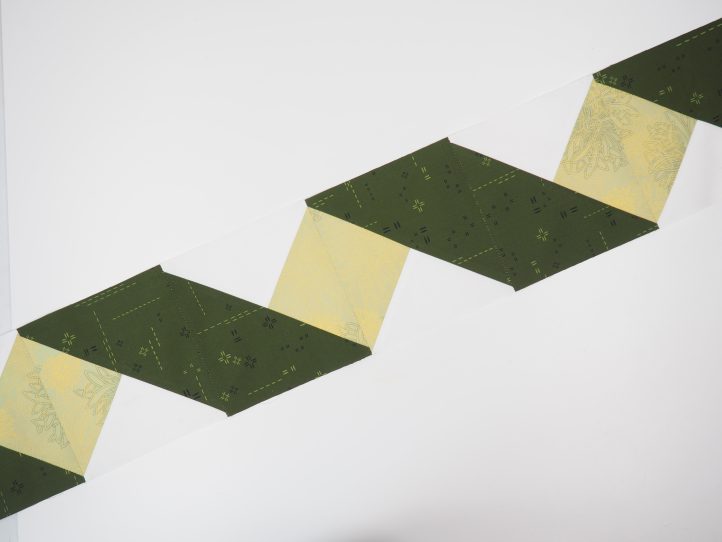
- TIP: To get the twist pattern going, place one block down and the place the next turned 180°. This means that if the dark green triangle is on the bottom left hand side on block one, it will be on the top right hand side for block two and so on. Make it simpler by following this pattern and making the border in blocks of two before joining them.

- The HST blocks will yield two units per block and they will be opposites. So on two of the sides, the orientation will be as described above and on the remaining two, the dark green triangle will be on the top left and bottom right hand sides in the pair. The main thing is that there is a green blender square in the middle of each.
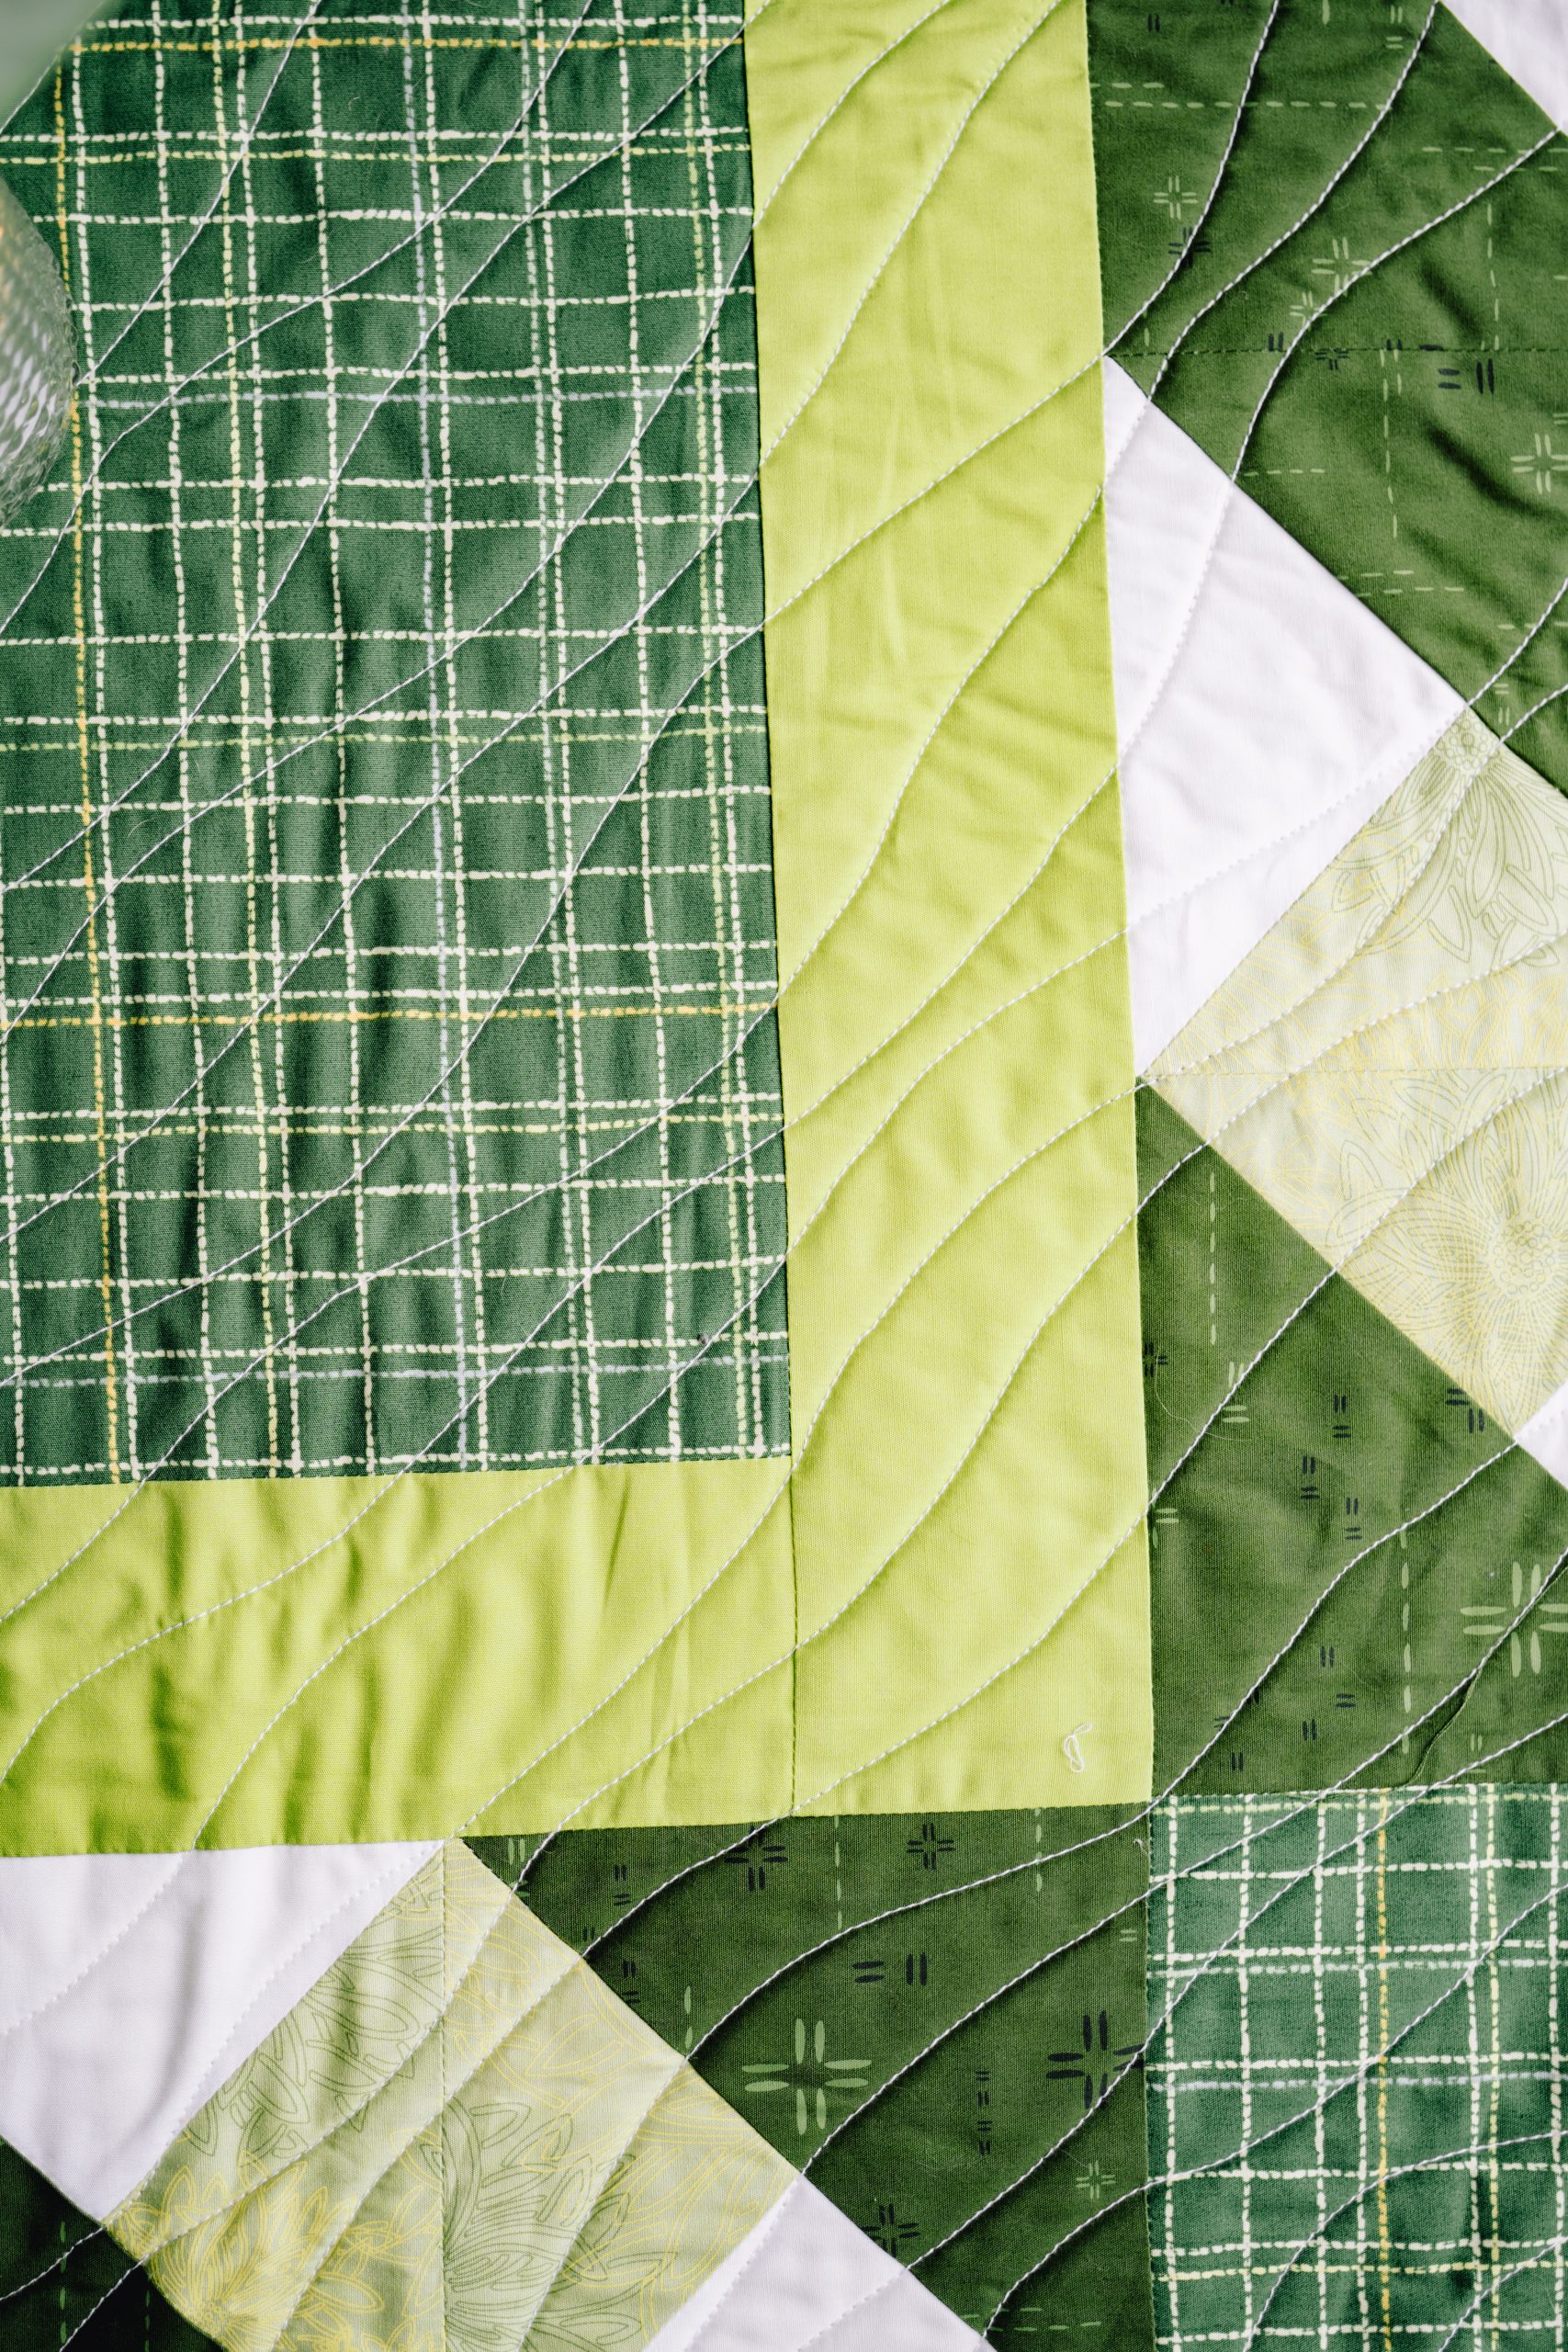
- Attach the solid green sashes to the top and bottom of the center square and press. Then repeat for the left and right strips.
- TIP: Because of the pieced border, movement is possible (the bias edges contribute too) so you may need to trim the sash widths slightly. Temporarily fit the borders on to the center and check that everything is lined up properly.
- Attach one of your twist border strips to the top and one to the bottom of this. Press, being careful not to stretch any bias edges.
- Finally, attach a cornerstone to the remaining two border twist strips and sew to the remaining sides to complete the top. Press and prepare to make a quilt sandwich.
- Lay your pressed backing fabric face down and center the batting on top. Add the quilt top, face up and pin so that no movement is possible in any direction.
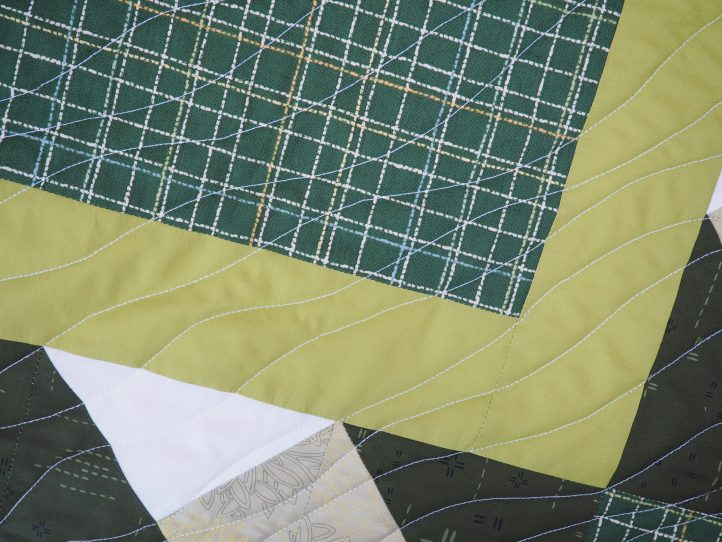
- Quilt with your favorite design. Debbie prefers a random diagonal wave and this has the added benefit (apart from being super easy) that it can be done on most standard home sewing machines. You will need your walking foot however.
- Once the quilting is done, trim the backing and batting to the size of the top and trim to square everything up. Round the corners with something like an upturned tea cup (or other ‘round thing’). This removes the need to miter the corners but you can leave the corners square and miter if you prefer.

- To prepare the bias tape, fold your long strip in half, length wise, with the wrong sides together and press to obtain a center crease.
- Open the tape out and fold the two long raw edges to the center crease and press again. Roll until it is needed.
- Bind with your bias tape.